Showing posts with label 1790s. Show all posts

Friday, July 13, 2018

Photos from L'Amusette's spring ball at Haihara Manor, 2017.

This time I'm here to share some pictures from a ball more than a year ago. (Better late than never, right?) I've already posted about this event once before - it's an annual masquerade ball hosted by the dance group L'Amusette every spring in Haihara Manor in Tampere, Finland. I've been lucky enough to be able to go every year since they started organizing it since 2013 and it's always the highlight of the spring. :) As usual, I was way too busy enjoying the event to take of pictures during the official program but I did take some outfit photos of my friends and they turned out nicely so I'm excited to share them with you. At the end of this post you can also see a couple of photos (by Markku Arvonen) of the actual program.

Mia (@ohgloomysunday) had made a new gown and a utterly fabulous cap which I adore! The first photo is also possibly my all time favorite photo I've captured of her.


Noora totally rocked the 1790s look - she always looks like a vision in her empire dresses and like she has just stepped out of one of the period fashion plates! You can see more pictures of her outfit on her blog.


At this ball we had the pleasure of meeting Anna-Mari (aka @mollamaricreations) for the first time in real life. She has since become a regular member of our 18th century sewing gang in Finland. She such a talented crafts person and an inspiration! ;)


Since she doesn't have her own costume blog, I must share with you several pictures of her outfit. I just can't believe this was her first 18th century gown! Well, technically it was the second but I'm not counting the one she had made years before joining the world of historical costuming.


By the way, she based her gown on the robe à l'Anglaise pattern (diagram XXII) in The Cut of Women's Clothes. It's the same pattern I scaled up for my brown Indienne print gown - it was so much fun to see another version of it come to life!


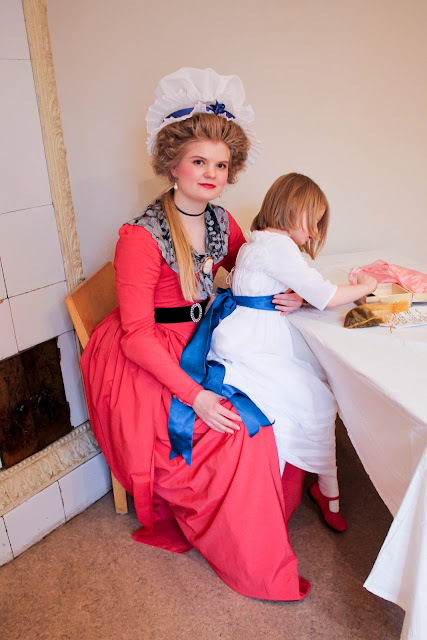
Mia also made a chemise dress for her little niece. These photos of them turned out so adorable I couldn't pick just one to share!


These pictures remind me of those tender late 18th century mother and child portraits by George Romney and others (you can see more of them on my Pinterest board). I love that even Mia's gown matches with the gown the lady is wearing in the first one!


I wore my robe en chemise which I have already shown you here.  The spring ball always has a different theme and this time it was French revolution - hence the revolutionary accessories in my and other's outfits.

Photo by Markku Arvonen.

This year we also met the lovely twin sisters Essi and Emilia (@loveofcostumes) who attended the ball for the first time.

Photo by Markku Arvonen.

At one point of the event we were horrified to witness the poor King and Queen of France loosing their heads in the (miniature) guillotine.

Photo by Markku Arvonen.

Afterwards the death of the King and Queen was reflected in the color of the food at dinner.

Photo by Markku Arvonen.

Johanna brought her jewelry shop to the event as she often does.


To read another description of this event and see some great detail pictures, go check out Rhia the Evil Dressmaker's blog post.

Wednesday, April 26, 2017

My second robe en chemise

This robe en chemise was a very quick and dirty project. The idea was to make something fast while trying out a pattern that I had been altering to fit. I was never entirely happy with my first robe en chemise that I had made for myself, so I wanted to make another. Design-wise it's really similar to the first gown, but there are some subtle, yet significant differences. Most notably, it's worn with a pair of 1780s stays, unlike my first robe en chemise that was made to go over my white 1760s stays, as mentioned in the original post about it. 


I've had the chance to wear this gown to an event twice already. The first time was to an informal 18th century gathering in February and I actually felt a bit overdressed for the simple occasion.


I wore the gown with my old bum pad that is smaller than the one I usually wear (for 1780s gowns). This bum pad doesn't extend to the sides so it's more appropriate for the early 1790s look that I was going for.


I'm not entirely happy about the amount of fabric in the back of the skirt because there's not much - with the bum pad it looks kind of sad. I had a very limited amount fabric so I ended up using every bit I had without having to piece the bodice or the sleeves. With so much gathering in the front, not as much material was left for the back.


Mia did my hair, as usual.

Photo: Jarno Manninen

Photo: Jarno Manninen


And then I also wore the gown to L'Amusette's annual spring ball last Saturday. The theme was French Revolution so the gown was accessorized accordingly.


There was no bum pad.


This time my hairdo was inspired by the simpler styles appearing in the 1790s as fashion transitions towards neoclassical style.


Under the gathered front, the gown has fitted front panels that are tied with five pairs of tapes at center front. This closure method is based on an extant dress in Musee de la Toile de Joyu. If you take a look at the photo in the link, you can see that the panels are unevenly stretched where the ties have pulled the fabric. To avoid this, I added bones to the edges of the panels.


Twill tapes were sewn to the underside of the center front panels to create casings for drawstrings.


The drawstrings are tied and hidden under the center front. 


The back is very simple. 


None of the photos of the finished gown so it very well so here's an in-progress photo before attaching the skirt and sleeves:


Oh, and there's a bonus - a little video clip that Mia took on her phone at the Spring ball! :) 


My Pinterest research boards related to this project:

Wednesday, July 2, 2014

Similarities...

This following fashion plate has appeared on my Pinterest feed quite a few times over the past couple of days and I guess many of you, who have already seen the said fashion plate and spent a lot of time browsing the pages of The Cut of Women's Clothes by Norah Waugh, have noticed that the cut of the dress depicted in it looks quite close to one of the patterns in the book (see diagram XXXII). It's a pity London Museum doesn't have photos of the original garment, that the pattern was taken from, on their online collections so we can't compare the fashion plate with it.

Journal des Luxus, December 1795.
This fashion plate also reminds of a quite similar dress (in cut) in a painting by Louis Léopold Boilly (below).

At the entrance (1796-1798), by Louis Léopold Boilly.

Why am I bringing this up on the blog, then? Mainly, just out of the joy of sharing and, secondly, because I find the raising waistlines of the 1790's very appealing and would love to sew a gown similar in style to these dresses in the future. This is something I'm only dreaming about so therefore it's not going to happen any day soon. But I wanted to write a brief post abut it anyway since the dresses of this type were definitely on my mind when I began to sew my pair of transitional stays that I think would work wonderfully for something like these gowns, with rising waists and gathered fronts.

Now, who's tempted to buy that fashion plate from Ebay? ;)

Monday, May 12, 2014

Transitional stays c. 1794-1800, chemise and under-petticoat

Here come the photos of the first garments that I've actually finished this year. It's such a relief to get something done completely because my projects haven't exactly gone smoothly in the past four months, which has resulted in leaving me with more UFOs than, well, ever before. That's also why I didn't post anything for a while, but I guess that happens to most of us sometimes, right? :)

Let's start with having a look at the front of the stays. I'm actually really happy I put more bones into the front panels of the stays than in the original pattern because I'm almost certain that there would be more creasing if I hadn't done so. Plus, the extra bones support the bust from below without making the stays any less comfortable. Should I ever make another pair of stays with this pattern, I might place the cups slightly closer to the center front because it's just not possible for my breasts to be quite this far apart - even if the aim is to get that separation effect. The issue doesn't really show much on the photos and I'm quite sure you can't tell once I'm wearing a gown on top of the stays so right now I'm just going to stick with this pair. Also, adding more width to the lower part of the cups might help with the creasing that you can see at the front.


Now we can also compare the results with a period engraving which is actually around ten years later than my transitional stays - but the shape that the stays provide looks basically the same, doesn't it?

The Ladies' Dress Maker, from "Book of English Trades", 1811.

The shape of the cups is controlled on top with drawstrings that run under the twill tape binding. 


Maybe you already noticed that there are actually modern underwires under the cups to support the breasts. Since it looks like there are bones under the cups of the trasitional stays on the MET, I thought I might get away with using them. :)


Unfortunately the photos of the back of the stays were unsuccessful so I'll have to try to get photos of it some other time and add them to the blog later. :/ 

I also made a under-petticoat. At first I wanted to make a bodiced petticoat but then, I really liked the petticoat Merja made for her riding habit, and eventually decided to leave the bodice out so that I wouldn't have to worry about the length of it. I actually didn't sew the shoulder straps into the waist tape of the petticoat at front either - they are only pinned so I can adjust the back depending on how high or low it should be. 

The front of the petticoat is almost triangular so that the petticoat gets wider towards the hem and there's no gathering at waist, which helps to create a smooth figure without making you look like you're larger than you actually are. 


The back is gathered to the waist tape only in the middle, but not on sides. 


And finally, here's the side view.


The petticoat is a bit too long so I will probably have to make it shorter by making a tuck at the hem but after that I'm ready to move on! :)

Wednesday, April 23, 2014

When 18th century sewing gets too overwhelming...

The short story: There are times when I get frustrated with most of my 18th century sewing because - lets face it - sometimes it can be a bit tiresome... and complicated. So what do you do? Bring out the regency to the rescue!

The long story: I've thought about starting making costumes for other periods than just the usual 1770s/1780s for a long time but never quite got around to do it. It was just recently when I realized I really am the social kind of costume maker and by that I mean that it's very hard for me to finish, or get even started on anything at all that I can't wear to events or with friends. So it's not a coincidence that I'm going to start making very late 18th century/early 19th century costumes now that I've become friends with Noora. It's so nice to have someone to talk about your costumes in real life and even more fun to know that you'll have someone to take your new clothes out with, sooner or later. Conveniently, also Merja started making herself costumes from this period a while ago.

Finally, here's proof of what I've been making...


Transitional stays - yay! And I'm near to finishing, only having the tabs of the other half to bind... Of course I ran out of twill tape just when I was about to finish. *sigh* So now I have to head to town to get some more before I can take more photos of the stays on body.


These stays are made out of just two layers of fabric - cotton for the outside and linen for the lining. 


The pattern is from the book Corsets by Jill Salen, with only a couple of alterations. I replaced the bust gussets with breast cups and narrowed the shoulder straps. Also, I increased the amount of bones from five on each side to eight, based vaguely on the transitional stays from V&A. Another pair of stays that I used for inspiration, mainly for the cups, is from Kent State University Museum. However, the shape of the cups (especially on the top) was heavily influenced by the pair from Met.


You can see the final pattern I made for the breast cups in the photo below. I had to make three mock-ups for it until I got it right. The first two were far too small and honestly, the third one could be just a bit larger but it works anyhow. 


It took me a while to figure out how to construct these stays, as the original in the book is also made out of only two layers of fabric so that you don't bind the stays before adding the lining as it's common. Eventually, I constructed the stays by joining the panels by whip stitching  them together after I had turned the seam allowances in between the outer layer and the lining of each panel. Photos will do much better job explaining than I will.


I admit being lazy and stitching the tape on top of seams and the boning channels by machine. :)


Somehow I managed to mess up while measuring the original pattern because I though it would fit but it turned out to be way too small and I had to slice it in two at the back and add eyelets for lacing. I'm quite sure your stays are not supposed to have lacing at the front as well as at the back but this was just so much quicker a solution than starting the whole thing over from the beginning. 


And since I'm quite sure you're all eager to see how these stays look when worn, I give you these two photos snapped quickly with my phone the last time I tried the stays on. Please ignore that I didn't lace them up properly. Also, I'm wearing my 18th century shift under the stays so you can see I definitely need another with a wider neckline and short sleeves. 


I was aiming to be able to wear these stays for costumes from about 1794 stretching into the 1810s, even though the stays itself date to about 1794-1800. I believe I did a pretty good job getting the suitable shape for that period. Or what do you think?


I'll share the rest of my thoughts in the next post once these stays are completely finished.