Showing posts with label Robe à l'anglaise. Show all posts

Tuesday, June 28, 2016

Williamsburg print gown (aka yet another floral print robe à l'Anglaise/Fig Leaf Patterns 101)

Can you already tell I'm crazy about cotton prints?

Honestly, after finishing my latest cotton print robe à l'Anglaise I hadn't been planning making yet another floral print gown. There are definitely other projects on my to-do list that I ought to be working on right now. But then Renaissance Fabrics started offering Williamsburg reproduction print cottons and I could not stop myself from getting some 5 yards of this trailing blossoms print in blue because I loved it so much.
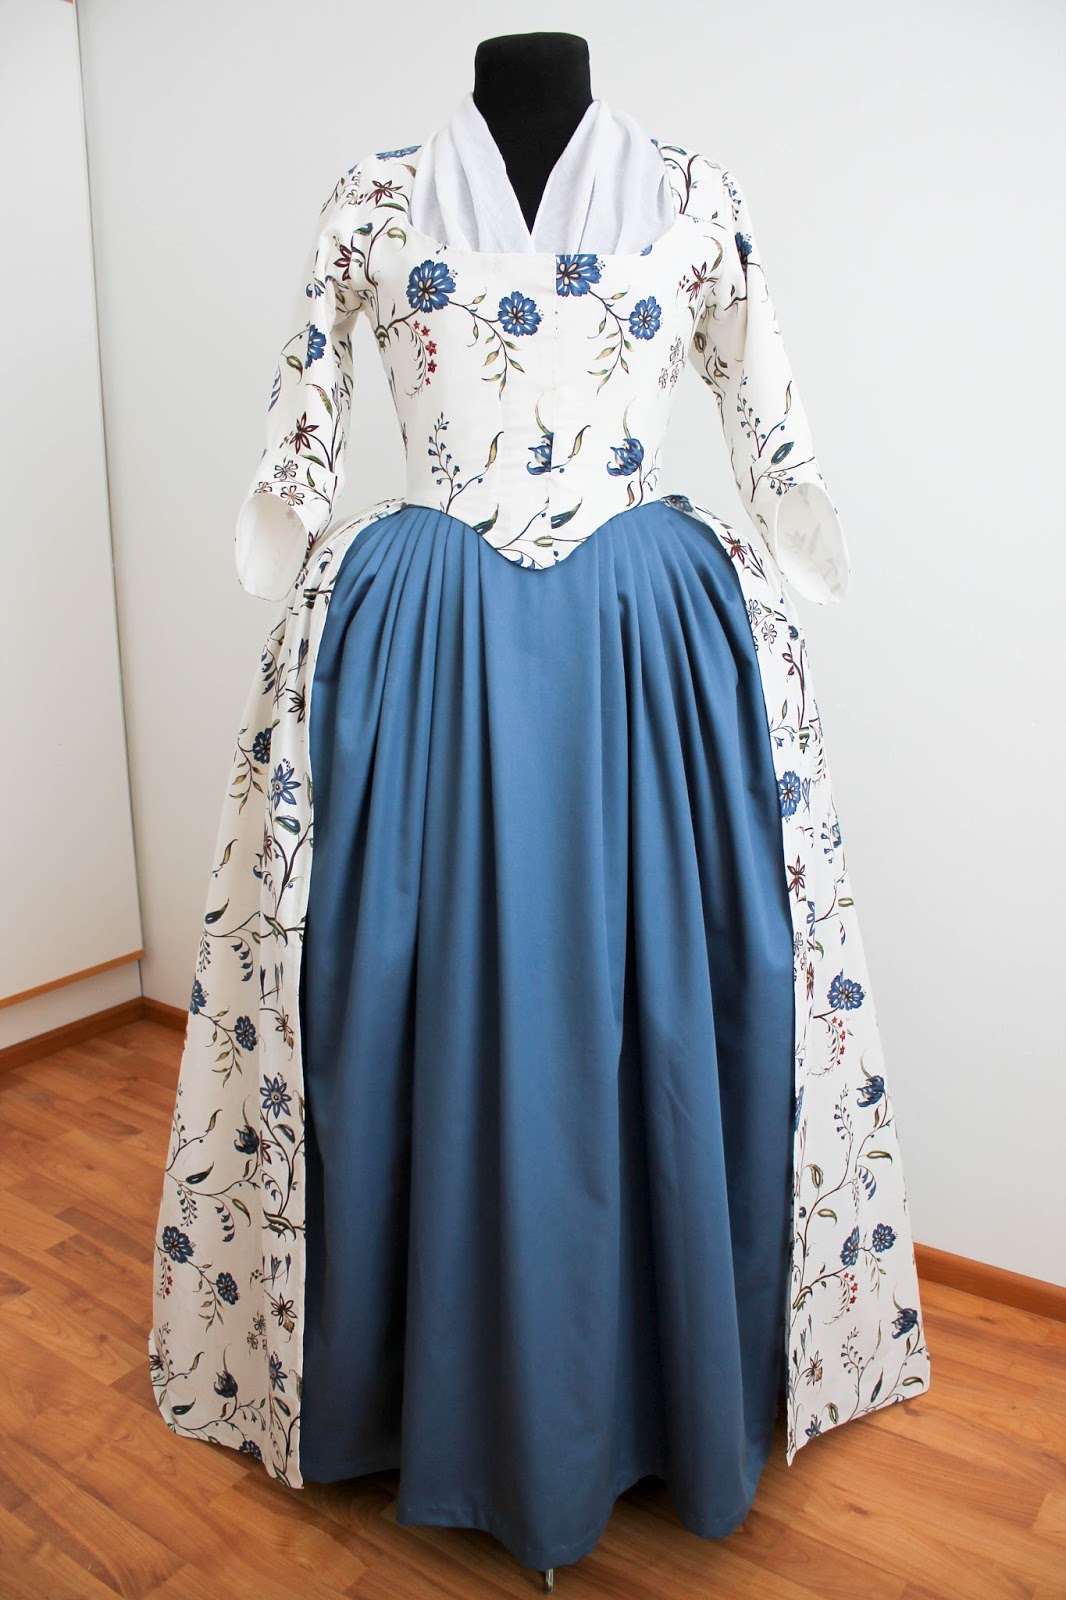

This gown was made using Fig Leaf Patterns 101. You can find photos of the original gown, which the pattern is based on, on Pinterest. I simplified the construction a bit so I left the back facing out and decided not to use the large box pleats just because I prefer the look of smaller pleats.


I also decided to close the gown with pins, after using hooks and eyes for the closure method for my center front closing gowns for a few years. I had tried using pins to close gowns a long time ago when I was just starting out with 18th century costume making but I never liked pinning because I thought it was much easier and faster to close a gown with hooks and eyes. However, I found out that pinning hadn't gotten any easier by now. I especially had problems closing the gown at the waist level so that the back would fit closely/tightly enough. I tried stitching tapes to the back of the waist on the inside of the gown to tie in the front in order to keep the back in place but it didn't work out for me, resulting in awful wrinkling of the fabric in the back. So I added lacing plackets to the lining on the front to make pinning easier, as the lacing helps to keep the bodice tight around the body.


There's an extra 1/2 inch on the other side of the center front for adjustability (see photo below). What I'm loving about lacing+pinning is that you can lace yourself into your stays more or less tightly depending on how you feel and that it doesn't matter if you loose or gain a bit of weight over time. 


I first sewed the lacing plackets to the lining only but then started worrying that the linen might stretch due to the pull of the lacing so I decided to stitch through the cotton as well, so that the stitches are visible on the outside. It's not as obvious in the photos as it is in reality. While looking at extant floral cotton gowns, I was really excited to find out that one extant from Met definitely has stitches on the front of the gown so it might be closed in the same manner as mine. 

The plackets have bones in them on both sides of the lacing, in order to and support the eyelets as well as to stop the front from puckering too much .


What I'm not loving so much is that the floral pattern is unintentionally repeated on both sides of the front. Oh well. I never try to match my prints on seams as it wasn't done as economical cutting was usually more important for such cotton or linen gowns


Plus, of course you want to show off your beautiful seaming, especially in the back! 


The back is actually constructed of only two pieces and the seams next to center back seam are achieved with tucks. The lining is without them. 


The gown is worn with my 1770s/1780s underwear


If you're thinking about purchasing this pattern, I say go for it. It comes with a wonderful instructions booklet which I found to be very comprehensive, with everything from information, photos and research about the original gown to general sewing instructions, fitting tips, construction etc. I would imagine this would even be great as your first 18th century gown in case you're just starting out 18th century costume making. 


Also, I think this dress would work the best with a pair of stays like this, without a dramatic difference between waist and bust measurements. I wear a more curvy type of 1780s stays with this dress so I had to add width to the pattern on the front of the bust. However, there are instructions for making such alterations to the pattern in the booklet, so of course you can wear any type of stays you like, but I thought I'd mention that anyhow.

The only suggestion I have is to make the sleeves smaller than in the pattern, since I found them to be really roomy, especially for a period when sleeves are more tight-fitting than earlier.  And I'm a person with a large arms, often resulting in having to cut the sleeves in the next size by comparison to the bodice size. A nifty thing about the sleeves is that there's a triangle piece under the arm, which allows for movement so this is especially great in case you're going to dance or work while wearing the dress.


I've already had two chances to wear this gown. Here's a teaser of how it looks when worn, until I get around doing a proper photoshoot and posting about it... This photo was taken at L'Amusette's spring ball that had an oriental theme.


Thursday, December 4, 2014

Brown floral print gown at the Ehrensvärd museum

I don't know if you still remember but earlier I mentioned an outfit that I couldn't finish on time for the Isokyrö event in August. Well, now it's done, but I only finished it a couple of days ago - so it was more than three months late for the original deadline. The dress would propably still be unfinished by now if I hadn't set a new deadline for it for this year's Christmas ball. Originally I had planned to wear the same dress as last year and make the naval riding habit for a parade preceding the ball but obviously it didn't happen as I'm behind on pretty much everything regarding to sewing (and blogging, too...). Alright, on to the new dress! 


I've always loved the white floral print gowns from the 1770s/1780s but they are so very common so wanted something a bit different for myself. After discovering some floral gowns in darker fabrics through museums collections I knew I had to have one like them some day. It took a couple of years but then earlier this year I managed to find a Moda print fabric through Herzwerk-Freiburg that was even more lovely than I had hoped for. The fabric was nearly out of print everywhere so I ended up ordering from three different sources to have enough of it.


For the bodice and sleeves I used a robe à l'Anglaise pattern from The Cut of Women's Clothes by Norah Waugh (see diagram XXII). Working the same way as I always do, I enlarged the scale pattern on the computer and printed it out. However, this pattern turned not to work easily for me and the fact that I had to make quite a few mock-ups with so many alterations delayed the completion of this gown. Also, it didn't help that the fabric stretched a bit more than I had imagined and the stretch of the mock-up fabric was also different... I swear I've never had so much trouble fitting sleeves as with this dress (I guess I only now truly understand the meaning of sleevils ;) ). Not having made sleeves like this earlier I wasn't even sure how they were supposed fit/look but I think they turned out to be alright in the end.  


To upgrade the look of a brown day gown into a dress suitable for a ball I added some red accessories, using the same ear rings as last year and the belt that I have worn with pretty much every fitted back gown that I have.


 I also intended to make a matching petticoat from the same fabric for this dress but decided to use a sheer white petticoat this time to further enhance the evening gown look and leave the self fabric petticoat for day wear occasions. I'm probably going to wear this dress at the 18th century fair of Isokyrö next year so the brown color of the matching petticoat should be much better for outdoors than the delicate white. The skirt of the dress will also be draped up to avoid the slight train from dragging in ground.


The dress has a tight fitting quarter back but the floral pattern of the fabric conceals the seamlines so you can't see much of them here. I'm actually really happy with the fit of the back since the back of this gown fits more smoothly than the back of my earlier quarter back gown that had wrinkles all over it. There's also a slight train but I made a cutting mistake and it ended up being shorter than I had intented. Looking at the photos, I notice that the train isn't even either - it is longer at the sides of the center back than in the very center. But right now I don't care. Especially because I want to make a divided bum pad like Aubry of A Fractured Fairytale did or at least a bum pad with a dip at the center back, which should fix that problem. 


My hairdo was created by Mia, a new friend who traveled with me to the ball for her first time. I feel so lucky that I now have a friend who understands sewing and lives permanently in my hometown! Meeting her has been one of the best things in the past few months and the fact that I met her through my blog helped me to get over my blogging anxieties that have partly kept me away from posting for a while. It reminded me again that there are quite a few lovely people that I might have never met if I didn't have this blog...


All of these photos are also taken by Mia, at the Ehrensvärd museum that you might have already recognized from last year's Christmas ball posts. For some reason (read: because we were too busy doing last minute sewing) we forgot to check the museum opening hours and the museum was just closing as we arrived there. But the museum guide was kind enough to let us take a few photos before leaving. :)


Here's Augustin Ehrensvärd himself up in the middle with Noora and I posing next to him. 


And last but certainly not least, Mia wearing Noora's floral robe à l'Anglaise.


Wednesday, October 9, 2013

Le Petit Bal au Petit Palais

After a few months of lonely sewing I always kind of forget why I love this hobby so much so it's great to get to meet some people that are into the same things as you a couple of times a year. About two weeks ago I traveled six hours by train down to Tampere to attend a little ball there. At first I thought about making a long post about this wonderful event but then changed my mind because both Nora and Merja already blogged about it and I feel like I haven't got much to add to what they said. So here comes a post with lots of photos with only a short description.

Photo: Teemu Laukkarinen
To sum it all up, the ball was wonderful and you could engage yourself to many different kinds of activities, although from my part the evening was mainly filled up with socializing and watching others perform.

Photo: Markku Arvonen
I was as lazy as always taking photos but luckily there were other photographers who did so much better job than me capturing the event. I only fetched my camera at tea/coffee time and later in the evening. So now there's a bunch of photos taken by me of people holding cups and drinking coffee.


Later in the evening I happened to have my camera ready for moments like the one below ;) Here's Ida checking her garters and tying them securely for her dance solo.


Maija of Couture Mayah looking happy wearing her ever so lovely striped polonaise.


Who could resist a silly bum shot of the striped gowns?


I would have loved to dance more than I did but I've had the flu on and off for some time and that night I wasn't feeling good enough to dance more than once. Besides, even though the dance I participated in was familiar from several past events, I kept forgetting where to go and what to do so I'll have to try to dance more some other time in future events when I'm feeling better.

Photo: Teemu Laukkarinen

One of the best things: Muskotti playing dance music.

Photo:Teemu Laukkarinen

And for the end of this post, a couple of shots of the striped robe à l'anglaise with accessories. I kind of bore myself by using the same accessories all over and over again but the red belt looks nice with all of my recent gowns.

Photo: Teemu Laukkarinen
Photo: Merja
To read more about the details of the evening, check out these two posts by Before the Automobile and The Shadow of My Hand. Nora and Merja did so much better job at describing the whole evening than I did.

Thursday, October 4, 2012

1780's striped robe à l'anglaise at Kuninkaan päivä

This post is mostly about photos of the gown because I already explained the construction and other detailed stuff about it in the earlier post. For once I got some pretty nice photos of the outfit from the day, which was really great because usually I end up having only a couple of blurry photos as I get back home from events and I really don't feel like posting those on the blog.

Photo: Mika Seidler

The next few shots were taken during the 18th century fashion show...

Photo: Teemu Laukkarinen

You can see the front quite well in the picture below. The zone front with tabs was inspired by the striped robe à l'anglaise at Met.


Photo: Teemu Laukkarinen

I didn't wear many accessories with the gown. I really wanted to have a red ribbon round my neck but unfortunately I left it at home or lost it at the dressing room, which wouldn't be a surprise as the dressing room was so full of everyone's costume parts and other things.

I was moving so some parts are a bit blurry...

Photo: Mika Seidler

I definitely should have had a huge and poofy neckerchief to complete the pigeon profile but I'll make one some other time. I'm thinking about something with ruffles like the neckerchief on the Met gown...

Photo: Teemu Laukkarinen

After the show...

Photo: Mika Seidler

Then I went out for a short stroll because it got really hot inside after the show. Thanks to Mika Seidler I also got some photos of the dress outdoors. First off, here are a couple of shots I took from outdoors. The only decent photos I got from the event anyway... Below, musketeers with mamaselli Tirpukka (from Tirbuck) and Gouvernante Astrid (from Pohjan sodasta Suomen sotaan - elämää 1700-luvulla) wearing an early 18th century mantua with fontange headdress.


Katariina Augustintytär (from Before the Automobile), wearing her beautiful riding habit. It was so nice to meet her again. 


And then, some more shots of my striped robe à l'anglaise...


The huge bum pad gives the dress a very nice swayback profile at the back.


The hem is trailing...


The hedgehog hairstyle is all my own hair. Credits to baroness von Mannheim (from Couture Mayah) who made my hair look good and thanks to her I also learned how to do this hairdo on my own.


For the evening I wore the dress with white petticoat with small stripes, added a few feathers to my hair and tied a belt with buckle round my waist. As you can see, the attempt to lift the train with strings failed because the hem is so long. However, I'll fix that with a third string and loop.

Photo: Jarno Manninen
Final thoughts:

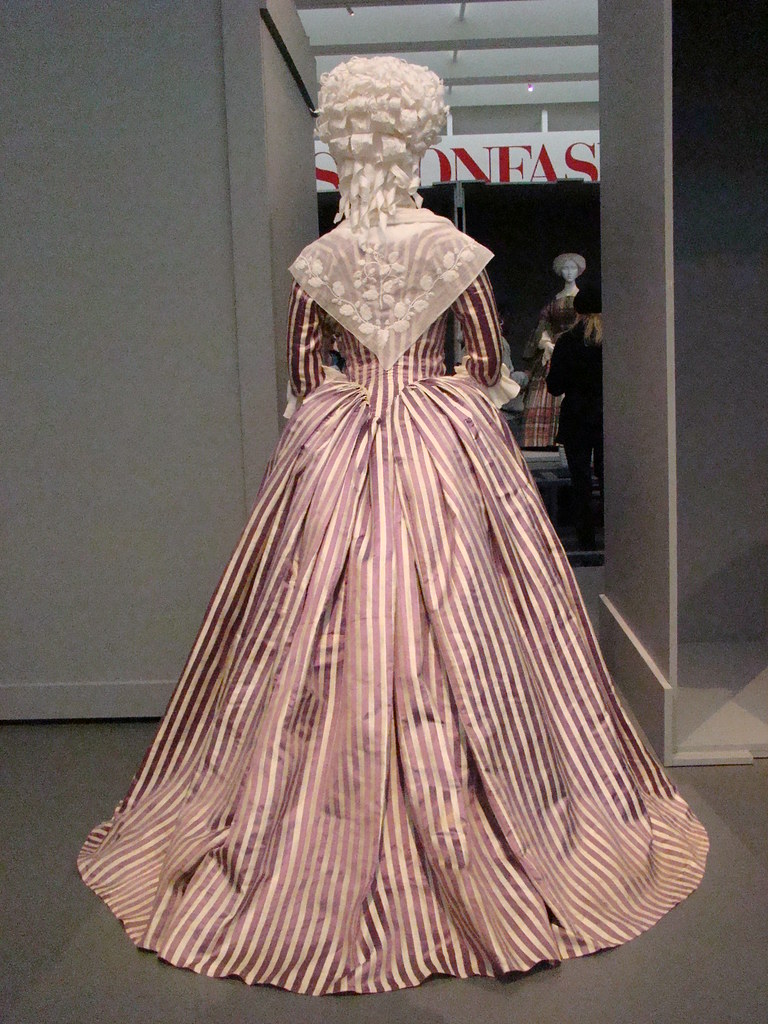
Overall, I'm happy with this dress and it has to be my favorite from my own gowns so far. However, looking back at the photos of the original gown I realize there are many differences between the original(s) and my dress. The differences don't bother me but I'd still like to point some of them out. Firstly, the stripes of the original dress are probably a couple of millimeters wider than the stripes of my dress which are about 1 cm wide.

Photo by Rebecca Thelin, via Flickr.

The purple stripe color is definitely of different shade. The purple of the museum dress seems more reddish than the stripe color of my gown which is a purple much more towards blue. It's really hard to tell what kind of purple the original is because it's quite different in different photos I've seen of it. When it comes to colors of photos, so much depends on several things, such as the lighting of the surroundings. And I assume some of the photos are probably edited - for example, take this photo and compare with this.

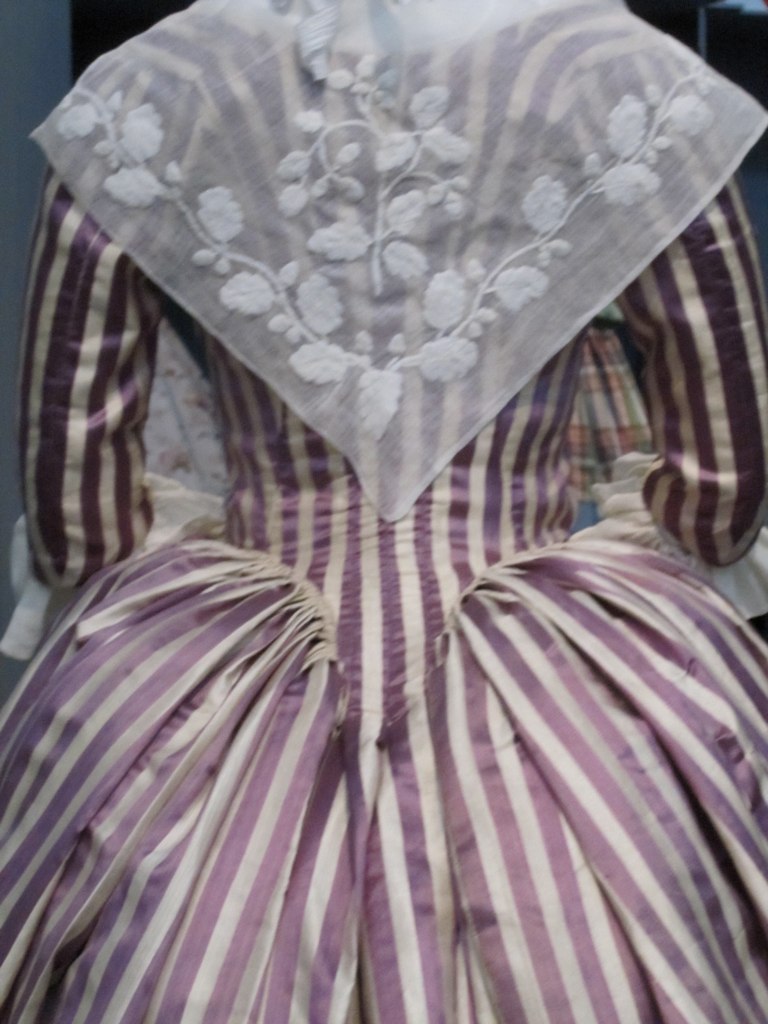
Photo by Loren Dearborn, via Flickr.

Also, the back side of my dress is quite different from the original. Firstly, the stripes form a slightly different pattern. In order to imitate the pattern of the original I probably should have draped the gown. However, I don't have a dress dummy so I couldn't do that. Secondly, I now realize the curve of the waistline at the back of the dress is much more radical in the original dress, whereas my dress has a more smooth line there. Also, the pleats at the waist are probably even tinier than the pleats of my gown.

Photo via Flickr.

There are probably a lot more differences but I'm not so keen on listing everything here. These were just the obvious ones. Again, I'm not so bothered by them anyway. :) What I'm still slightly bothered about is that the dress doesn't fit perfectly next to the armscye at the backside. It still wrinkles for a bit even if I tried to alter the fit during the mock-up fitting and bodice fitting. I suppose there's still some extra space at the armscye and that I'll have to pinch in a little at the armscye where the wrinkles appear before I make a new dress with the pattern. Or lower the armscye for a bit. Or do both. You'll hear more about it some time in the future. Until then...

Sources:

Fashioning Fashion, European fashion in detail, 1700-1915 by Sharon Takeda, Kay Spilker and Kimberly Chrisman-Cambell
Fashioning Fashion exhibit video
Fashioning Fashion exhibit virtual panorama
Fashioning Fashion exhibit photos by Loren Dearborn
Fashioning Fashion exhibit photos by Rebecca Thelin
Robe à l'anglaise (LACMA) photo I from Fashion is poison blog

Other striped gowns:


Thanks to everyone who allowed me to post their photos on the blog! I'm ever so grateful! :) Special thanks to Maria Nordback for arranging the Kuninkaan päivä event and to baron and baroness von Mannheim for hosting me during the weekend.