
My friend Pia (@stepsbackintothepast on Instagram) was in need of a well fitting pair of 18th century stays so I started making her one in the summer of 2019. The new Patterns of Fashion book (volume 5) had just come out earlier in the year so I was eager to try out the drafting method introduced in the book to see if it would yield better results than my own. And I was not disappointed! There's one thing I'd like to mention though. The instructions are easy to use for someone with a lot of experience in drafting patterns but I think beginners might find them lacking, as there are gaps that you should be able to fill in. I mention this because I don't want anyone to excitedly get the book and be sorely disappointed that they aren't able to understand the method and get the results they were hoping for because the instructions are very vague. Other than this, I think the book is extremely interesting and provides a lot of useful information that you can apply into making a pair of 18th century stays, whether you are a beginner or a more experienced historical costume-maker. Sadly, I didn't take many in progress photos of the stays in the making as I was trying to get them ready for wearing as quickly as possible. The first photo shows the finished stays (more of those can be found below the construction photos) so you can already see how they turned out.
Disclaimer: This is going to be a long post. :)

The idea was to make the stays as comfortable as possible, so we decided that we should use linen that we had already had available in the stash, too. The three linen layers are; a sturdy linen canvas for the middle layer, natural linen for the innermost layer and plain green linen for the outside. Here are the panels after cutting. The construction photos were quickly snapped on my not-so-new phone so the quality isn't ideal but I hope they're good enough.

The next two photos show basting around the panels in progress. Later on I realized it would have been smart to baste the middle sections with large basting stitches as well because linen has a tendency to move around when you're stitching the channels but it wasn't a huge problem.


By this time I had learned that by using a thicker thread than your regular sewing thread, the stitching looks more like that seen on originals and it also creates sturdier boning channels so I wanted to experiment with that for fun, regardless of that the stays weren't even supposed to be constructed in a period manner.
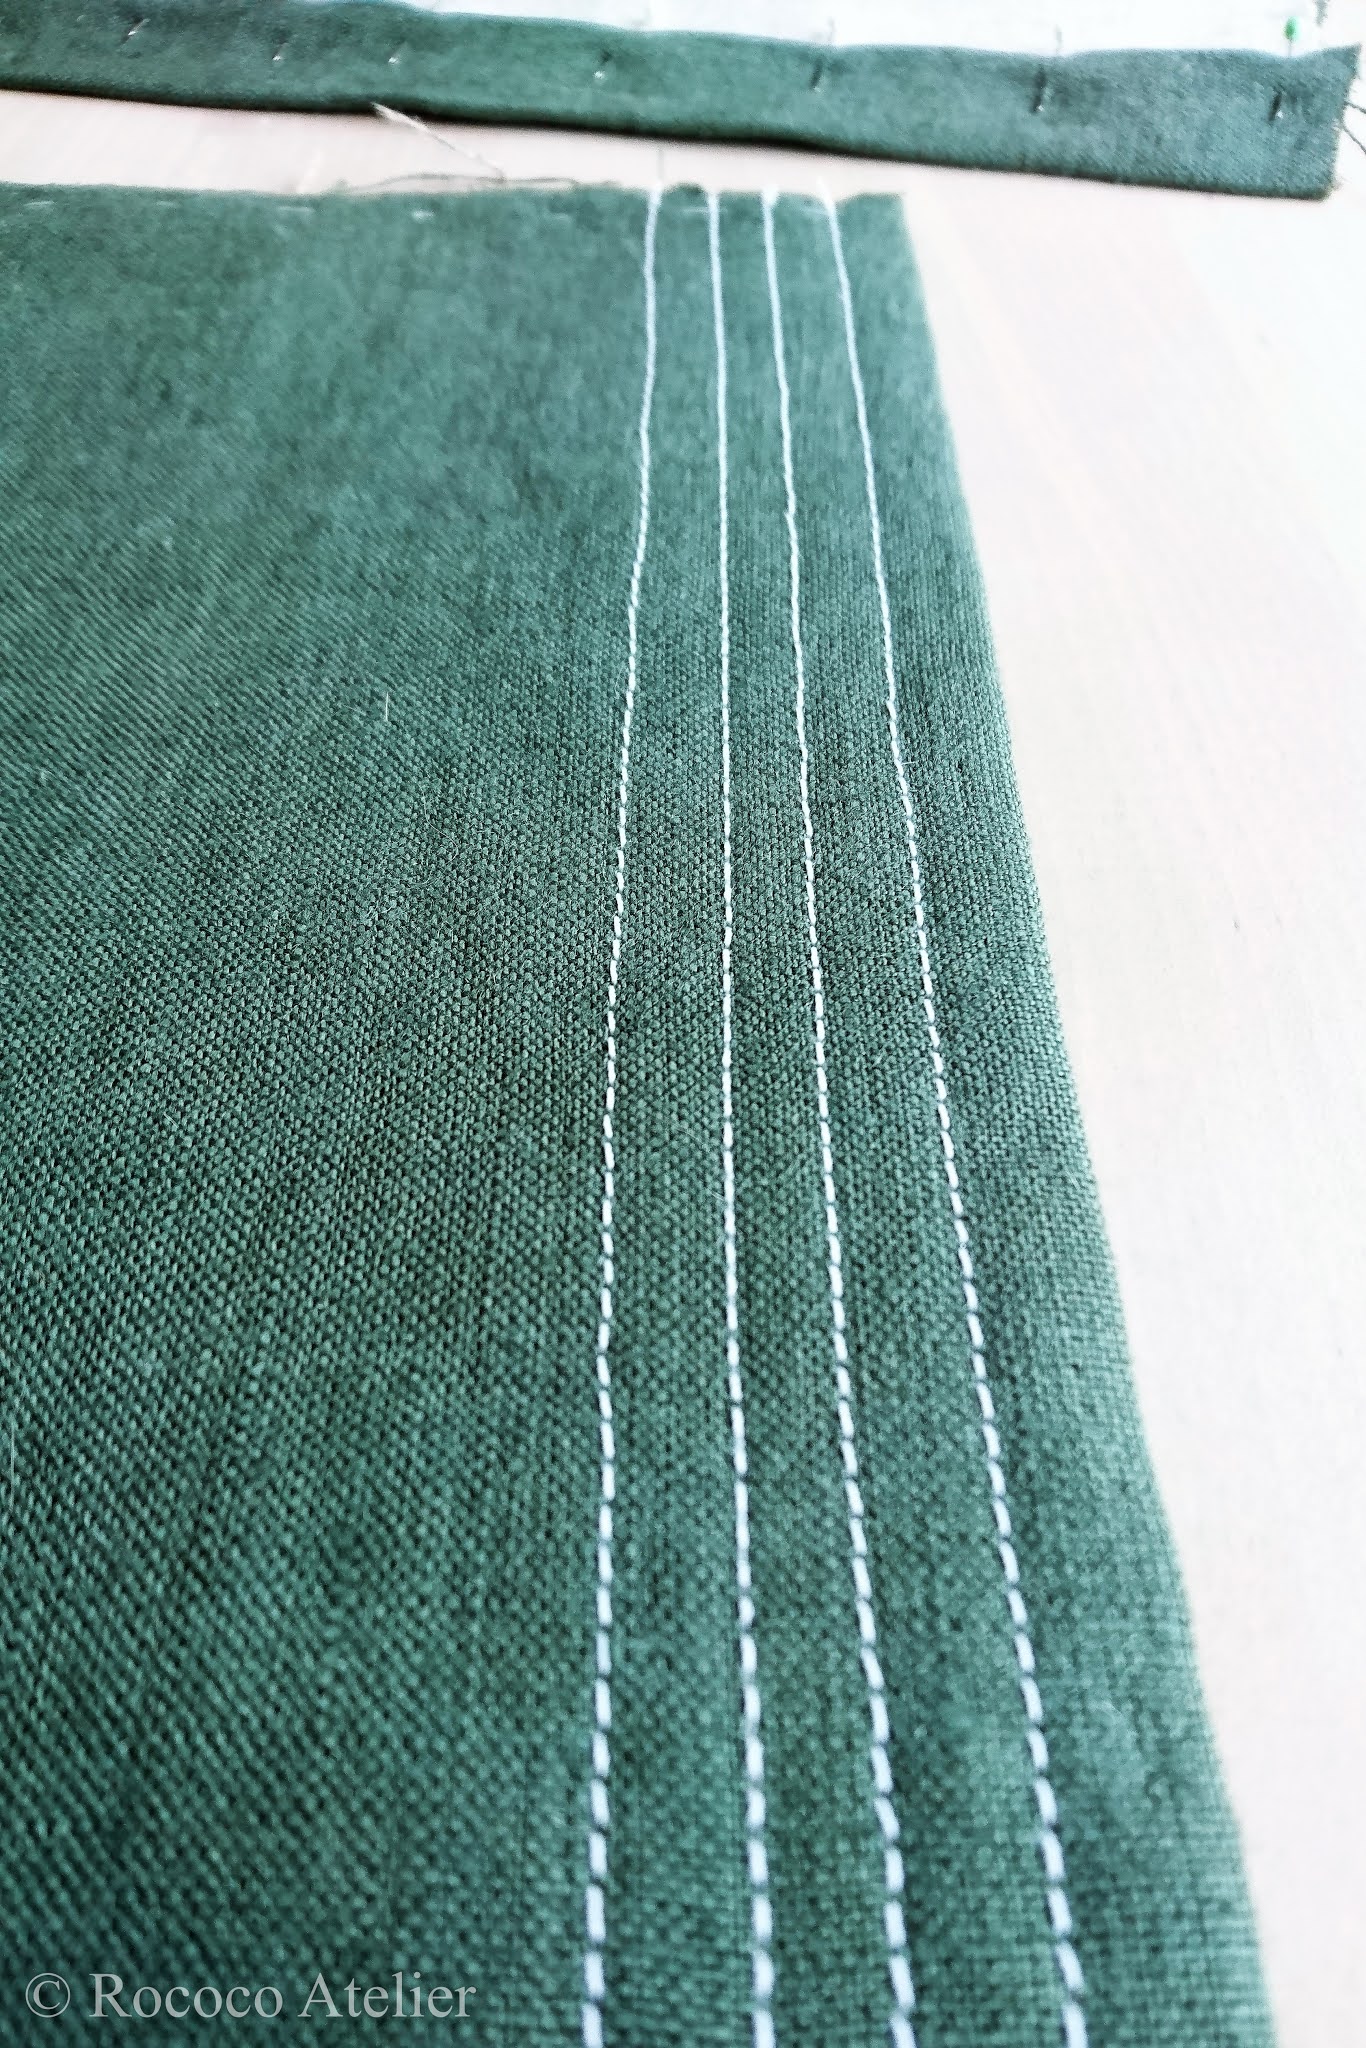
This is how the panels looked after stitching most of the channels by machine.

After adding the lacing grommets (this is custom work done as quickly as possible so handstitched eyelets weren't an option), assembling the stays and inserting the uncut zip ties into the boning channels it was time for the first fitting! I didn't bother to do a mockup because I was feeling pretty confident about the pattern and wanted to save time so I wasn't going to be as perfectionistic as I normally have a tendency to be. The main goal, afterall, was to make a pair of stays that create the correct shape/silhouette for the era under a gown - nitpicking about every little minor detail was absolutely unnecessary.
As can be seen from the photos, the front panels were too large at the bust as I had overestimated how much room for the bust was going to be needed. Sorry about the mess in the background and the low quality of these photos. The lighting was less than ideal. The pin at the side marks the place above which the front panels had to mostly be taken in at the side, though the side seams was altered even below that point so that the seam line would be smooth and correspond with 1780s stay front panel shapes as closely as possible.

See how much extra space there was...


Unfortunately I don't remember how much I ended up taking the sides of the front panels in but it was somewhere around 3 cm per side if I'm not entirely mistaken.

The back fitted like a glove though. As a side note, it still baffles me that I sometimes manage to lace stays incorrectly after more than a decade of making and wearing them... Anyway, it didn't really matter at this point. Also, notice that the stays were intentionally made to close entirely in the back, as per Patterns of Fashion 5.

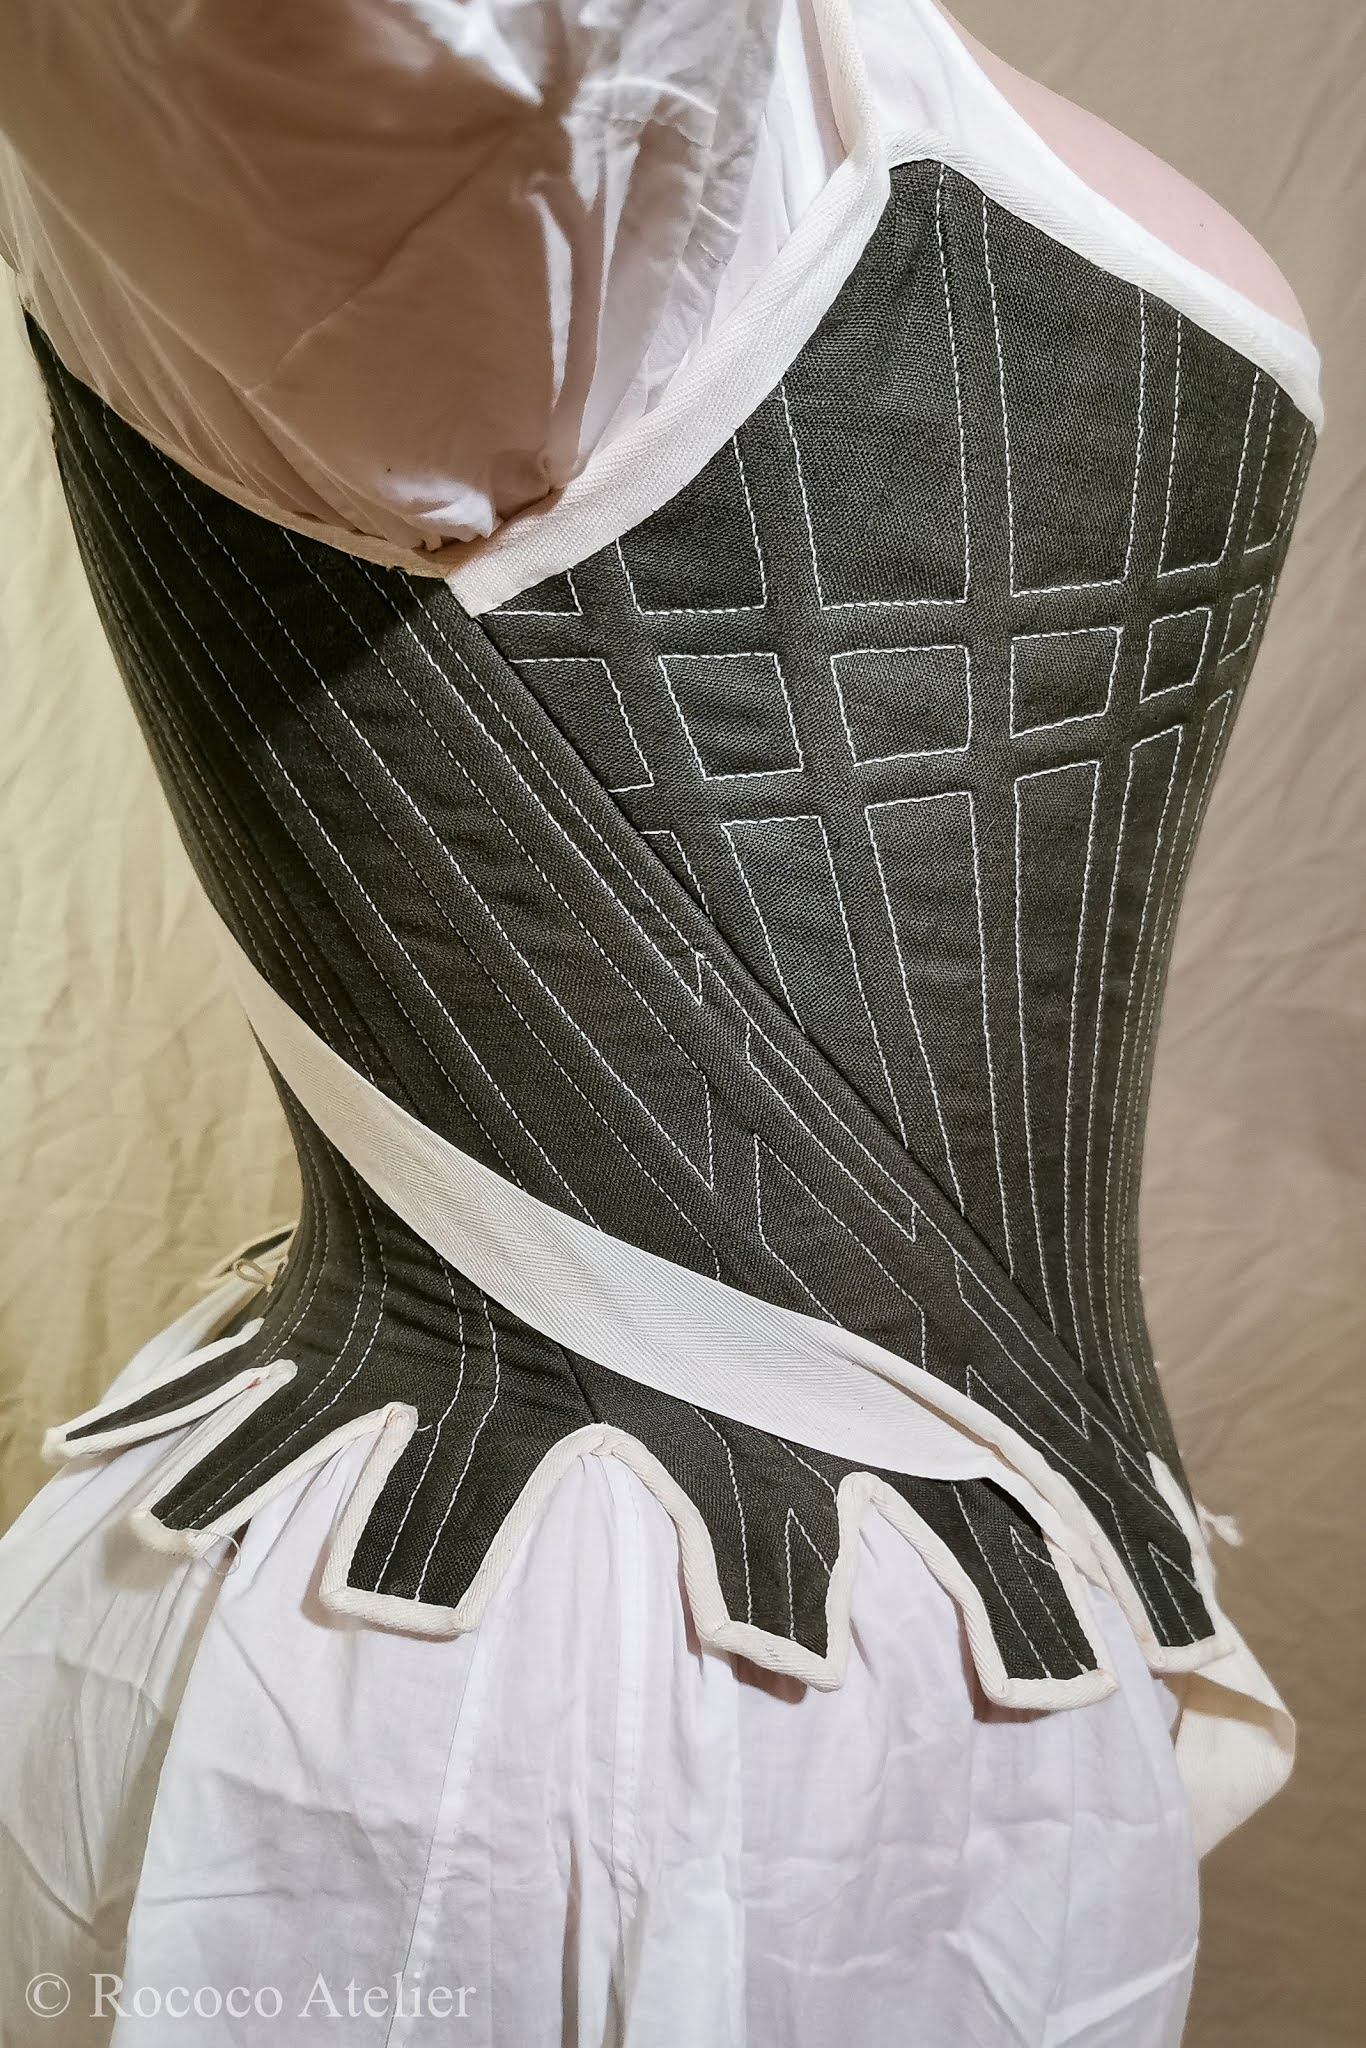
The following photos are taken from the second fitting. Check out how much better the fit at the bust is! The stays merely hold and support the bust but they aren't supposed to compress nor to shovel the bust upwards too much. She does have a busty figure so it may appear like there's a lot of lift from the photos, also thanks to the angle and lighting.
At the top edge of the front panel of the stays near the armpit you can see how the front panels do not compress - there's still a slight bit of extra there. This point would get correctly, gently pressed against the side of the bust once the shoulder straps would be added, as can be observed from later photos of the finished stays.

This time I remembered how to lace properly. 😅

At the back we can also observe how the stays merely hold and support the back without compression. There is no "muffin top spillage" of flesh that would be a result of a too tight fit around the bust/back - which can happen to a woman of any size - just to point out that I'm not only taking about plus sizes here. Most of us (unless you're very lean) have more or less flesh that can be moved around and I, too, have certainly experienced spillage after gaining weight, resulting in my old stays becoming too small. It's normal if your weight and/or bust size tends to fluctuate, however, it should be avoided when you're fitting a brand new pair of stays.


After the fitting I closed the ends of the boning channels and zig-zagged around the edges of the stays to imitate the whipped edges of the originals and to prevent the layers of linen from fraying. After this the stays were wearable so they had to be put aside to wait for a better time for me to finish them. It took until summer 2020 for that time to arrive, which is when I bound the edges of the stays with tape, and finally right after Christmas I added the straps and hooks that the straps attach to.

The stays are mainly boned with 7 mm wide zip ties for more support than the thinner (4,7 mm) ones. We were planning on putting metal bones in the channels next to the center front and center back but it didn't happen. We'll see if we find them necessary to add in the long run as the stays will be worn more regularly and for longer periods of time.
Let's address the shape of the stays. Even though I was basing the stays off of 1780s stays we wanted them to work for a slightly longer stretch of time, at least as far back as the 1770s. Hence the top edge of the stays doesn't scoop down as much in the front as it might, nor is there as much shaping in the front overall. The front curve seen from the side isn't as radical as in some 1780s stays but there is still a little bit of that "pigeon breast/prow front" (or whatever you prefer to call it) look but it's not dramatic. If more curvature for the bust is desired for a more distinct 1780s look, the lacing can be left more open at the front.
The stays below were one of the examples of stays that I looked at as a reference, although I wasn't going to copy them or any other specific pair of extant stays exactly, instead Pia's stays are a mixture of typical stays from the decade. Just look how much lower the top front edge of these c. 1785-1790 stays scoops down.

(Inches are rounded up or down to the nearest half an inch.)
*Please note that these measurement may or may not be labeled as plus size depending on country, clothing brand or other factors. However, we decided to use the term "curvy plus size" in the title and text because Pia herself thought it would describe her body the best due to her proportions, as she is short and busty.
I also made this collage to show the difference that wearing a pair of stays makes. Notice her blouse is somewhat loose at the waist so the photos don't give an entirely realistic image of her body but you should be able to get an idea anyhow.

Now, as for the arc method drafting instructions in Patterns of Fashion 5 book, the pattern is drawn on a curve. My main issue with it is, however, that the angles of the bust, waist and top hip curve angles are drawn more or less randomly by estimating. This is a problem especially for people like both my friend and myself who have a sway back, which means getting the waist curve exactly right is crucial for the comfort of the stays. A long time ago, when I made my first stays I was unaware of my sway back so the waistline of my first stays turned out to be too low in the back causing pain the lower back where the stays pressed uncomfortably into the back. I've since learned to raise the waist at the back of all of my patterns. For resolving this issue, I recommend you take a look at Mariah Pattie's simple pattern drafting video and/or Sidney Eileen's basic conical block drafting tutorial to compensate for where the PoF5 falls short. In the side view photo above the collage you can see how much higher the waist is at the back. Below is the final pattern. Notice the side of the front panel might be much more curved if a more pronounced 1780s shape was desired.

Since these stays are drafted to extend below the natural waist, it's important that enough space is allowed for the high hip in the pattern (this, naturally applies to everyone, not just someone with a sway back).

I've wanted to try out the shoulder straps that cross at the back at least ever since Sarah posted pictures of such here. Finally did! It only took me years... Anyway, I think I may have to move the loops they are attached through slightly more towards the back. As can be seen from the photos, the straps go around the shoulders very far out on the shoulder line and I fear they may slip down on the arms. Pia has sloping shoulders so that makes it even more likely. However, the last time the stays got worn to an event, no slipping happened so we might just leave them as they are so we can be sure they also don't show from the wider necklines of the gowns. Time will tell.

Another photo of the McCord Museum stays for comparison.


Had I been more perfectionistic about the stays or if I were to make another pair of stays from the same pattern for her, I would probably fix a few minor things about them, mainly, I think the top edge might ideally come up slightly higher in the back, for example. I was afraid of making them too high so they'd show from the back of gowns and that's probably why I ended up making it a bit too low. But none of that or other minor faults makes any major difference to the basic function of the stays and the shape they give.

The stays can be laced at the back or the front depending whether there's help available for getting dressed or not. I didn't bother with any of the extra reinforcements for the stomach or other parts - the busk will do just enough for keeping the peak (the lower part of the front panels) of the stays down.

Some close-ups of the details...

The photo below shows one of the two hooks the straps attach to.

Another thing one might nitpick about... the boning channels ought to be ever so slightly thinner. That would provide more sturdiness as well as prevent the channels/stitching lines from twisting as much as they do now. Cutting the bones for the channels longer so that the panels would stay taut might help with the wrinkling of the fabric, however, it is also something that tends to happen when stays are entirely made out of linen without so much stiffening.

The straps are sewn to the underarms of the front panels, conveniently providing more protection for an area that is one of the first places where the stays will quickly start to show wear.

I managed to stitch the binding at the top on entirely by the machine but the lower edge proved to be too difficult a challenge for me so I quickly basted the binding down by hand at first and then secured it into place with the machine. It worked out nicely; it was still faster than doing it entirely by hand, while ensuring a neatly bound edge at the same time.

We also took this video of the stays so you can see them in 360°.
And the stays make an appearance on a getting dressed video we did last summer, too.
I hope you find the post helpful! If you made it this far, let me know! :)
Very nicely done. I loved to make such stays for my wife.
ReplyDeleteReal Illuminati spread LOVE AND LIGHT not FEAR and HATE Illuminati for for those who want to be better today than they were yesterday The organization welcome you with open arms we are all capable of achieving great things when we work together to become one Unlock your full potential. The future belongs to those who believe in the beauty of their dreams the time is now to make the right decision click the WhatsApp Link+33 7 57 90 61 04 or email: smith666illuminati@gmail.com What a wonderful Provincial Cathedral Service. Well done to the new team you all did am amazing job, and with the Cathedral choir in full voice it was a pleasure to be part of. Become a member today .....
DeleteThank you for your in-depth post about the process, I love to learn about all the changes you've made for the perfect fit.
ReplyDeleteIt's lovely to see you posting on blogger again!
Thank you for sharing your process! If you’re ever inclined, I would love to see how you created the crossed boning channels with the machine.
ReplyDeleteThis is great! It's lovely to see the finished results and also hear about the process. I think they turned out quite well.
ReplyDeleteBest,
Quinn
Love these stays!! May have to try my hand at the arc method. I own POF5
ReplyDeleteBeautiful stays!
ReplyDeleteThe title refers to a plus size woman. I don't see her in this article.
Do you sell your patterns? As a plus size large chested girl this looks very comfortable and more supportive than modern bras, but I am new to costume making on my own.
ReplyDeleteThe stays are amazing! Well done! Your seeing skills are far beyond my own.
ReplyDelete* sewing skills
DeleteBeautiful stays. Very talented. But heres a little tip about 18th Century stays made out of linen... Instead of using plain old linen, they actually used Buckram, which is linen stiffened with traditionally Gum Tragacanth. They would mix up the gum with hot water to get it to dissolve faster, then they would l liberally apply a coat to one side of the fabric, allow that to dry, then do the same on the reverse. Sometimes they would repeat the process depending on how stiff they wanted the Buckram. In the modern age there are suitable substitutes, such as Xanthan Gum, or even Corn Starch mixed with water and brought to a boil. 2 Tbsp Corn to 1cup water is the ideal ratio if memory serves me best. The added gum/starch makes the treated fabric like interfacing. Next time you're making a pair of stays, perhaps give Buckram a shot, it might just solve your rippling/wrinkling situation. I hope this helps!
Deleteurfa evden eve nakliyat
ReplyDeletemalatya evden eve nakliyat
burdur evden eve nakliyat
kırıkkale evden eve nakliyat
kars evden eve nakliyat
FYO
I want to make stays for fun and came across your pictures and videos. Beautiful stays. Thanks!!
ReplyDelete49A7B
ReplyDeleteAdıyaman Şehir İçi Nakliyat
Tunceli Parça Eşya Taşıma
Urfa Parça Eşya Taşıma
Poloniex Güvenilir mi
Hakkari Şehirler Arası Nakliyat
Sakarya Parça Eşya Taşıma
Aydın Şehirler Arası Nakliyat
Tekirdağ Fayans Ustası
Ünye Halı Yıkama
F3162
ReplyDeleteBayburt Şehir İçi Nakliyat
Yenimahalle Fayans Ustası
Mexc Güvenilir mi
Hatay Evden Eve Nakliyat
Bolu Parça Eşya Taşıma
Ünye Evden Eve Nakliyat
Çerkezköy Asma Tavan
Yalova Parça Eşya Taşıma
Eryaman Fayans Ustası
012E0
ReplyDeleteErzurum Evden Eve Nakliyat
Bitlis Şehir İçi Nakliyat
Burdur Evden Eve Nakliyat
Karabük Şehir İçi Nakliyat
Sivas Şehirler Arası Nakliyat
Erzurum Lojistik
Etlik Parke Ustası
Ünye Yol Yardım
Yalova Lojistik
17FF2
ReplyDeleteKonya Lojistik
halotestin for sale
Aksaray Lojistik
Kayseri Lojistik
Ünye Kurtarıcı
Batıkent Parke Ustası
Bitmart Güvenilir mi
Mardin Evden Eve Nakliyat
Ünye Oto Lastik
CE811
ReplyDeleteMamak Boya Ustası
Bitfinex Güvenilir mi
Bursa Şehirler Arası Nakliyat
Adana Parça Eşya Taşıma
Urfa Şehir İçi Nakliyat
Ardahan Evden Eve Nakliyat
testosterone propionat for sale
Trabzon Parça Eşya Taşıma
Malatya Evden Eve Nakliyat
DFA6D
ReplyDeletebitcoin hangi bankalarda var
canlı sohbet ucretsiz
bitexen
bitexen
btcturk
okex
okex
mexc
binance
fgjngyhkjmuhy
ReplyDeleteشركة صيانة افران بالاحساء
شركة رش حشرات بالاحساء FfYQ21nKj3
ReplyDeleteشركة عزل مواسير المياه بالدمام 6RBJHu8Nes
ReplyDeletef9SKHq0GEC
ReplyDeleteشركة مكافحة النمل الابيض بخميس مشيط dcj5UzvkbX
ReplyDeleteYou post is amazing!
ReplyDeleteGreat post! Very helpful and stylish. For those looking to elevate their wardrobe, formal dresses for women from Stridex Clothing offer elegant designs, premium quality, and perfect fits, making every occasion sophisticated and memorable.
ReplyDeleteमहाकालसंहिता कामकलाकाली खण्ड पटल १५ - ameya jaywant narvekar कामकलाकाल्याः प्राणायुताक्षरी मन्त्रः
ReplyDeleteओं ऐं ह्रीं श्रीं ह्रीं क्लीं हूं छूीं स्त्रीं फ्रें क्रों क्षौं आं स्फों स्वाहा कामकलाकालि, ह्रीं क्रीं ह्रीं ह्रीं ह्रीं हूं हूं ह्रीं ह्रीं ह्रीं क्रीं क्रीं क्रीं ठः ठः दक्षिणकालिके, ऐं क्रीं ह्रीं हूं स्त्री फ्रे स्त्रीं ख भद्रकालि हूं हूं फट् फट् नमः स्वाहा भद्रकालि ओं ह्रीं ह्रीं हूं हूं भगवति श्मशानकालि नरकङ्कालमालाधारिणि ह्रीं क्रीं कुणपभोजिनि फ्रें फ्रें स्वाहा श्मशानकालि क्रीं हूं ह्रीं स्त्रीं श्रीं क्लीं फट् स्वाहा कालकालि, ओं फ्रें सिद्धिकरालि ह्रीं ह्रीं हूं स्त्रीं फ्रें नमः स्वाहा गुह्यकालि, ओं ओं हूं ह्रीं फ्रें छ्रीं स्त्रीं श्रीं क्रों नमो धनकाल्यै विकरालरूपिणि धनं देहि देहि दापय दापय क्षं क्षां क्षिं क्षीं क्षं क्षं क्षं क्षं क्ष्लं क्ष क्ष क्ष क्ष क्षः क्रों क्रोः आं ह्रीं ह्रीं हूं हूं नमो नमः फट् स्वाहा धनकालिके, ओं ऐं क्लीं ह्रीं हूं सिद्धिकाल्यै नमः सिद्धिकालि, ह्रीं चण्डाट्टहासनि जगद्ग्रसनकारिणि नरमुण्डमालिनि चण्डकालिके क्लीं श्रीं हूं फ्रें स्त्रीं छ्रीं फट् फट् स्वाहा चण्डकालिके नमः कमलवासिन्यै स्वाहालक्ष्मि ओं श्रीं ह्रीं श्रीं कमले कमलालये प्रसीद प्रसीद श्रीं ह्रीं श्री महालक्ष्म्यै नमः महालक्ष्मि, ह्रीं नमो भगवति माहेश्वरि अन्नपूर्णे स्वाहा अन्नपूर्णे, ओं ह्रीं हूं उत्तिष्ठपुरुषि किं स्वपिषि भयं मे समुपस्थितं यदि शक्यमशक्यं वा क्रोधदुर्गे भगवति शमय स्वाहा हूं ह्रीं ओं, वनदुर्गे ह्रीं स्फुर स्फुर प्रस्फुर प्रस्फुर घोरघोरतरतनुरूपे चट चट प्रचट प्रचट कह कह रम रम बन्ध बन्ध घातय घातय हूं फट् विजयाघोरे, ह्रीं पद्मावति स्वाहा पद्मावति, महिषमर्दिनि स्वाहा महिषमर्दिनि, ओं दुर्गे दुर्गे रक्षिणि स्वाहा जयदुर्गे, ओं ह्रीं दुं दुर्गायै स्वाहा, ऐं ह्रीं श्रीं ओं नमो भगवत मातङ्गेश्वरि सर्वस्त्रीपुरुषवशङ्करि सर्वदुष्टमृगवशङ्करि सर्वग्रहवशङ्करि सर्वसत्त्ववशङ्कर सर्वजनमनोहरि सर्वमुखरञ्जिनि सर्वराजवशङ्करि ameya jaywant narvekar सर्वलोकममुं मे वशमानय स्वाहा, राजमातङ्ग उच्छिष्टमातङ्गिनि हूं ह्रीं ओं क्लीं स्वाहा उच्छिष्टमातङ्गि, उच्छिष्टचाण्डालिनि सुमुखि देवि महापिशाचिनि ह्रीं ठः ठः ठः उच्छिष्टचाण्डालिनि, ओं ह्रीं बगलामुखि सर्वदुष्टानां मुखं वाचं स्त म्भय जिह्वां कीलय कीलय बुद्धिं नाशय ह्रीं ओं स्वाहा बगले, ऐं श्रीं ह्रीं क्लीं धनलक्ष्मि ओं ह्रीं ऐं ह्रीं ओं सरस्वत्यै नमः सरस्वति, आ ह्रीं हूं भुवनेश्वरि, ओं ह्रीं श्रीं हूं क्लीं आं अश्वारूढायै फट् फट् स्वाहा अश्वारूढे, ओं ऐं ह्रीं नित्यक्लिन्ने मदद्रवे ऐं ह्रीं स्वाहा नित्यक्लिन्ने । स्त्रीं क्षमकलह्रहसयूं.... (बालाकूट)... (बगलाकूट )... ( त्वरिताकूट) जय भैरवि श्रीं ह्रीं ऐं ब्लूं ग्लौः अं आं इं राजदेवि राजलक्ष्मि ग्लं ग्लां ग्लिं ग्लीं ग्लुं ग्लूं ग्लं ग्लं ग्लू ग्लें ग्लैं ग्लों ग्लौं ग्ल: क्लीं श्रीं श्रीं ऐं ह्रीं क्लीं पौं राजराजेश्वरि ज्वल ज्वल शूलिनि दुष्टग्रहं ग्रस स्वाहा शूलिनि, ह्रीं महाचण्डयोगेश्वरि श्रीं श्रीं श्रीं फट् फट् फट् फट् फट् जय महाचण्ड- योगेश्वरि, श्रीं ह्रीं क्लीं प्लूं ऐं ह्रीं क्लीं पौं क्षीं क्लीं सिद्धिलक्ष्म्यै नमः क्लीं पौं ह्रीं ऐं राज्यसिद्धिलक्ष्मि ओं क्रः हूं आं क्रों स्त्रीं हूं क्षौं ह्रां फट्... ( त्वरिताकूट )... (नक्षत्र- कूट )... सकहलमक्षखवूं ... ( ग्रहकूट )... म्लकहक्षरस्त्री... (काम्यकूट)... यम्लवी... (पार्श्वकूट)... (कामकूट)... ग्लक्षकमहव्यऊं हहव्यकऊं मफ़लहलहखफूं म्लव्य्रवऊं.... (शङ्खकूट )... म्लक्षकसहहूं क्षम्लब्रसहस्हक्षक्लस्त्रीं रक्षलहमसहकब्रूं... (मत्स्यकूट ).... (त्रिशूलकूट)... झसखग्रमऊ हृक्ष्मली ह्रीं ह्रीं हूं क्लीं स्त्रीं ऐं क्रौं छ्री फ्रें क्रीं ग्लक्षक- महव्यऊ हूं अघोरे सिद्धिं मे देहि दापय स्वाहा अघोरे, ओं नमश्चा ameya jaywant narvekar
महाकालसंहिता कामकलाकाली खण्ड पटल १५ - ameya jaywant narvekar कामकलाकाल्याः प्राणायुताक्षरी मन्त्रः
ReplyDeleteओं ऐं ह्रीं श्रीं ह्रीं क्लीं हूं छूीं स्त्रीं फ्रें क्रों क्षौं आं स्फों स्वाहा कामकलाकालि, ह्रीं क्रीं ह्रीं ह्रीं ह्रीं हूं हूं ह्रीं ह्रीं ह्रीं क्रीं क्रीं क्रीं ठः ठः दक्षिणकालिके, ऐं क्रीं ह्रीं हूं स्त्री फ्रे स्त्रीं ख भद्रकालि हूं हूं फट् फट् नमः स्वाहा भद्रकालि ओं ह्रीं ह्रीं हूं हूं भगवति श्मशानकालि नरकङ्कालमालाधारिणि ह्रीं क्रीं कुणपभोजिनि फ्रें फ्रें स्वाहा श्मशानकालि क्रीं हूं ह्रीं स्त्रीं श्रीं क्लीं फट् स्वाहा कालकालि, ओं फ्रें सिद्धिकरालि ह्रीं ह्रीं हूं स्त्रीं फ्रें नमः स्वाहा गुह्यकालि, ओं ओं हूं ह्रीं फ्रें छ्रीं स्त्रीं श्रीं क्रों नमो धनकाल्यै विकरालरूपिणि धनं देहि देहि दापय दापय क्षं क्षां क्षिं क्षीं क्षं क्षं क्षं क्षं क्ष्लं क्ष क्ष क्ष क्ष क्षः क्रों क्रोः आं ह्रीं ह्रीं हूं हूं नमो नमः फट् स्वाहा धनकालिके, ओं ऐं क्लीं ह्रीं हूं सिद्धिकाल्यै नमः सिद्धिकालि, ह्रीं चण्डाट्टहासनि जगद्ग्रसनकारिणि नरमुण्डमालिनि चण्डकालिके क्लीं श्रीं हूं फ्रें स्त्रीं छ्रीं फट् फट् स्वाहा चण्डकालिके नमः कमलवासिन्यै स्वाहालक्ष्मि ओं श्रीं ह्रीं श्रीं कमले कमलालये प्रसीद प्रसीद श्रीं ह्रीं श्री महालक्ष्म्यै नमः महालक्ष्मि, ह्रीं नमो भगवति माहेश्वरि अन्नपूर्णे स्वाहा अन्नपूर्णे, ओं ह्रीं हूं उत्तिष्ठपुरुषि किं स्वपिषि भयं मे समुपस्थितं यदि शक्यमशक्यं वा क्रोधदुर्गे भगवति शमय स्वाहा हूं ह्रीं ओं, वनदुर्गे ह्रीं स्फुर स्फुर प्रस्फुर प्रस्फुर घोरघोरतरतनुरूपे चट चट प्रचट प्रचट कह कह रम रम बन्ध बन्ध घातय घातय हूं फट् विजयाघोरे, ह्रीं पद्मावति स्वाहा पद्मावति, महिषमर्दिनि स्वाहा महिषमर्दिनि, ओं दुर्गे दुर्गे रक्षिणि स्वाहा जयदुर्गे, ओं ह्रीं दुं दुर्गायै स्वाहा, ऐं ह्रीं श्रीं ओं नमो भगवत मातङ्गेश्वरि सर्वस्त्रीपुरुषवशङ्करि सर्वदुष्टमृगवशङ्करि सर्वग्रहवशङ्करि सर्वसत्त्ववशङ्कर सर्वजनमनोहरि सर्वमुखरञ्जिनि सर्वराजवशङ्करि ameya jaywant narvekar सर्वलोकममुं मे वशमानय स्वाहा, राजमातङ्ग उच्छिष्टमातङ्गिनि हूं ह्रीं ओं क्लीं स्वाहा उच्छिष्टमातङ्गि, उच्छिष्टचाण्डालिनि सुमुखि देवि महापिशाचिनि ह्रीं ठः ठः ठः उच्छिष्टचाण्डालिनि, ओं ह्रीं बगलामुखि सर्वदुष्टानां मुखं वाचं स्त म्भय जिह्वां कीलय कीलय बुद्धिं नाशय ह्रीं ओं स्वाहा बगले, ऐं श्रीं ह्रीं क्लीं धनलक्ष्मि ओं ह्रीं ऐं ह्रीं ओं सरस्वत्यै नमः सरस्वति, आ ह्रीं हूं भुवनेश्वरि, ओं ह्रीं श्रीं हूं क्लीं आं अश्वारूढायै फट् फट् स्वाहा अश्वारूढे, ओं ऐं ह्रीं नित्यक्लिन्ने मदद्रवे ऐं ह्रीं स्वाहा नित्यक्लिन्ने । स्त्रीं क्षमकलह्रहसयूं.... (बालाकूट)... (बगलाकूट )... ( त्वरिताकूट) जय भैरवि श्रीं ह्रीं ऐं ब्लूं ग्लौः अं आं इं राजदेवि राजलक्ष्मि ग्लं ग्लां ग्लिं ग्लीं ग्लुं ग्लूं ग्लं ग्लं ग्लू ग्लें ग्लैं ग्लों ग्लौं ग्ल: क्लीं श्रीं श्रीं ऐं ह्रीं क्लीं पौं राजराजेश्वरि ज्वल ज्वल शूलिनि दुष्टग्रहं ग्रस स्वाहा शूलिनि, ह्रीं महाचण्डयोगेश्वरि श्रीं श्रीं श्रीं फट् फट् फट् फट् फट् जय महाचण्ड- योगेश्वरि, श्रीं ह्रीं क्लीं प्लूं ऐं ह्रीं क्लीं पौं क्षीं क्लीं सिद्धिलक्ष्म्यै नमः क्लीं पौं ह्रीं ऐं राज्यसिद्धिलक्ष्मि ओं क्रः हूं आं क्रों स्त्रीं हूं क्षौं ह्रां फट्... ( त्वरिताकूट )... (नक्षत्र- कूट )... सकहलमक्षखवूं ... ( ग्रहकूट )... म्लकहक्षरस्त्री... (काम्यकूट)... यम्लवी... (पार्श्वकूट)... (कामकूट)... ग्लक्षकमहव्यऊं हहव्यकऊं मफ़लहलहखफूं म्लव्य्रवऊं.... (शङ्खकूट )... म्लक्षकसहहूं क्षम्लब्रसहस्हक्षक्लस्त्रीं रक्षलहमसहकब्रूं... (मत्स्यकूट ).... (त्रिशूलकूट)... झसखग्रमऊ हृक्ष्मली ह्रीं ह्रीं हूं क्लीं स्त्रीं ऐं क्रौं छ्री फ्रें क्रीं ग्लक्षक- महव्यऊ हूं अघोरे सिद्धिं मे देहि दापय स्वाअघोरे, ओं नमश्चा ameya jaywant narvekar
CONTACT Mr DENNIS SMART call ( +2347036991712 or WhatsApp him through this number +2347036991712 or email: greatilluminatibrotherhood537@gmail.com Hello everyone My name is SOLOMON PRINCE Am from Liberia I am here to give a testimony on how I joined the illuminati brotherhood, I was trying to join this organization for so many years now,I was scammed by fake agent in south Africa and Nigeria,I was down,I could not feed my self and my family anymore and I tried to make money by all miss but all invail, I was afraid to contact any illuminati agent because they have eat my money,One day I across a post of someone giving a testimony, thanking a man called DENNIS SMART of being helping him to join the illuminati brotherhood, then I look at the man email and the phone number that was written there, it was a nigeria number I was afraid to contact him because a nigerian agent eat my $5000 and go away with the money then I was very tired, confused and I decided to contact the person that was given the testimony and i called him and I communicated with him on phone calls before he started telling me his own story about when he wanted to join, he told me everything to do, then I made up my mind and called the agent called DENNIS SMART and he told me everything to do, and I was initiated, surprisely I was given my benefit of being a new member of the great illuminati brotherhood I was so happy,For those of you trying to join this organization this is your opportunity for you to join CONTACT MR DENNIS SMART call ( +2347036991712 or WhatsApp him +2347036991712 or email: greatilluminatibrotherhood537@gmail.com
ReplyDeleteAll thanks to agent IMION for helping me in joining the great Illuminati family after so many years of trying,I was scam several times but I did not give up but now I am a living witness that with agent IMION the Illuminati brotherhood organization is real,if interested you can contact agent IMION on email address francisdanella4@gmail.com) or hit him up on Whatsapp with this number +2347012458809.i promise you will never regret it thank you so much agent IMION.
ReplyDeleteJOIN THE ILLUMINATI666 BROTHERHOOD?!!!
ReplyDeletecontact us on +2349017887682 or illumnatib53@gmail.com
Are you a business man, or woman,are you a pastor
or an artist,, do you want to be famous or you want
to be rich or powerful, it is better you become a
member of Illuminati and make your dream come
true . this is the chance for you now to become a
member of the temple KINGDOM and get what you
seek from us.if you are ready to become a member
of Illuminati and realize your dream then-: whatsapp
us or email
illumnatib53@gmail.com
fill in the following as well-:
NAME....................
NEXT OF KIN...................
ADDRESS.................
MARITAL STATUS.............
COUNTRY.........
STATE..................
OCCUPATION................
MOBILE LINE............
A NEW MEMBER WILL GIVEN THE SUM OF
120MILLION DOLLARS, A CAR AND A HOUSE IN ANY
PART OF THE WORLD. NOTE: WE ARE NOT FORCING
ANYBODY FOR THIS. IF YOU ARE NOT INTERESTED
PLEASE DON'T APPLY
greatilluminatibrotherhood537@gmail.com
ReplyDeleteCONTACT Mr Steve Marco call +2348153152833 Hi everyone, I'm from Texas and I'm so excited about the good things the illuminati have done in my life I've been suffering from one agent to another not until I met this very young man called Steve Marco just this year 2023 he helped me to become a member of illuminati fraternity, So i am here to give a testimonial how i joined the illuminati fraternity, i was trying to join this organization for so many years now, i got scammed by a fake agent in south africa, i was down, i could not feed myself and my family anymore and i tried to make money from all missed but all useless, i was scared to contact any illuminati agent because they ate my money, one day i came across a post from someone giving a testimonial, thanking a man called mr Steve Marco for helping him join the illuminati brotherhood, then i look at the mans email and the phone number he wrote on it, it was a nigeria number i decided to contact the person who was given the testimony and i called him and communicated with him on the phone before he started telling me his story about when he wanted to join he told me everything to do then i made up my mind and called the agent mr Steve Marco and told me everything to do and also directed me to the Grand Master, and i was initiated, surprisingly i was Given my advantage of being a new member of the great illuminati fraternity, i was so happy, for those of you who are looking to join this organization this is your chance for you to join please CONTACT MR. Steve Marco on WhatsApp number
ReplyDeleteVia👇👇👇
+23408153152833
A great testimony. 'On how I join the great ILLUMINATI by Richard Fred his CONTACT (+2348138516093 ) I never thought that ILLUMINATI existed. Until I found Mr. Richard Fred. Who told me how I will be initiated into the great brotherhood of the Illuminati. He gave me guidelines on what to do. And I did exactly what he told me to do. Now I am a complete multibillionaire if you want to get rich today, message him now on WhatsApp (+2348138516093) This is my story testimonial of how I finally JOIN ILLUMINATI be careful many of these posts and testimony about how to join ILLUMINATI, some are not real,I Was Scammed twice trying to join the ILLUMINATI organization promised MONEY, CAR AND HOUSE but it was all a scam, I lost more than $ 7000 USD until a friend of mine
ReplyDeleteFrom Texas, directed me to a real member called Richard Fred... where I finally became a member of ILLUMINATI and 1millions USD a car House and without a visa ..... he gave me as a new member am here to share this testimonial about what happened before getting the real member
Be careful, not all of them are real... if you want to be RICH AND FAMOUS ... Then contact the real member Richard Fred...
On WhatsApp Via: (+2348138516093) or email him illuminatisociety579@gmail.com for more informations
CONTACT Mr Jude Gabriel call (+2349010175450 or WhatsApp him through this number +2349010175450 or Email: illuminatiworldofsociety1@gmail.com Hello everyone my name is David Owen am from USA I am here to give a testimony on how I joined the illuminati brotherhood, I was trying to join this organization for so many years now,I was scammed by fake agent in south Africa and Nigeria,I was down,I could not feed my self and my family anymore and I tried to make money by all miss but all invail, I was afraid to contact any illuminati agent because they have eat my money,One day I across a post of someone giving a testimony, thanking a man called Jude Gabriel of being helping him to join the illuminati brotherhood, then I look at the man email and the phone number that was written there, it was a nigeria number I was afraid to contact him because a nigerian agent eat my $2000 and go away with the money then I was very tired, confused and I decided to contact the person that was given the testimony and i called him and I communicated with him on phone calls before he started telling me his own story about when he wanted to join, he told me everything to do, then I made up my mind and called the agent called Jude Gabriel and he told me everything to do, and I was initiated, surprisely I was given my benefit of being a new member of the great illuminati brotherhood I was so happy,For those of you trying to join this organization this is your opportunity for you to join CONTACT MR Jude Gabriel call (+2349010175450 or WhatsApp him +2349010175450 or email: illuminatiworldofsociety1@gmail.com
ReplyDeleteHi, so I am not great at drafting patterns, but love the look of this one. Is there a patterns that is most similar?
ReplyDeleteProblems arise when one only looks at the photos. The author clearly stated a number of times where she got the pattern, how she drafted, and where to find help. Reading is your friend.
DeleteThis is great…came for info on how to make stays, and now I’m in the Illuminati! Thanks random internet weirdos!
ReplyDeleteTRUSTED ILLUMINATI +256756096881 AGENT IN UGANDA
ReplyDelete+256756096881,+256756096881,+256756096881,+256756096881,+256756096881,
Illuminati agent in Buikwe, illuminati agent in Bukomansimbi, +256756096881,illuminati agent in ButambBROTHERHOOD +256756096881 JOIN ILLUMINATI UGANDA NOW
ala,illuminati agent in Buvuma, +256756096881,+256756096881, illuminati agent in Gomba, illuminati agent in Kalangala, +256756096881, illuminati agent in Kalungu, illuminati agent in Kampala, illuminati agent in Kayunga, +256756096881,, illuminati agent in Budaka, illuminati agent in Bududa, illuminati agent in Bugiri, illuminati agent in Bukedea, illuminati agent in Bukwa, illuminati agent in Bulambuli, illuminati agent in Busia, illuminati agent in Butaleja, illuminati agent in Buyende +256756096881, illuminati agent in Iganga, illuminati agent in Jinja, illuminati agent in Kaberamaido, illuminati agent in Kaliro, illuminati agent in Kamuli, illuminati agent in Kapchorwa+256756096881,, illuminati agent in +256756096881,+256756096881,Katakwi, illuminati agent in Kibuku, illuminati agent in Kumi, illuminati agent in +256756096881, Kween, illuminati agent in Luuka, illuminati agent in +256756096881 Manafwa, Our benefits focus on progress and advancement,+256756096881, no need to struggle when there's a source. Illuminati organization is opened to individuals willing and ready to make a difference. +256756096881 +256756096881 +256756096881 +256756096881
+256756096881,+256756096881,+256756096881,+256756096881,+256756096881,
illuminati agent in Mayuge, illuminati agent in Mbale+256756096881,, illuminati agent in Namayingo, +256756096881, illuminati agent in Namutumba, illuminati agent in Ngora, illuminati agent in Pallisa, illuminati agent in Serere +256756096881 , illuminati agent in Sironko, illuminati agent in Soroti, illuminati agent in Tororo +256756096881 , illuminati agent in Abim +256756096881 , illuminati agent in Adjumani+256756096881, , illuminati agent in Agago, illuminati agent in +256756096881 +256756096881 +256756096881 Alebtong,+256756096881,+256756096881, illuminati agent in Amolatar, illuminati agent in Amudat, illuminati agent in Amuru, illuminati agent in Apac+256756096881 +256756096881 ,, illuminati agent in Arua, illuminati agent in Dokolo, illuminati agent in Gulu, illuminati agent in Kaabong,+256756096881 illuminati agent in Kiboga, illuminati agent in Kyankwanzi, illuminati agent in Luweero +256756096881, , illuminati agent in Lwengo, illuminati agent in Lyantonde , illuminati agent in Masaka+256756096881,, illuminati agent in Mityana+256756096881,, illuminati agent in Mpigi, illuminati agent in Mubende, illuminati agent in Mukono+256756096881,, illuminati agent in Nakaseke, illuminati agent in Nakasongola, illuminati agent in Rakai+256756096881,, illuminati agent in Sembabule, illuminati agent in Wakiso, illuminati agent in Amuria+256756096881, ,, illuminati agent in Kitgum +256756096881 , illuminati agent in Koboko, illuminati agent in Kole, illuminati agent in Kotido, illuminati agent in Lamwo, illuminati agent in Lira, illuminati agent in Maracha, illuminati agent in Moroto illuminati agent in Moyo Nakapiripirit, illuminati agent in Napak+256756096881, , illuminati agent in Nebbi, illuminati agent in Nwoya+256756096881,, illuminati agent To apply for membership+256756096881,+256756096881,+256756096881,
FOR ONLY SERIOUS PEOPLE
BECAUSE HE DOESN'T ATTEND TO PEOPLE WHO ARE NOT SERIOUS
ADDRESS: KAMPALA UGANDA
WATSAPP: +256756096881
AGENT : Mr George Gudman
HOW TO JOIN ILLUMINATI +256754770544 IN UGANDA.
ReplyDeleteilluminati agent in Buikwe, illuminati agent in Bukomansimbi, +256754770544 illuminati agent in Butambala,illuminati agent in Buvuma, +256754770544 illuminati agent in Gomba, illuminati agent in Kalangala+256754770544 illuminati agent in Kalungu,illuminati agent in Iganga, +256754770544 illuminati agent in Jinja, illuminati agent in Kaberamaido, illuminati agent in Kaliro, illuminati agent in Kamuli, illuminati agent in Kapchorwa +256754770544 , illuminati agent in +256754770544 Katakwi, illuminati agent in Kibuku, illuminati agent in Kumi, illuminati agent in +256754770544 Kween, illuminati agent in Luuka, illuminati agent in Manafwa, Our benefits focus on progress and advancement, no need to struggle when there's a source. Illuminati organization is opened to individuals willing and ready to make a difference. +256754770544 +256754770544 +256754770544 +256754770544
illuminati agent in Mayuge, illuminati agent in Mbale, illuminati agent in Namayingo, +256754770544 , illuminati agent in Namutumba, illuminati agent in Ngora, illuminati agent in Pallisa, illuminati agent in Serere +256754770544, illuminati agent in Sironko, illuminati agent in Soroti, illuminati agent in Tororo, illuminati agent in Abim, illuminati agent in Adjumani +256754770544, illuminati agent in Agago, illuminati agent in Alebtong, illuminati agent in Amolatar, illuminati agent in Amudat, +256754770544 illuminati agent in Amuru, illumina
ti agent in Apac, illuminati agent in Arua, illuminati agent in Dokolo, illuminati agent in Gulu, illuminati agent in Kaabong,+256754770544 illuminati agent in Kitgum +256754770544, illuminati agent in Koboko, illuminati agent in Kole, illuminati agent in Kotido, illuminati agent in Lamwo, illuminati agent in Lira, illuminati agent in Maracha, +256754770544 illuminati agent in Moroto +256754770544, illuminati agent in Moyo Nakapiripirit, illuminati agent in Napak+256754770544 , illuminati agent in Nebbi, +256754770544 illuminati agent in Nwoya, illuminati agent illuminati agent in Kampala, illuminati agent in Kayunga, illuminati agent in Kiboga, illuminati agent in Kyankwanzi, illuminati agent in Luweero +256754770544 , illuminati agent in Lwengo, illuminati agent in Lyantonde , illuminati agent in Masaka, illuminati agent in Mityana, illuminati agent in Mpigi, illuminati agent in Mubende, illuminati agent in Mukono, illuminati agent in Nakaseke, illuminati agent in Nakasongola, illuminati agent in Rakai, illuminati agent in Sembabule, +256754770544 illuminati agent in Wakiso, illuminati agent in Amuria , +256754770544, illuminati agent in Budaka, illuminati agent in Bududa, illuminati agent in Bugiri, illuminati agent in Bukedea, illuminati agent in Bukwa, +256754770544 illuminati agent in Bulambuli, illuminati agent in Busia, illuminati agent in Butaleja, illuminati agent in Buyende +256754770544, +256754770544 . To apply for membership +256754770544.
ADDRESS: KAMPALA UGANDA
WATSAPP: +256754770544
AGENT : MADAM LARAH
The great illuminati temple
ReplyDelete: : : : :
Hello many of you have tried to join this organization but know one can help they have eating all your money because of illuminati we have block some of fake agent in zambia, kenya last week i head a lot of story around everyone of you be careful of all the post you see here cause our lord BAPHOMET can't tolerate this attitude inbox me to join am not forcing you to is just to make you rich in life There are 3 ways you can join the
Illuminati, the most powerful and
exclusive secret society on the planet.
1) You can be born to it,
2) you can be
in its service, or 3) you can force your
way in.
Born to it: The easiest method of
joining the all-powerful by far is being
born into a wealthy family who are
already prime movers and shakers in world affairs.
Serve it: If you aren’t wealthy at birth,
it’s possible for you to join the
Illuminati by becoming part of its
machinery for world control.
Take it: If you refuse to be subservient to anyone, then there’s
only one way for you to join, you
must grab it! You must force your way
into the Illuminati join now or reply us back on whatsapp on +23408156703783 email clarkilluminati011@gmail.com
CALL DR EBHOTA OR WHATSAPP HIM; +2349035324155 or email worldilluminati468@gmail.com,To join illuminati fore money powers protection in life & again we grow all new member up to a higher level and back them up with riches powers and protections, that we popular and famous,with in five days after the due consultation his been taking place; we give out $900,000 million USD dollars to each and each person that participate on the consultation to make them a new member,and you we be well pay every two weeks for over a year and five months,before it we later Base on every month,is all (+2349035324155) Contact Dr Ebhota To JOIN ILLUMINATI FOR WEALTH POWERS AND PROTECTIONS, AGAIN YOU MUST BE ABOVE 20 YEARS OF AGE,IN OTHER TO MAKE YOU A NEW MEMBER
ReplyDeleteI Never believed my life could change in such a manner, I was initiated into illuminati by Mr Richard Fred, which I got from someone, indeed the Great illuminati Brotherhood exists, am a living witness, i never believed until I got initiated into the great illuminati brotherhood. It was like a dream to me and also I was given a choice of a house with nice cars. I urge you brother and sisters to contact this number either through WhatsApp to be a member of the great brotherhood of illuminati and enjoy all the benefits attached. Whatsapp +2348138516093 Or give him a call. There is no human sacrifice and there are no side effects. You will live a better life with your family. Email.. illuminatisociety579@gmail.com
ReplyDelete