
This is the first time I used a pattern that I actually hadn't drafted completely by myself. I'm used to using the same pattern all over again and again because it's easy to change the pattern that already fits you so well. Anyhow, this time I used an already existing pattern from the book Fashion - A History from the 18th century to the 20th century - Volume I (see p. 126).
Since the pattern was in small scale, I scanned it first and then scaled it up to right size on computer. I was happy to notice the ratio between waist measurement and bust measurement was already right. So I printed the pattern out. However, I was not surprised to find out that the distance between bust level and waist level was too long for me. So I had to shorten the stays as well. I did it on computer and printed the pattern out again. Of course, shortening the whole pattern means that everything gets shortened lengthwise, including tabs and shoulder straps. So I had to redraw those parts back to the right size.
At first I thought I'd finally try out flat reed as boning material. But after finding out it was nowhere to be found in town, I was too eager to start making the stays so I gave up the idea of ordering it online. Besides, I still wanted to work from stash, not buying more materials if I already had something that could be used. So eventually I decided t go with cable ties as usual. The situation was pretty much the same with other materials as well. I had just enough brown cotton twill left from an earlier pair of brown stays from last year so I didn't buy any new fabric either.
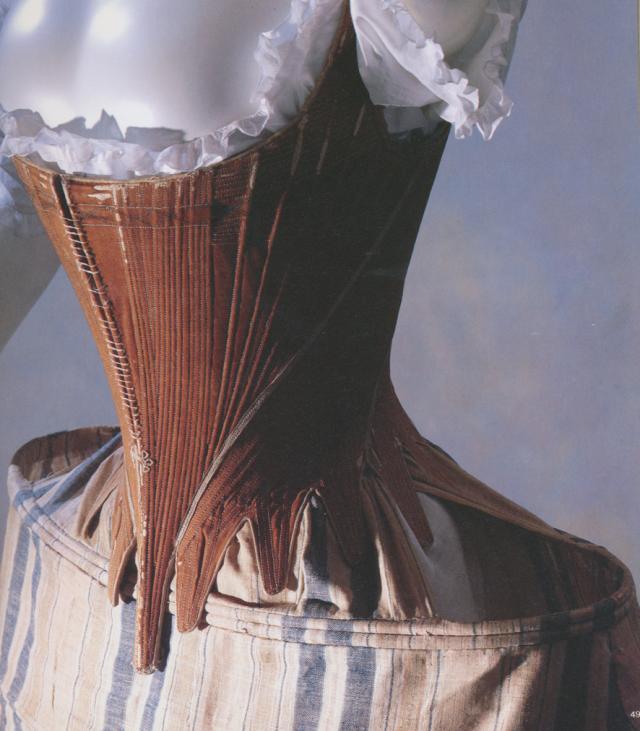
As you'll be able tell from the photos, the bones of my stays aren't as narrow as the bones in the original. The original has got really narrow bones and there are lots of them. I guess the narrowest bones must be around 2 mm. But I did follow the boning pattern as precisely as I could with the 5 mm wide bones. I ended up using 148 bones while, according to the book, the original has got 162 bones.
Another thing you'll be able to tell from the photos is that I didn't follow the original that precisely at some other parts either. What's really the most important thing for me is that the shape of these stays is as close to the original as possible. Naturally, the resulting shape on my body can't be exactly the same as the shape that the original stays would have given to the owner, but I guess it's still pretty close, given the fact that I didn't have to change the pattern in any other part than in the length of the side.

What's so different then, compared to my earlier 1780's stays? Well, the first photo shows quite well how wide these stays are at the front. I would almost think that the front panels should be slightly narrower because it kind of feels like the stays don't fit perfectly over the breast area. But then again, looking at the extant stays from the 1780's, many of them have really wide front panels. And I don't think it's because the ladies were really busty. The fashionable pigeon breast look is probably mostly created with the help of huge neckerchiefs but the stays really are the base of that figure. So, with the wide front panels the bust gets really bowed out. The shoulders get also pushed towards the back, so that the bust gets even more accentuated.
According to The History of Underclothes by C. Willett and Phillis Cunnington, the discomfort of the fashionable corset in 1779 may be gathered from the Sylph, a novel by Georgiana, Duchess of Devonshire: ... Then, they [the stays] are so intolerably wide across the breast that my arms are absolutely sore with them; and my sides so pinched! (p. 87) The Sylph is actually available on Google books and you can read it here. Check out page 69 for the whole paragraph in particular.


The neckline of the shift isn't actually quite wide enough for these stays.

Because of the white 5 mm tape over the seams and the amount of lacing holes (78) to be bound by hand with thread, it actually took me longer to finish this pair of stays than it normally takes me.

When the stays are laid on floor you get to see how wide the front panels really are.

Still doing this the wrong way... The lining went first and the stays were bound after that. I had only a few pieces of linen in the stash so every panel is lined with separate pieces, which is not the historically correct way either.

Sources:
Corset c. 1760-1770 from KCI Digital Archives
Another view of the same corset via Dreamstress
Third view of the corset via Les Fées Tisseuses
Fashion - A History from the 18th century to the 20th century - Volume I
The History of Underclothes by C. Willett and Phillis Cunnington
For the end of this post, here's a promise: Next garment I'll sew will be something else than underwear...
It's so beautiful and I like the thorough description of the sewing process and fitting. As stays are the foundation of historical garments they are so very important and there never can be too many blogposts about them!
ReplyDeleteThank you for sharing,
Sabine
Thank you! :) I couldn't agree with you more! I really enjoy making the undergarments. Maybe even more than making of those things that go on top of them...
DeleteFantastic!!! These are my favorite of yours!
ReplyDeleteThank you! :) So are they my favorite, too. I definitely like the shape they give, even if this isn't the most comfortable pair of stays I've made.
DeleteAbsolutely lovely!!!
ReplyDeleteThank you! :)
DeleteWow! It's so beautiful!!!
ReplyDeleteLovely! What did you use to bind your edges?
ReplyDeleteBest,
Quinn
Thank you! :) I simply used bias binding tape.
DeleteNot tired of it! These are AMAZING and look like they fit really well.
ReplyDeleteThank you! I'm certainly not tired of making these either... There are so many other extant stays that I'd like to try out but I really am going to make some outer garments now!
DeleteWhat an amazing silhouette ! Beautifull ! Am very curious to see it under a gown.
ReplyDeleteThank you! I'm really happy with the silhouette, too. :) You won't have to wait for that for long because I'm already working on something that goes on top of these stays!
DeleteI agree with Augustinytär, these are your most gorgeous! And I agree with you, making stays are fun!
ReplyDeleteThank you! I'm not so sure about the making part but finishing and wearing the stays you made yourself is so much fun. Stitching the endless rows of boning channels kind of isn't ;)
Deleteoh WOW. This is stunning...I'd never want to put a gown on over it! Definitely don't stop sharing, it's really inspiring to see how much work you put into making them correctly!
ReplyDeleteThank you! Can I be a daring tavern wench next time and wear nothing on top of these? ;)
DeleteSwoon! Just when I thought you had made the prettiest stays yet, you throw in another pair, even more gorgeous than the last! Seriously, if you ever feel like giving a course on stay-making, let me know. I could really use some expert advice because my stays always turn out not quite the thing. :P
ReplyDeleteThank you! I'll keep that in mind the next time I make stays so maybe I can host a stay-along? ;) Though, your chinoiserie stays are going to be truly lovely!
DeleteThese are SO pretty!
ReplyDeleteThank you! :)
DeleteYour stays are gorgeous! I’ve nominated you for the Very Inspiring Blogger award: http://asartorialstatement.blogspot.com/2013/03/my-first-blog-award.html
ReplyDeleteThank you so much! :)
DeleteI nominated you for a Very Inspiring Blogger Award: http://demodecouture.com/2013/04/very-inspiring-blogger-award/
ReplyDeleteOoh, thank you so much! :)
DeleteI have nominated you for an inspiring blogger award
ReplyDeletewww.historyseamstress.wordpress.com
Thank you!
DeleteStunning stays . . . I don't think I've ever seen a finer example!
ReplyDeleteThank you so much! That's such a huge compliment for me :)
DeleteDear Sanna, could I use those photos in my new report about XVIII century corsets? Of course, I will check that this is your corset! :)
ReplyDeleteI'm sorry it took me a while to reply! Yes, sure, you can use any of these photos for your report. Is it on the internet? If so, then link them back to my blog or credit any way you prefer. :) I hope I'm not too late...!
Deletehi there! I have been searching and searching for the pattern for those KCI stays...I can't seem to locate any copies of that book in my local library. If there is any way you would be able to share the pattern from the book, it would be amazing...
ReplyDeleteHi! I'm sorry it took so long for me to reply! If you could give me your email address I can scan and share the pattern with you on Google Drive or just simply send it via email. :) (I have a Facebook page for Rococo Atelier so you can send me a private message there if you don't want to publish your email address here. )
Deleteमहाकालसंहिता कामकलाकाली खण्ड पटल १५ - ameya jaywant narvekar कामकलाकाल्याः प्राणायुताक्षरी मन्त्रः
ReplyDeleteओं ऐं ह्रीं श्रीं ह्रीं क्लीं हूं छूीं स्त्रीं फ्रें क्रों क्षौं आं स्फों स्वाहा कामकलाकालि, ह्रीं क्रीं ह्रीं ह्रीं ह्रीं हूं हूं ह्रीं ह्रीं ह्रीं क्रीं क्रीं क्रीं ठः ठः दक्षिणकालिके, ऐं क्रीं ह्रीं हूं स्त्री फ्रे स्त्रीं ख भद्रकालि हूं हूं फट् फट् नमः स्वाहा भद्रकालि ओं ह्रीं ह्रीं हूं हूं भगवति श्मशानकालि नरकङ्कालमालाधारिणि ह्रीं क्रीं कुणपभोजिनि फ्रें फ्रें स्वाहा श्मशानकालि क्रीं हूं ह्रीं स्त्रीं श्रीं क्लीं फट् स्वाहा कालकालि, ओं फ्रें सिद्धिकरालि ह्रीं ह्रीं हूं स्त्रीं फ्रें नमः स्वाहा गुह्यकालि, ओं ओं हूं ह्रीं फ्रें छ्रीं स्त्रीं श्रीं क्रों नमो धनकाल्यै विकरालरूपिणि धनं देहि देहि दापय दापय क्षं क्षां क्षिं क्षीं क्षं क्षं क्षं क्षं क्ष्लं क्ष क्ष क्ष क्ष क्षः क्रों क्रोः आं ह्रीं ह्रीं हूं हूं नमो नमः फट् स्वाहा धनकालिके, ओं ऐं क्लीं ह्रीं हूं सिद्धिकाल्यै नमः सिद्धिकालि, ह्रीं चण्डाट्टहासनि जगद्ग्रसनकारिणि नरमुण्डमालिनि चण्डकालिके क्लीं श्रीं हूं फ्रें स्त्रीं छ्रीं फट् फट् स्वाहा चण्डकालिके नमः कमलवासिन्यै स्वाहालक्ष्मि ओं श्रीं ह्रीं श्रीं कमले कमलालये प्रसीद प्रसीद श्रीं ह्रीं श्री महालक्ष्म्यै नमः महालक्ष्मि, ह्रीं नमो भगवति माहेश्वरि अन्नपूर्णे स्वाहा अन्नपूर्णे, ओं ह्रीं हूं उत्तिष्ठपुरुषि किं स्वपिषि भयं मे समुपस्थितं यदि शक्यमशक्यं वा क्रोधदुर्गे भगवति शमय स्वाहा हूं ह्रीं ओं, वनदुर्गे ह्रीं स्फुर स्फुर प्रस्फुर प्रस्फुर घोरघोरतरतनुरूपे चट चट प्रचट प्रचट कह कह रम रम बन्ध बन्ध घातय घातय हूं फट् विजयाघोरे, ह्रीं पद्मावति स्वाहा पद्मावति, महिषमर्दिनि स्वाहा महिषमर्दिनि, ओं दुर्गे दुर्गे रक्षिणि स्वाहा जयदुर्गे, ओं ह्रीं दुं दुर्गायै स्वाहा, ऐं ह्रीं श्रीं ओं नमो भगवत मातङ्गेश्वरि सर्वस्त्रीपुरुषवशङ्करि सर्वदुष्टमृगवशङ्करि सर्वग्रहवशङ्करि सर्वसत्त्ववशङ्कर सर्वजनमनोहरि सर्वमुखरञ्जिनि सर्वराजवशङ्करि ameya jaywant narvekar सर्वलोकममुं मे वशमानय स्वाहा, राजमातङ्ग उच्छिष्टमातङ्गिनि हूं ह्रीं ओं क्लीं स्वाहा उच्छिष्टमातङ्गि, उच्छिष्टचाण्डालिनि सुमुखि देवि महापिशाचिनि ह्रीं ठः ठः ठः उच्छिष्टचाण्डालिनि, ओं ह्रीं बगलामुखि सर्वदुष्टानां मुखं वाचं स्त म्भय जिह्वां कीलय कीलय बुद्धिं नाशय ह्रीं ओं स्वाहा बगले, ऐं श्रीं ह्रीं क्लीं धनलक्ष्मि ओं ह्रीं ऐं ह्रीं ओं सरस्वत्यै नमः सरस्वति, आ ह्रीं हूं भुवनेश्वरि, ओं ह्रीं श्रीं हूं क्लीं आं अश्वारूढायै फट् फट् स्वाहा अश्वारूढे, ओं ऐं ह्रीं नित्यक्लिन्ने मदद्रवे ऐं ह्रीं स्वाहा नित्यक्लिन्ने । स्त्रीं क्षमकलह्रहसयूं.... (बालाकूट)... (बगलाकूट )... ( त्वरिताकूट) जय भैरवि श्रीं ह्रीं ऐं ब्लूं ग्लौः अं आं इं राजदेवि राजलक्ष्मि ग्लं ग्लां ग्लिं ग्लीं ग्लुं ग्लूं ग्लं ग्लं ग्लू ग्लें ग्लैं ग्लों ग्लौं ग्ल: क्लीं श्रीं श्रीं ऐं ह्रीं क्लीं पौं राजराजेश्वरि ज्वल ज्वल शूलिनि दुष्टग्रहं ग्रस स्वाहा शूलिनि, ह्रीं महाचण्डयोगेश्वरि श्रीं श्रीं श्रीं फट् फट् फट् फट् फट् जय महाचण्ड- योगेश्वरि, श्रीं ह्रीं क्लीं प्लूं ऐं ह्रीं क्लीं पौं क्षीं क्लीं सिद्धिलक्ष्म्यै नमः क्लीं पौं ह्रीं ऐं राज्यसिद्धिलक्ष्मि ओं क्रः हूं आं क्रों स्त्रीं हूं क्षौं ह्रां फट्... ( त्वरिताकूट )... (नक्षत्र- कूट )... सकहलमक्षखवूं ... ( ग्रहकूट )... म्लकहक्षरस्त्री... (काम्यकूट)... यम्लवी... (पार्श्वकूट)... (कामकूट)... ग्लक्षकमहव्यऊं हहव्यकऊं मफ़लहलहखफूं म्लव्य्रवऊं.... (शङ्खकूट )... म्लक्षकसहहूं क्षम्लब्रसहस्हक्षक्लस्त्रीं रक्षलहमसहकब्रूं... (मत्स्यकूट ).... (त्रिशूलकूट)... झसखग्रमऊ हृक्ष्मली ह्रीं ह्रीं हूं क्लीं स्त्रीं ऐं क्रौं छ्री फ्रें क्रीं ग्लक्षक- महव्यऊ हूं अघोरे सिद्धिं मे देहि दापय स्वाअघोरे, ओं नमश्चा ameya jaywant narvekar