Friday, March 1, 2013

Brown KCI stays

I don't know if you guys are starting to get tired of me posting about underwear but here's one more post about stays. I know a lot of people don't like making stays but the reason why I have sewed so many of them during the past year or so is that it's actually really fun to try out different kinds of patterns and to see the result in how changes in the pattern change the shape of your body. I've been pretty quiet about this project and the reason why I never wrote about it on the blog was simple. I've made so many posts about stays lately so I felt like there's no need to post photos of the stays during construction because I've already showed you most of my common construction techniques. Apart from the construction techniques, I have quite a few thoughts on this pair of stays so I'm going to skip most of the usual parts and write a sort of review of the stays and it's pattern itself.

This is the first time I used a pattern that I actually hadn't drafted completely by myself. I'm used to using the same pattern all over again and again because it's easy to change the pattern that already fits you so well. Anyhow, this time I used an already existing pattern from the book Fashion - A History from the 18th century to the 20th century - Volume I (see p. 126).

Since the pattern was in small scale, I scanned it first and then scaled it up to right size on computer. I was happy to notice the ratio between waist measurement and bust measurement was already right. So I printed the pattern out. However, I was not surprised to find out that the distance between bust level and waist level was too long for me. So I had to shorten the stays as well. I did it on computer and printed the pattern out again. Of course, shortening the whole pattern means that everything gets shortened lengthwise, including tabs and shoulder straps. So I had to redraw those parts back to the right size.

At first I thought I'd finally try out flat reed as boning material. But after finding out it was nowhere to be found in town, I was too eager to start making the stays so I gave up the idea of ordering it online. Besides, I still wanted to work from stash, not buying more materials if I already had something that could be used. So eventually I decided t go with cable ties as usual. The situation was pretty much the same with other materials as well. I had just enough brown cotton twill left from an earlier pair of brown stays from last year so I didn't buy any new fabric either.

As you'll be able tell from the photos, the bones of my stays aren't as narrow as the bones in the original. The original has got really narrow bones and there are lots of them. I guess the narrowest bones must be around 2 mm. But I did follow the boning pattern as precisely as I could with the 5 mm wide bones. I ended up using 148 bones while, according to the book, the original has got 162 bones.

Another thing you'll be able to tell from the photos is that I didn't follow the original that precisely at some other parts either. What's really the most important thing for me is that the shape of these stays is as close to the original as possible. Naturally, the resulting shape on my body can't be exactly the same as the shape that the original stays would have given to the owner, but I guess it's still pretty close, given the fact that I didn't have to change the pattern in any other part than in the length of the side.


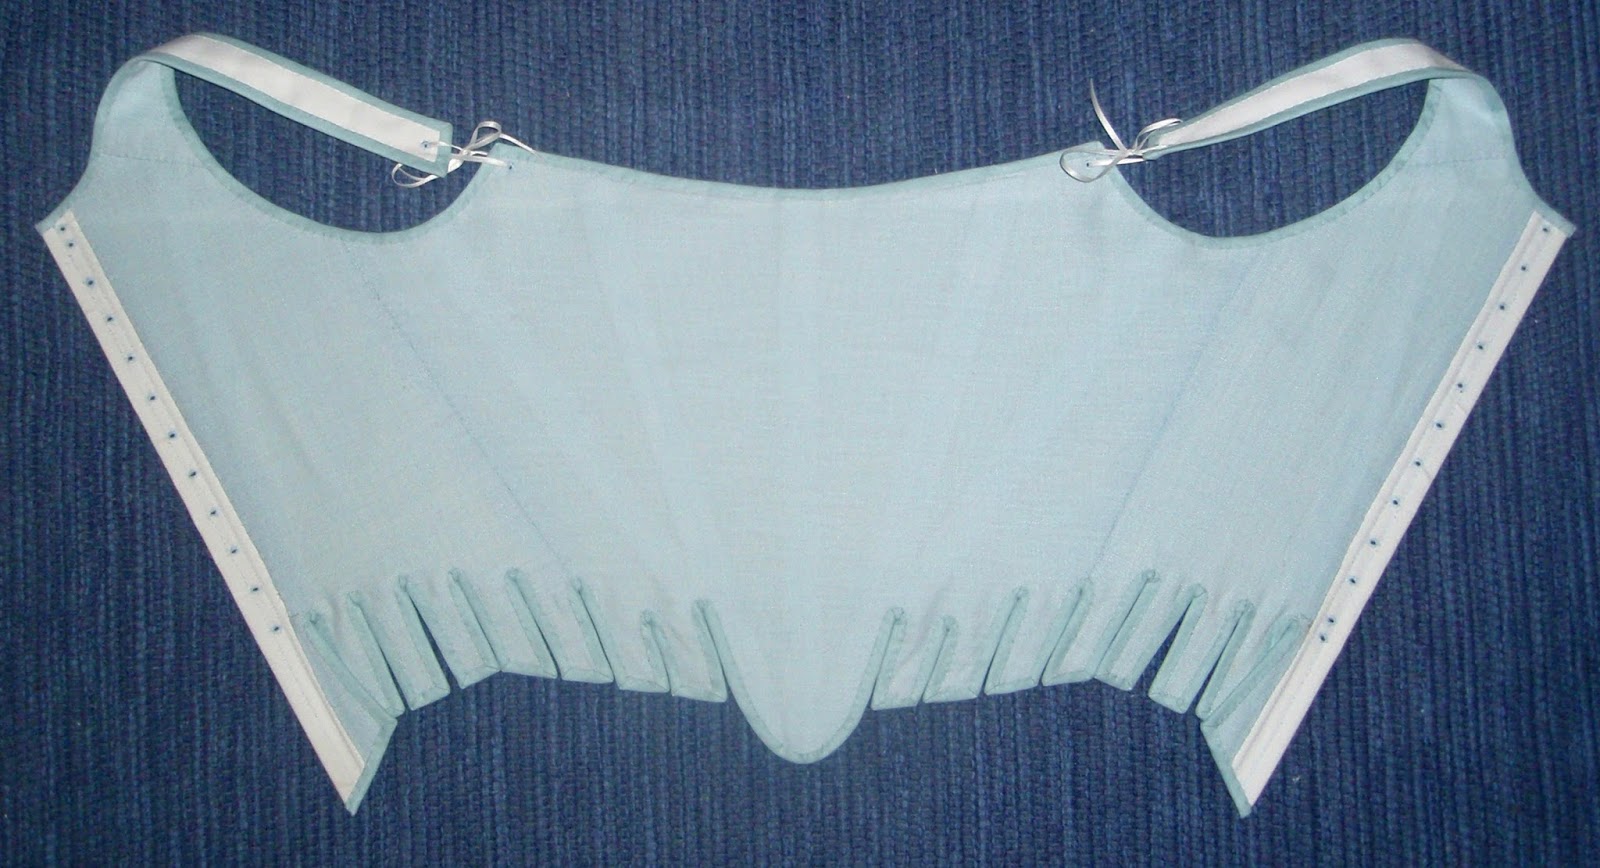
What's so different then, compared to my earlier 1780's stays? Well, the first photo shows quite well how wide these stays are at the front. I would almost think that the front panels should be slightly narrower because it kind of feels like the stays don't fit perfectly over the breast area. But then again, looking at the extant stays from the 1780's, many of them have really wide front panels. And I don't think it's because the ladies were really busty. The fashionable pigeon breast look is probably mostly created with the help of huge neckerchiefs but the stays really are the base of that figure. So, with the wide front panels the bust gets really bowed out. The shoulders get also pushed towards the back, so that the bust gets even more accentuated.

According to The History of Underclothes by C. Willett and Phillis Cunnington, the discomfort of the fashionable corset in 1779 may be gathered from the Sylph, a novel by Georgiana, Duchess of Devonshire: ... Then, they [the stays] are so intolerably wide across the breast that my arms are absolutely sore with them; and my sides so pinched! (p. 87) The Sylph is actually available on Google books and you can read it here. Check out page 69 for the whole paragraph in particular.


The neckline of the shift isn't actually quite wide enough for these stays.


Because of the white 5 mm tape over the seams and the amount of lacing holes (78)  to be bound by hand with thread, it actually took me longer to finish this pair of stays than it normally takes me.


When the stays are laid on floor you get to see how wide the front panels really are.


Still doing this the wrong way... The lining went first and the stays were bound after that. I had only a few pieces of linen in the stash so every panel is lined with separate pieces, which is not the historically correct way either.


Sources:

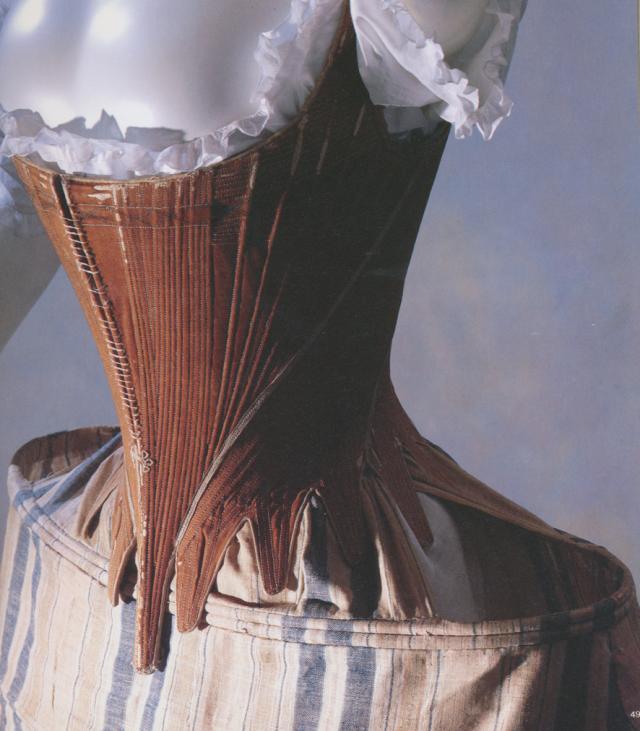
Corset c. 1760-1770 from KCI Digital Archives
Another view of the same corset via Dreamstress
Third view of the corset via Les Fées Tisseuses
Fashion - A History from the 18th century to the 20th century - Volume I 
The History of Underclothes by C. Willett and Phillis Cunnington

For the end of this post, here's a promise: Next garment I'll sew will be something else than underwear...

Sunday, January 20, 2013

Pocket hoops and petticoats for 1760's and 1770's

When it comes to costume making, it's been really quiet over here for the last couple of months. To be honest, I've lost motivation for creating anything but I tend to have these periods every now and then and they usually pass in some time so no worries, I'm just about to get back to sewing any time soon. Plans and patterns have been made but nothing much else, except for a ruffly cap.  I also never got around to post pictures of my new pocket hoops and petticoats as promised after taking quick photos of them in December so I thought to post them up now - maybe blogging will give me the little boost of inspiration that I need to get back on sewing.

So, here we have the pocket hoops. I actually had pocket hoops before these, too, but since they were made a long time ago as I was just starting with 18th century and sewing in general, the pockets were terrible: they would clung to my thighs and were made out of a too sheer fabric which caused the ends of the hoop steel to tear the fabric even if I had rounded the edges. As you can imagine, they were really uncomfortable. Anyway, these are the new pocket hoops. 


 And then, the first petticoat. It turned out to be shorter than I intended but it does the job so I don't mind.


And second petticoat which was made a year ago from an earlier garment... It seems the beginning of this post is almost a repetition from the post linked. I didn't remember I had just the same motivation issue in January 2012...


And the next one would be the actual petticoat. I really like the width of these pocket hoops and the voluminousness they give to the petticoats. 

Tuesday, November 13, 2012

Completed 1760's stays

The 1760's stays were completed two weeks ago and now I finally got around to post them here on the blog. This project actually started out as I wanted to try out how fast I could make a pair of fully-boned stays. It took me two weeks to about 10 days to sew this pair which is my quickest so far. Though, I must admit I could have finished them in about half of that time or even less because I honestly couldn't help myself getting distracted by the internet. (There are so many lovely costume making blogs out there!) This pair is made out of two layers of cotton and lined in linen and all of the materials came from my stash , except the bias binding. 


Compared to the 1780's stays, these stays give you a much more straight profile at the front.


For the first time in long time I felt confident enough to bind the lacing holes by hand because I was sure of how the holes should be placed.


On the inside the seam allowances were whip-stitched down by hand.


I guess I'm starting to get used to binding the edges of stays as it's not as hard as it used to be. If you want your stays to be bound beautifully, I definitely recommend that your binding shouldn't be seen on the outside for more than 5 mm and that you start to bind the stays from the inside so you can control how it looks on the outside more easily.  Also, the narrower and the stretchier your binding tape is, the easier it is to attach to the stays without any problems. Besides, from what I've seen, I've noticed that the extant stays are mostly bound with really narrow tapes anyhow. I agree with Isis pointing out that most of the extant stays also seem to be square at the end of the tabs, rather than rounded. As said before, the square ends are much easier to bind than the rounded. I've noticed that really narrow tabs are also extremely hard to bind as well.


I lined the stays first before adding the binding around the edges. I just kind of prefer the neat, finished look of doing it this way. Plus, you don't have to bind every tab separately.


Now I'm finally starting to feel confident enough to make a pair of hand-sewn stays, hopefully in not-too-distant future... It has always felt like such a waste of time to me to sew stays by hand because I would end up disliking them anyway as I knew I didn't know enough to make a really good pair... Anyhow, the next post is going to be about other undergarments I made for 1760's costumes.

Wednesday, October 24, 2012

Fully-boned 1760's stays in progress

Here we go again. I might have said I've had enough of stays for this year but now I've been making new stays for mid-18th century costumes. I based the pattern on the oldest pair of existing stays in Finland and you can see them here. The original is made out of 8 panels of pale brown linen (plus shoulder straps) and the 5mm wide boning channels are stitched in blue silk thread. With two small black-and-white photos of the stays in Dress of Gentlewomen in Finland in the 18th century by Riitta Pylkkänen and the one blurry photo from the web, it was a bit hard to imitate the boning pattern precisely. However, it's quite close to Garsault's  fully-boned stay pattern featured (for example) in The cut of women's clothes by Norah Waugh.

As usual, I mix both modern and period methods for construction. First, after cutting all the pieces, I stitched all the boning channels by machine.


Then I sewed the panels together.


And then inserted the bones (cable ties) into the channels. There are 140 bones altogether.


More w.i.p. photos coming later on as I progress... :)

Thursday, October 18, 2012

The Versatile Blog Award and a short sewing hiatus

Just to let you know, I'm not sewing at the moment. Our bedroom is currently under renovation, which means that all of my sewing supplies have been removed from the sewing corner for a while. I really hope we'll be done with the renovation before the end of the week because I'm still very inspired by the last event and would love to start making some new things for my 18th century wardrobe. As I haven't been able to sew, I have been drafting some patterns. For example, I just finished patterns for a 1760's fully-boned stays and for another 1780's robe à l'anglaise for a friend.

About a week ago I was happy to notice that sew18thcentury.com nominated me with the Versatile Blogger Award. I really wasn't expecting to receive another award in such a short while after the Liebster Blog nomination. Anyhow, I'm very honored to receive another one and very happy to hear someone would find my blog worthy of this award.
Accepting this honor means I need to:

1) Thank and link back to the person who nominated you.
2) Paste the award to my blog.
3) Tell 7 thing about myself.
4) Nominate 15 other blogs.

And now, seven things about me. I'll try to keep them sewing-related...

1)  As kids, my friend and I drew a pirate comic and we wanted to know more about the Golden Age of Piracy. I was more into naval history than fashion history back then. As time passed I got more and more into historical clothing and finally started sewing historical costumes at the age of 15. My first dress turned all alright for something that's your first piece of clothing that you have ever sewed but it was far from being a real 18th century costume. 

2) I sewed my first 18th century corset about half a year after starting sewing. It was an awful thing but the fit was surprisingly good... for someone who has sewed only one garment before.

3) The first fashion history book I borrowed from the library was The Chronicle of Western Costume by John Peacock. Browsing through all the periods, I found 18th century the most appealing.

4) At first when seeing Sofia Coppola's Marie Antoinette in the movies I did not like it. Later on I started enjoying the movie because of the costumes and music. (I can't get enough of that soundtrack.) Nowadays Marie Antoinette is still one of my favorite 18th century movies even if you can easily tell some costumes are quite far from being historically accurate. 

5) My purple robe à la polonaise was the first costume that I was truly happy with. Though, it no longer fits... *sigh* 

6) Sewing 21st century clothing is mostly boring to me. I have sewn many modern garments as I took my studies in modern dressmaking but I still prefer to sew historical costumes. I secretly weep in my mind every time I have to replace zippers or shorten jeans. 

7) I probably spend more money on my costumes than on my everyday clothing. I rarely buy new clothing and I'm not interested in shopping anyway. Fabric shopping is another story, though! ;)

I'd like to nominate the following blogs...

Thursday, October 4, 2012

1780's striped robe à l'anglaise at Kuninkaan päivä

This post is mostly about photos of the gown because I already explained the construction and other detailed stuff about it in the earlier post. For once I got some pretty nice photos of the outfit from the day, which was really great because usually I end up having only a couple of blurry photos as I get back home from events and I really don't feel like posting those on the blog.

Photo: Mika Seidler

The next few shots were taken during the 18th century fashion show...

Photo: Teemu Laukkarinen

You can see the front quite well in the picture below. The zone front with tabs was inspired by the striped robe à l'anglaise at Met.


Photo: Teemu Laukkarinen

I didn't wear many accessories with the gown. I really wanted to have a red ribbon round my neck but unfortunately I left it at home or lost it at the dressing room, which wouldn't be a surprise as the dressing room was so full of everyone's costume parts and other things.

I was moving so some parts are a bit blurry...

Photo: Mika Seidler

I definitely should have had a huge and poofy neckerchief to complete the pigeon profile but I'll make one some other time. I'm thinking about something with ruffles like the neckerchief on the Met gown...

Photo: Teemu Laukkarinen

After the show...

Photo: Mika Seidler

Then I went out for a short stroll because it got really hot inside after the show. Thanks to Mika Seidler I also got some photos of the dress outdoors. First off, here are a couple of shots I took from outdoors. The only decent photos I got from the event anyway... Below, musketeers with mamaselli Tirpukka (from Tirbuck) and Gouvernante Astrid (from Pohjan sodasta Suomen sotaan - elämää 1700-luvulla) wearing an early 18th century mantua with fontange headdress.


Katariina Augustintytär (from Before the Automobile), wearing her beautiful riding habit. It was so nice to meet her again. 


And then, some more shots of my striped robe à l'anglaise...


The huge bum pad gives the dress a very nice swayback profile at the back.


The hem is trailing...


The hedgehog hairstyle is all my own hair. Credits to baroness von Mannheim (from Couture Mayah) who made my hair look good and thanks to her I also learned how to do this hairdo on my own.


For the evening I wore the dress with white petticoat with small stripes, added a few feathers to my hair and tied a belt with buckle round my waist. As you can see, the attempt to lift the train with strings failed because the hem is so long. However, I'll fix that with a third string and loop.

Photo: Jarno Manninen
Final thoughts:

Overall, I'm happy with this dress and it has to be my favorite from my own gowns so far. However, looking back at the photos of the original gown I realize there are many differences between the original(s) and my dress. The differences don't bother me but I'd still like to point some of them out. Firstly, the stripes of the original dress are probably a couple of millimeters wider than the stripes of my dress which are about 1 cm wide.

Photo by Rebecca Thelin, via Flickr.

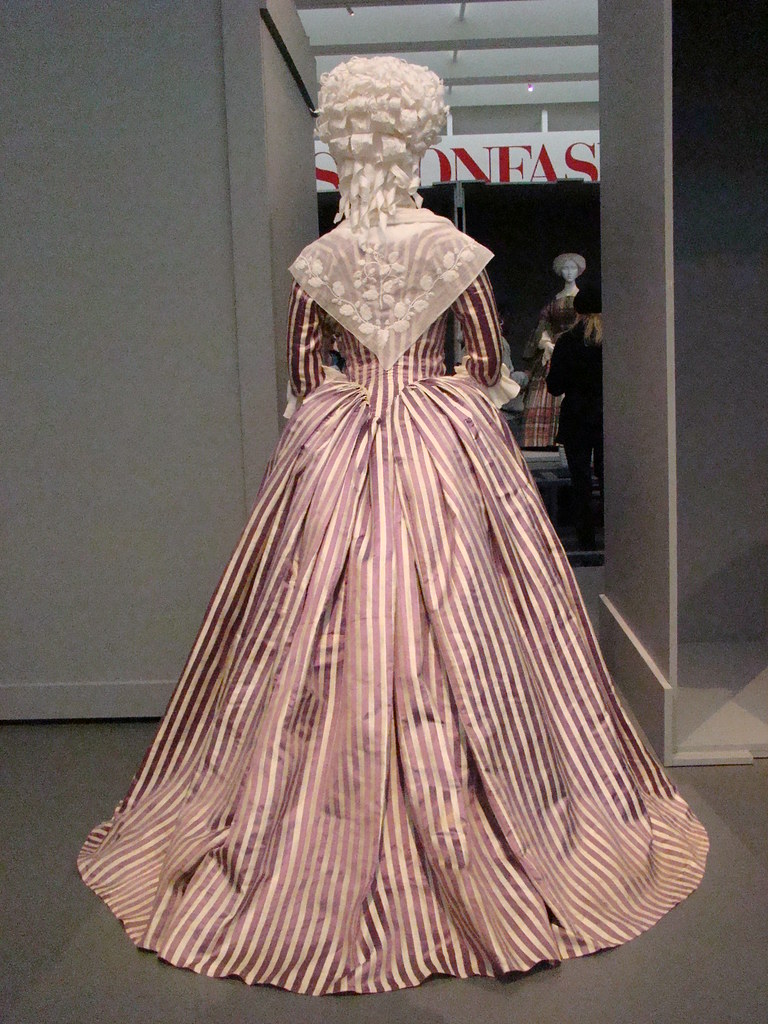
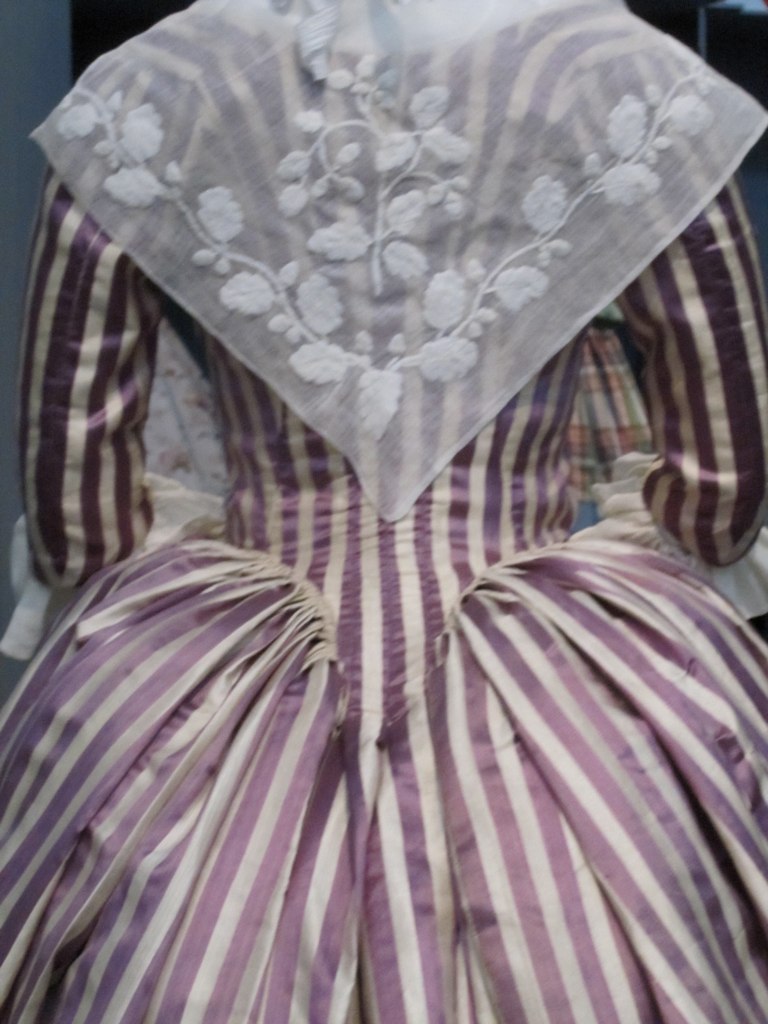
The purple stripe color is definitely of different shade. The purple of the museum dress seems more reddish than the stripe color of my gown which is a purple much more towards blue. It's really hard to tell what kind of purple the original is because it's quite different in different photos I've seen of it. When it comes to colors of photos, so much depends on several things, such as the lighting of the surroundings. And I assume some of the photos are probably edited - for example, take this photo and compare with this.

Photo by Loren Dearborn, via Flickr.

Also, the back side of my dress is quite different from the original. Firstly, the stripes form a slightly different pattern. In order to imitate the pattern of the original I probably should have draped the gown. However, I don't have a dress dummy so I couldn't do that. Secondly, I now realize the curve of the waistline at the back of the dress is much more radical in the original dress, whereas my dress has a more smooth line there. Also, the pleats at the waist are probably even tinier than the pleats of my gown.

Photo via Flickr.

There are probably a lot more differences but I'm not so keen on listing everything here. These were just the obvious ones. Again, I'm not so bothered by them anyway. :) What I'm still slightly bothered about is that the dress doesn't fit perfectly next to the armscye at the backside. It still wrinkles for a bit even if I tried to alter the fit during the mock-up fitting and bodice fitting. I suppose there's still some extra space at the armscye and that I'll have to pinch in a little at the armscye where the wrinkles appear before I make a new dress with the pattern. Or lower the armscye for a bit. Or do both. You'll hear more about it some time in the future. Until then...

Sources:

Fashioning Fashion, European fashion in detail, 1700-1915 by Sharon Takeda, Kay Spilker and Kimberly Chrisman-Cambell
Fashioning Fashion exhibit video
Fashioning Fashion exhibit virtual panorama
Fashioning Fashion exhibit photos by Loren Dearborn
Fashioning Fashion exhibit photos by Rebecca Thelin
Robe à l'anglaise (LACMA) photo I from Fashion is poison blog

Other striped gowns:


Thanks to everyone who allowed me to post their photos on the blog! I'm ever so grateful! :) Special thanks to Maria Nordback for arranging the Kuninkaan päivä event and to baron and baroness von Mannheim for hosting me during the weekend.