Saturday, August 18, 2012

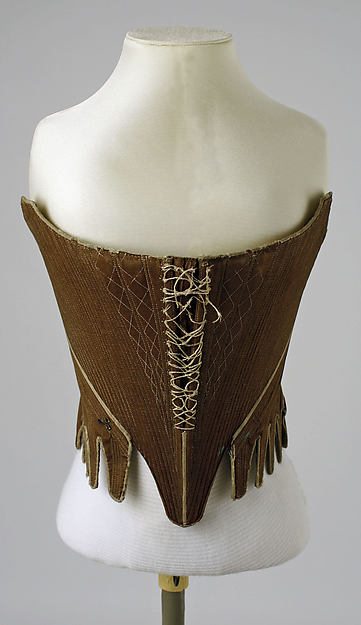
Finished dark brown stays!

So, I'm finished with the dark brown stays! I added the very last linen lining panel to them yesterday but we already took some pictures of the stays a couple of days ago. I've basically said everything I wanted to say about these stays in earlier posts so now it's just time for the photos. :)


In case you're wondering, the materials used were: dark brown cotton twill for the outer layers, linen for the inner layers and for the lining, white cotton twill tape for binding and 5 mm cable ties for boning. Also, there are four 7mm metal bones altogether, two in the front and two in the back.


By the way, these tabs were actually much more easier to bind than the more rounded ones, at least to me. I used twill tape for my stays for the first time and the binding part wasn't as hard as it has been before.


The edges of the back panels won't close as closely as they used to. After adding the lining the stays wouldn't stretch as much as before. Or then I just gained a little weight during the summer, which is very probable as well. Anyhow, I'm just happy the gap is even.


As you can see in the photo below, the stays won't lie completely flat on the floor.


I'm so relieved to have finished these stays, even if stays in general are lot of fun for me. It's just that I haven't had much time to sew anything else than stays this year. So I'm very excited to finally get started with some dresses very soon!

Friday, June 29, 2012

Fitting the dark brown stays + updates

My friend came over yesterday and she helped me to take better photos of my earlier 1780's stays. Check them out here! I've now sewn the pieces of the new stays together and I got to try them on a couple of days ago. This was the result:


I had made the the front too small and there wasn't enough space for bust. The figure was all too flat when the stays were laced completely. So, I opened the lacing leaving a gap at the upper edge of the center front, as seen in the picture, to achieve the right shape. I was considering for a while whether I would just always wear them like this or if I should make new front pieces. Also, I was getting a bit frustrated because of so much tweaking on stays and felt like I should just go with the earlier pair of 1780's stays and give up with the new ones. But, in the end, realizing that the eyelets weren't positioned right either - the front pieces wouldn't meet evenly - I pulled myself together and decided to sew new front pieces. The pattern needed a little reconsidering. In the picture below, you can see a sketch of the original shape of the centre front piece. There were two options how I could give more space to the bust: you could curve out the line at the side or at the front. I chose the option I because I had lacing at the front and it could cause some problems if the centre front wasn't straight. I also needed a little more space at the armpit so the option I also allowed me to add space there at the same time.


So, I took the old front pieces away, sewed up the new front pieces and I got to try the stays on again yesterday. This time, it was a success.


I had made the tabs a little longer than in my earlier stays. It turned out to be a good idea, accompanied the curvy lines of the pattern, the tabs flare out very beautifully! Also, I gave the tabs more tooth-like shape like in many of the 1780's stays so I suppose they'll be also easier to bind.


Now the shape is finally what I was going for. The top edge curves up radically and supports the bust area from the sides and holds it in place preventing the breasts from flattening and sliding towards the sides.


I'm really fond of the back side. The boning structure emphasizes the waist and the conical shape of the stays. You can also see the effect of the curvy seams of the back side panels: the stays follow the lines of the back very nicely.


I'm happy I had the patience to go on with these stays and not to give up with them. I've learned a lot during the process of fitting and pattern making of these stays and I really hope this post helps others who are pondering the same things I did. :) Hopefully next time as I'm posting I'll be able to show you pictures of the finished stays. We'll see about it later on!

Friday, June 15, 2012

Dark brown 1780's stays in progress + graduation

In the last post I told you that I would make another pair of 1780's because I wasn't perfectly happy with the last ones - the fit was really good but the shape, however, wasn't. So, I started drawing a new pattern in the beginning of May but I had to put it aside because there was only a month to my graduation and I had a lot of stuff to finish for school. The month was really crazy and I got really stressed about having far too much to do so I didn't have any time nor energy to sew at home at all. But now I'm happy to say I finished everything in time and graduated! Currently, I call myself to be on vacation, even if I'm, in fact, just unemployed. I do think I deserve to rest and to the things I love for a while, though, and now I'm not planning to start looking for a job before August. There's not much interesting to say about my graduation, except that my mom gave me a new sewing machine as a graduation gift and I received this awesome congratulations card from a very dear friend of mine.


Isn't that just pretty? I think it's also really funny she drew the graduation hat on the top of her hair! And the card glitters! :D Now it has got a special place on my sewing table.

Alright, back to sewing progress... I've now cut the pieces for the new stays and sewn all the channels for bones, here's a picture of how it looks at the moment:


I chose dark brown cotton twill for the outer fabric because many 1780's stays found in museums are brown - all shades of beige and brown seem to have been really popular during the decade. I debated whether it would be a good idea to use such a dark color because one of the dresses I'm going to make to be worn on the stays is going to be very light in color, but as I couldn't find any good beige fabric the decision was easy in the end.  To achieve that curved profile I'm going for, I added more curve to the front, back and back side panels. I'm really excited to see how it looks on the first fitting which I hope I'll be able to do in some the next few days. Things will be much easier for me now because the stays will be laced in the front as well as in the back. The pattern is, once again, my own, based on a few examples in museum collections and books. As usual, I will use cable ties for boning but also four metal bones, two for the centre front and two for the centre back.

Tuesday, May 8, 2012

1780's stays - finally finished (Updated!)

So I finally finished my new 1780's stays. At first I stated sewing these like crazy but I don't know why I got so lazy by the time I had added the first two panels of the lining so that it took me a couple of months to add the rest. 


And some new photos of the stays when worn.


Now the back lacing closes completely again but it's really comfortable with about 2-3 cm gap between the back edges.


Each tab was lined separately and the rest of the panels were added after that.


I'm quite happy with the binding. It has got visible stitches on the right side even if you can't tell from the photo below. Though I think a narrower part of the binding tape should be seen on the right side. The tape  is also double fold bias tape because I couldn't find twill tape earlier. Later on, after I had already added the binding to these stays I found some twill tape that will be used for the next stays. 


Now I kind of feel like making yet another pair of stays. The shape isn't as curved as I wished it was and I want to use that twill tape I've got now. Also, I'm thinking about covering those metal eyelets with thread so that it would look more accurate or even try to find some metal rings of which I was talking about in an earlier post. And front lacing would also probably be more practical... I haven't been able to sew much lately and won't be at least for a month anyway because I'm just about to graduate in the beginning of June and I'm really busy finishing some stuff for school at the moment. So don't expect to hear much from me until then.

Monday, April 2, 2012

IMATEX is working again

It's been a while since my last post on the stays. I actually sewed the binding already a long time ago but now I've got two panels of the lining left to sew to the underside of the stays and then I'll be finished. I hope to do it next weekend, if not earlier. Anyhow, I thought I should write a post about IMATEX here because I just noticed it's working again! I don't know if it has been for some time already or if you all have noticed it before but here's a link to the page. It's great the English search actually works as well!


If you get on the login page at first, click on the accedir com usuari extern and change the language into English on the lower left corner of the page. After that, click on the Imatex link on the left and search link will appear underneath. On the search options I've chosen "Thesaurus" and searched with the word "18th century" for most records of the period. If you're not so particularly interested in pieces of fabrics, you can simply go to page about 50 and you'll find pictures of whole outfits and garments there. The search is a bit slow, actually, but what's great is that the zoom is really great bacause you can take a very close look at the garments.

Happy searching! 

Monday, March 5, 2012

Another pair of stays in progress

In an earlier post I mentioned that I had already picked another pattern for my own 1780s stays and now I've started to work on the second pair to which I'm going to make all the cahnges needed. I already had a pair of stays which fitted me quite well but those had unfortunately began to look really worn so I drafted a new pattern from the old pattern. I didn't base the pattern on any stays in particular but on several 1780s stays on the internet. The stays probably look the most like this pair:

Stays ca. 1780 from the MET
I realized I had never posted pictures of my old stays on this blog so here's the pair I was talking about above. I wish they still looked as good as they used to... This was a surprisingly well fitting pair of stays, actually, because I couldn't do the fittings that well when I made these two years ago.The only problem was that they pushed my waist down because I have a short back so they were a bit uncomfortable.


I managed to put the new stays together really quickly and I had the chance to try them on on Friday. This was the result:


Due to the stretching of the fabric, they were slightly too big and the edges met in the back even though I had planned the usual 5cm gap when drawing the pattern. Unfortunately it seems I forgot to take photos of the back view during the first fitting.... Anyway, I removed two bones, one on each side panel (see the photo above in the middle) and took in the seams where I could. I also added more curve to the sides of the front panels to archieve a better curved figure of the 1780s. I did the second fitting today and was happy with the results, even though the gap in the back is still a bit less than 5cm.


Notice the difference in the curve, compared to the photos of the first fitting...?


This time I remembered to take pictures of the back as well. The edges don't meet perfectly evenly because I had to lace myself in the stays by myself. Next time I'll take pictures when my partner is at home so it'll be easier.

Tomorrow I'm heading off to town to get some binding tape so that I can finish these during this week. I'm on vacation so it means I have the time to make it if I just pull myself together to have the patience with it. Oh, and I'm also going to be looking for a new sewing machine. The one that I have now is a cheap one and I fear it will break down any time, which would be terrible because it's borrowed from my grandmother. I really need my own machine anyway.

P.S. You may have noticed that cat in one of the photos :) It seems there's a craze for sewing cats on costume blogs so I guess I'll have to give my two sewing cats their own post some day... Because they just love to "help" me with my sewing and always sneak into the photos... They're adorable.

Tuesday, February 28, 2012

Mitts mock-up and my little sewing corner

I started making the pattern for my mitts on Friday and sewed the mock-up yesterday and here's the result:


The thumb part ended up a bit too long but it was easy to fix. After making a couple of changes to the pattern, I began with the embroidery pattern today. However, it ended up too complicated so I need to make another one. It's not too complicated to make, really, but I want a more simple one for my first mitts. So I'm going to save the embroidery pattern for another pair that I plan to make in white some day.

The weekend was quite busy and I was happy to finally organize and clean my sewing corner that I have quite selfishly taken over in our bedroom. This is where I work at the moment:


While dreaming of my own sewing room, it's nice to have this little area for myself in our small apartment...


A new find from Saturday (above). It's really nice to have things divided into small boxes so I can easily find what I'm looking for while I'm working at the table. This isn't exactly what I was looking for but I thought I could paint and decorate it some day because I couldn't find a prettier one. I've been searching for something like this for ages so when I came across this one I simply had to get it.


Some of my history and costume books... Some borrowed, most of them my own.


A couple of stash boxes. I couldn't find space for them in the walk-in closet... And that's my old lap top on top of them, along with the black wool that I intend to use for the mitts.


I've got stash here and there, everywhere around the apartment...