Thursday, September 13, 2012

Liebster Blog Award!

I'd like to thank Angela from The Merry Dressmaker for surprising me yesterday with the Liebster Blog Award! I'm so happy to receive my very first blog award and now it's time for me to pass it on. It was so hard deciding only five favorite bloggers because there are so many awesome bloggers that I truly admire and who would definitely deserve to be presented with this award. 

Liebster Blog Award rules:

1) Add the award icon to your blog!
2) Link to your awarder to say "Thank You".
3) And most importantly, award five (5) of your favorite bloggers with less than 200 followers with the award! 

And the Liebster Blog Award goes to... 

Rebel's Haven: Vera's Costume Journal: I admire Vera's patience and determination with all of her costume making projects. Especially, I'm in awe with all the work she puts into a costume to make it perfect, down to the smallest details. 

Isis' Wardrobe: I know I'm breaking the rules here because Isis already has over 200 followers. However, it's only two followers above the limit as I'm writing this so I thought to give this award to her anyway. Her blog is so inspiring to me and she's so supportive towards others so I really think she deserves to get this award! 

Les Choses Délicates: Yet another inspiring blog with so many pretty pictures. I love all of her 18th centruy outfits, but her blue zone front gown must be one of the prettiest dresses I've ever seen! 

L'eventail, la Rose et L'Edelweiss: This is a blogger that I originally found on deviantArt. Few years ago she was one of the first 18th century costume makers that I ever stumbled upon on the net and her works have inspired me since the very beginning. 

Sweet Threads, Dude!: What can I say? This blogger simply makes awesome costumes and I really admire her accuracy with details.

For closure, I'd like to thank all of my readers for your support and especially those who constantly leave comments. I really appreciate it - it keeps me going even when I feel like giving up with my sewing and throwing the unfinished garments to dumpster! :) Well, that's all from this time! I'm making progress with the striped robe à l'anglaise so you can expect to see some W.I.P. photos very soon! 

Monday, September 10, 2012

Underwear for 1770s and 1780s

Last week was all about making underwear for the striped robe à l'anglaise. I sewed a new big bumpad, shift and an under-petticoat. My old shift was in a very bad condition and a way too loose around the arms for 1770's and 1780's sleeves so that's why I needed a new one. I've always been quite lazy about underwear because all those garments won't be seen but it was just recently when I realized that you actually need proper underwear for good costumes. I've been in a hurry because the deadline for the 1780's robe à l'anglaise is in 19 days so I just machine-sewed pretty much all the undies.

First off, the shift. Sorry for the modern underwear showing but the fabric is just so sheer I had to wear something there under for the photos for the sake of modesty. The shift pattern is based on the variation A of  chemise in Garsault's L'Art de la Lingerie, found on La couturière Parisienne.


The new bumpad. I made it a lot bigger than my earlier two bumpads. Also, there's a ruffle around the edges because I thought might give the skirts more smoother line. It works. The bumpad is cotton and stuffed with some old pillow stuffing.


The first under-petticoat. I forgot to wear stockings for the photos. It doesn't matter, though. I just wanted to see the effect of the new bumpad and petticoats.


The second under-petticoat. It's an old one, made to be worn with the smaller bumpads so the hem isn't even with the new one.


I'm actually a bit ashamed to admit that I still don't have a pair of hanging pockets after five years in this hobby. I will sew them... eventually. But now I'm off to start making the dress itself!

Tuesday, September 4, 2012

Upcoming project: Striped 1780's dress

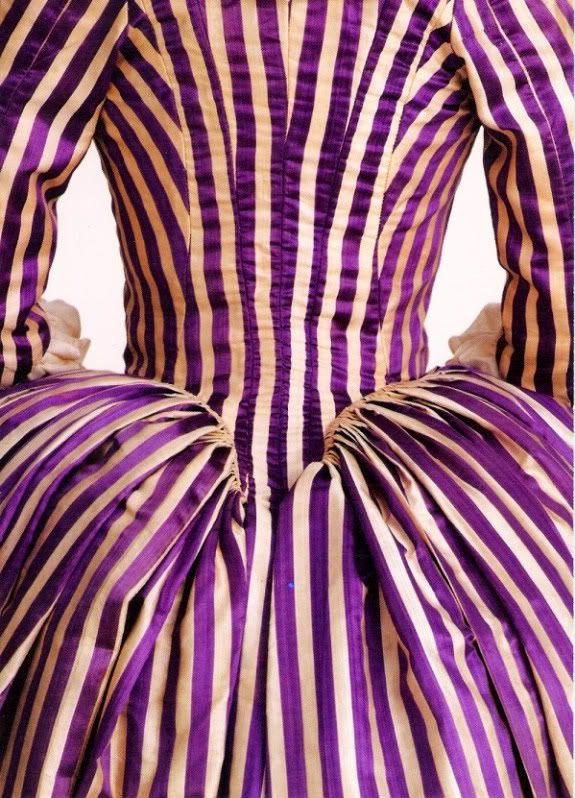
I'm finally about to start to make a new dress. This is a gown of which I've been dreaming of since I saw a picture of a striped 1780's robe à l'anglaise in the book Fashioning fashion a few months ago. There's only a back view photo of the dress (below) in the book if I remember correctly. I tried to find the dress in LACMA digital collection but it wasn't there. Later on, I saw some pictures of the said dress on a flickr set of Fashioning Fashion exhibit and thought I'd love to sew the dress for myself because I'm absolutely crazy about stripes and purple is one of my favorite colours.

Picture via Fashion is Poison blog.
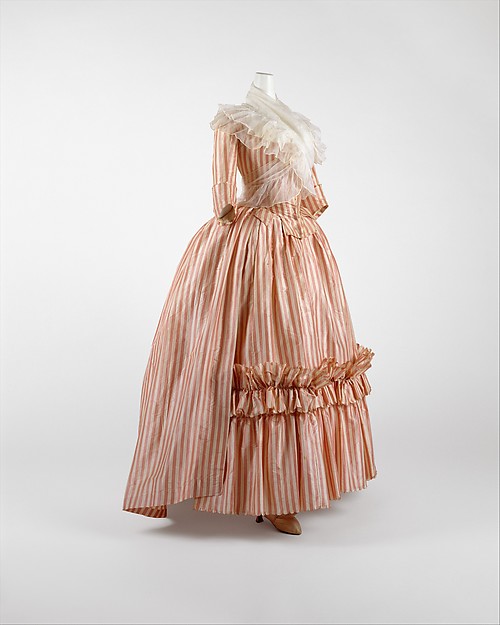
The dress instantly made me think of another very similar anglaise gown on MET.


Unfortunately I couldn't start making the dress as soon as I would have wanted to because it took me a couple of months to find the fabric. I knew I probably wouldn't find white and purple striped silk fabric but luckily I did find the fabric in cotton! It looks almost blue when photographed but it's actually purple. Here's a sketch of my version of this type of dress. I'm not yet sure whether I'll add ruffles to the petticoat like in the Met dress. I'll have to see about it later on. Changes in the design are very probable anyway.


At the moment I'm making a humongous bumpad to be worn under the petticoat because I realized my earlier bumpad was much too small. I'll post photos of the progress on the dress as I get there.

Pattern for robe à l'anglaise (1787) found via the Costumer's Manifesto. 
By the way, I started a facebook site for Rococo Atelier so that I can share interesting links with you. I'll also post links to my recent blog posts there so you can follow the blog more easily if you don't have a blogger account. Like Rococo Atelier here. 

Saturday, August 18, 2012

Finished dark brown stays!

So, I'm finished with the dark brown stays! I added the very last linen lining panel to them yesterday but we already took some pictures of the stays a couple of days ago. I've basically said everything I wanted to say about these stays in earlier posts so now it's just time for the photos. :)


In case you're wondering, the materials used were: dark brown cotton twill for the outer layers, linen for the inner layers and for the lining, white cotton twill tape for binding and 5 mm cable ties for boning. Also, there are four 7mm metal bones altogether, two in the front and two in the back.


By the way, these tabs were actually much more easier to bind than the more rounded ones, at least to me. I used twill tape for my stays for the first time and the binding part wasn't as hard as it has been before.


The edges of the back panels won't close as closely as they used to. After adding the lining the stays wouldn't stretch as much as before. Or then I just gained a little weight during the summer, which is very probable as well. Anyhow, I'm just happy the gap is even.


As you can see in the photo below, the stays won't lie completely flat on the floor.


I'm so relieved to have finished these stays, even if stays in general are lot of fun for me. It's just that I haven't had much time to sew anything else than stays this year. So I'm very excited to finally get started with some dresses very soon!

Friday, June 29, 2012

Fitting the dark brown stays + updates

My friend came over yesterday and she helped me to take better photos of my earlier 1780's stays. Check them out here! I've now sewn the pieces of the new stays together and I got to try them on a couple of days ago. This was the result:


I had made the the front too small and there wasn't enough space for bust. The figure was all too flat when the stays were laced completely. So, I opened the lacing leaving a gap at the upper edge of the center front, as seen in the picture, to achieve the right shape. I was considering for a while whether I would just always wear them like this or if I should make new front pieces. Also, I was getting a bit frustrated because of so much tweaking on stays and felt like I should just go with the earlier pair of 1780's stays and give up with the new ones. But, in the end, realizing that the eyelets weren't positioned right either - the front pieces wouldn't meet evenly - I pulled myself together and decided to sew new front pieces. The pattern needed a little reconsidering. In the picture below, you can see a sketch of the original shape of the centre front piece. There were two options how I could give more space to the bust: you could curve out the line at the side or at the front. I chose the option I because I had lacing at the front and it could cause some problems if the centre front wasn't straight. I also needed a little more space at the armpit so the option I also allowed me to add space there at the same time.


So, I took the old front pieces away, sewed up the new front pieces and I got to try the stays on again yesterday. This time, it was a success.


I had made the tabs a little longer than in my earlier stays. It turned out to be a good idea, accompanied the curvy lines of the pattern, the tabs flare out very beautifully! Also, I gave the tabs more tooth-like shape like in many of the 1780's stays so I suppose they'll be also easier to bind.


Now the shape is finally what I was going for. The top edge curves up radically and supports the bust area from the sides and holds it in place preventing the breasts from flattening and sliding towards the sides.


I'm really fond of the back side. The boning structure emphasizes the waist and the conical shape of the stays. You can also see the effect of the curvy seams of the back side panels: the stays follow the lines of the back very nicely.


I'm happy I had the patience to go on with these stays and not to give up with them. I've learned a lot during the process of fitting and pattern making of these stays and I really hope this post helps others who are pondering the same things I did. :) Hopefully next time as I'm posting I'll be able to show you pictures of the finished stays. We'll see about it later on!

Friday, June 15, 2012

Dark brown 1780's stays in progress + graduation

In the last post I told you that I would make another pair of 1780's because I wasn't perfectly happy with the last ones - the fit was really good but the shape, however, wasn't. So, I started drawing a new pattern in the beginning of May but I had to put it aside because there was only a month to my graduation and I had a lot of stuff to finish for school. The month was really crazy and I got really stressed about having far too much to do so I didn't have any time nor energy to sew at home at all. But now I'm happy to say I finished everything in time and graduated! Currently, I call myself to be on vacation, even if I'm, in fact, just unemployed. I do think I deserve to rest and to the things I love for a while, though, and now I'm not planning to start looking for a job before August. There's not much interesting to say about my graduation, except that my mom gave me a new sewing machine as a graduation gift and I received this awesome congratulations card from a very dear friend of mine.


Isn't that just pretty? I think it's also really funny she drew the graduation hat on the top of her hair! And the card glitters! :D Now it has got a special place on my sewing table.

Alright, back to sewing progress... I've now cut the pieces for the new stays and sewn all the channels for bones, here's a picture of how it looks at the moment:


I chose dark brown cotton twill for the outer fabric because many 1780's stays found in museums are brown - all shades of beige and brown seem to have been really popular during the decade. I debated whether it would be a good idea to use such a dark color because one of the dresses I'm going to make to be worn on the stays is going to be very light in color, but as I couldn't find any good beige fabric the decision was easy in the end.  To achieve that curved profile I'm going for, I added more curve to the front, back and back side panels. I'm really excited to see how it looks on the first fitting which I hope I'll be able to do in some the next few days. Things will be much easier for me now because the stays will be laced in the front as well as in the back. The pattern is, once again, my own, based on a few examples in museum collections and books. As usual, I will use cable ties for boning but also four metal bones, two for the centre front and two for the centre back.

Tuesday, May 8, 2012

1780's stays - finally finished (Updated!)

So I finally finished my new 1780's stays. At first I stated sewing these like crazy but I don't know why I got so lazy by the time I had added the first two panels of the lining so that it took me a couple of months to add the rest. 


And some new photos of the stays when worn.


Now the back lacing closes completely again but it's really comfortable with about 2-3 cm gap between the back edges.


Each tab was lined separately and the rest of the panels were added after that.


I'm quite happy with the binding. It has got visible stitches on the right side even if you can't tell from the photo below. Though I think a narrower part of the binding tape should be seen on the right side. The tape  is also double fold bias tape because I couldn't find twill tape earlier. Later on, after I had already added the binding to these stays I found some twill tape that will be used for the next stays. 


Now I kind of feel like making yet another pair of stays. The shape isn't as curved as I wished it was and I want to use that twill tape I've got now. Also, I'm thinking about covering those metal eyelets with thread so that it would look more accurate or even try to find some metal rings of which I was talking about in an earlier post. And front lacing would also probably be more practical... I haven't been able to sew much lately and won't be at least for a month anyway because I'm just about to graduate in the beginning of June and I'm really busy finishing some stuff for school at the moment. So don't expect to hear much from me until then.