Showing posts with label Petticoats. Show all posts

Monday, May 12, 2014

Transitional stays c. 1794-1800, chemise and under-petticoat

Here come the photos of the first garments that I've actually finished this year. It's such a relief to get something done completely because my projects haven't exactly gone smoothly in the past four months, which has resulted in leaving me with more UFOs than, well, ever before. That's also why I didn't post anything for a while, but I guess that happens to most of us sometimes, right? :)

Let's start with having a look at the front of the stays. I'm actually really happy I put more bones into the front panels of the stays than in the original pattern because I'm almost certain that there would be more creasing if I hadn't done so. Plus, the extra bones support the bust from below without making the stays any less comfortable. Should I ever make another pair of stays with this pattern, I might place the cups slightly closer to the center front because it's just not possible for my breasts to be quite this far apart - even if the aim is to get that separation effect. The issue doesn't really show much on the photos and I'm quite sure you can't tell once I'm wearing a gown on top of the stays so right now I'm just going to stick with this pair. Also, adding more width to the lower part of the cups might help with the creasing that you can see at the front.


Now we can also compare the results with a period engraving which is actually around ten years later than my transitional stays - but the shape that the stays provide looks basically the same, doesn't it?

The Ladies' Dress Maker, from "Book of English Trades", 1811.

The shape of the cups is controlled on top with drawstrings that run under the twill tape binding. 


Maybe you already noticed that there are actually modern underwires under the cups to support the breasts. Since it looks like there are bones under the cups of the trasitional stays on the MET, I thought I might get away with using them. :)


Unfortunately the photos of the back of the stays were unsuccessful so I'll have to try to get photos of it some other time and add them to the blog later. :/ 

I also made a under-petticoat. At first I wanted to make a bodiced petticoat but then, I really liked the petticoat Merja made for her riding habit, and eventually decided to leave the bodice out so that I wouldn't have to worry about the length of it. I actually didn't sew the shoulder straps into the waist tape of the petticoat at front either - they are only pinned so I can adjust the back depending on how high or low it should be. 

The front of the petticoat is almost triangular so that the petticoat gets wider towards the hem and there's no gathering at waist, which helps to create a smooth figure without making you look like you're larger than you actually are. 


The back is gathered to the waist tape only in the middle, but not on sides. 


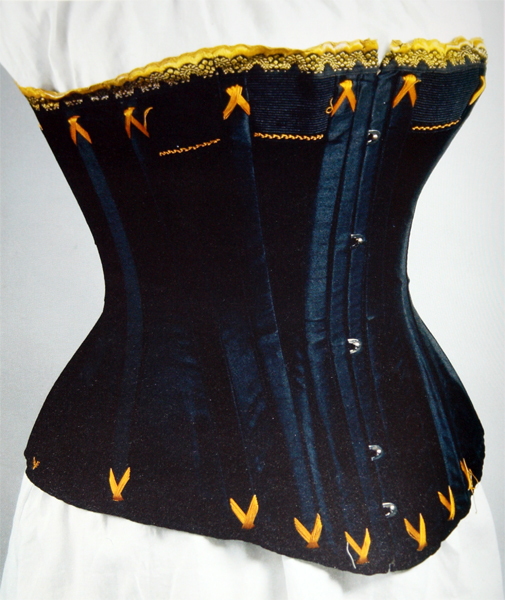
And finally, here's the side view.


The petticoat is a bit too long so I will probably have to make it shorter by making a tuck at the hem but after that I'm ready to move on! :)

Sunday, January 20, 2013

Pocket hoops and petticoats for 1760's and 1770's

When it comes to costume making, it's been really quiet over here for the last couple of months. To be honest, I've lost motivation for creating anything but I tend to have these periods every now and then and they usually pass in some time so no worries, I'm just about to get back to sewing any time soon. Plans and patterns have been made but nothing much else, except for a ruffly cap.  I also never got around to post pictures of my new pocket hoops and petticoats as promised after taking quick photos of them in December so I thought to post them up now - maybe blogging will give me the little boost of inspiration that I need to get back on sewing.

So, here we have the pocket hoops. I actually had pocket hoops before these, too, but since they were made a long time ago as I was just starting with 18th century and sewing in general, the pockets were terrible: they would clung to my thighs and were made out of a too sheer fabric which caused the ends of the hoop steel to tear the fabric even if I had rounded the edges. As you can imagine, they were really uncomfortable. Anyway, these are the new pocket hoops. 


 And then, the first petticoat. It turned out to be shorter than I intended but it does the job so I don't mind.


And second petticoat which was made a year ago from an earlier garment... It seems the beginning of this post is almost a repetition from the post linked. I didn't remember I had just the same motivation issue in January 2012...


And the next one would be the actual petticoat. I really like the width of these pocket hoops and the voluminousness they give to the petticoats. 

Friday, September 14, 2012

W.I.P.: Striped robe à l'anglaise

Here's a little post about my progress with the striped robe à l'anglaise as promised! First off this week, I sewed up the petticoat. I'm really starting to think it needs some ruffles but I haven't decided yet. I'll have to see how tight I'm with fabric at the end anyway so that decision is saved for later.


Next, I drew the pattern for the bodice and made a mock-up. It was pretty good in the front. I just wanted to make the center front a little longer.


However, the back side of the bodice was a mess! So many wrinkles everywhere!


Problem solved: The back was too baggy and it needed to be tightened. Also, I had to change the shape of the armholes (see on the left side).


After making the changes to the pattern, I finally started cutting the dress itself and this is where I'm at at the moment:


 I think I still need to tweak the the back side since I'm not happy with the stripes not forming 100% similar pattern on both sides. Though, I noticed that the stripes weren't that perfect in the original (via Romancing the Tome blog) either. I guess it would be "period" to leave it this way, too, but I'm too much of a perfectionist to do that. I also think I need to add a waist band to the inside of the dress in order to keep the back tightly in the right place. I'm going to be gone for the weekend but hopefully I can continue sewing the dress on Moday. "See" you next time!

Monday, September 10, 2012

Underwear for 1770s and 1780s

Last week was all about making underwear for the striped robe à l'anglaise. I sewed a new big bumpad, shift and an under-petticoat. My old shift was in a very bad condition and a way too loose around the arms for 1770's and 1780's sleeves so that's why I needed a new one. I've always been quite lazy about underwear because all those garments won't be seen but it was just recently when I realized that you actually need proper underwear for good costumes. I've been in a hurry because the deadline for the 1780's robe à l'anglaise is in 19 days so I just machine-sewed pretty much all the undies.

First off, the shift. Sorry for the modern underwear showing but the fabric is just so sheer I had to wear something there under for the photos for the sake of modesty. The shift pattern is based on the variation A of  chemise in Garsault's L'Art de la Lingerie, found on La couturière Parisienne.


The new bumpad. I made it a lot bigger than my earlier two bumpads. Also, there's a ruffle around the edges because I thought might give the skirts more smoother line. It works. The bumpad is cotton and stuffed with some old pillow stuffing.


The first under-petticoat. I forgot to wear stockings for the photos. It doesn't matter, though. I just wanted to see the effect of the new bumpad and petticoats.


The second under-petticoat. It's an old one, made to be worn with the smaller bumpads so the hem isn't even with the new one.


I'm actually a bit ashamed to admit that I still don't have a pair of hanging pockets after five years in this hobby. I will sew them... eventually. But now I'm off to start making the dress itself!

Wednesday, February 1, 2012

W.I.P.: 1780s stays and petticoat for polonaise progress

So, I'm happy to tell I actually kept my promise I made in the last post and started sewing the petticoat for my robe à la polonaise. At the moment I've got only half of the trimming on the hem left to do. I got the idea for the pinking of edges from Janet Arnold's Patterns of Fashion I. I guess most of you are familiar with the book and recognize the petticoat I'm talking about. I don't have a real 18th century pinking tool since it's not available anywhere on the web at the moment (Do correct me if I'm wrong.) so I used my pinking shears to imitate the triangular pinking style. It's quite time-consuming and doesn't have the exact same shape of the original 18th century pinking but I'm happy with the result anyway. 


I decided on a pleated trimming style that matches with the trimming on the gown itself.


I found this lovely drawing of a woman sewing with a similar pleated petticoat trimming style.

Louis Roland Trinquesse, Seated Woman Sewing, 1788

Also, I mentioned I was making patterns for 1780s stays in a post last September (Was it that long ago, really?!)  and I found the cut pieces last weekend when I was going through my fabric boxes and thought I should make them although I had decided on another pattern. I'm probably going to sell them once they're finished so I 'm not going to make any changes to them according to my size. I do this just purely for fun and to test out the pattern I had picked.

Friday, January 20, 2012

Underwear

Lately I haven't been sewing much out of studies... I've been just planning and dreaming mostly. The good news is that I'm nearly finished with a 1890s corset I'm making for my final project at school. I think I haven't mentioned that here before. The pattern is from Corsets: Historical Patterns & Techniques by Jill Salen. Mine is going to be very plain in white. It has been fun to try out something from the 19th century for a change. 

The whole project includes a set of unmentionables (underwear) from the 1890s and a study of the women's fashionable silhouette from 16th century to the early 20th century, which means I'm been researching a lot about the underwear from other periods than just 18th century, too, and it has been really interesting. 

Today I really felt like I just had to get my hands on sewing at home so I decided to make an extra under-petticoat that I should have made a long time ago but I just never got around to do it. It was a really quick project and here's the result. The petticoat is fitted over pocket hoops and has a ruffle in the hem. It's also white and shorter than my other petticoats so that it won't be seen. Nothing special, really, but anyway... A girl can never have enough petticoats, right? I was thinking about making a tutorial how to make a quick petticoat but I realized there is a few tutorials available already. 

Go check out:

The Diary of a Mantua Maker: Perfectly pleated petticoats


Now, feeling this productive, I think I'm heading off to make the actual petticoat for my robe à la Polonaise, since I didn't make it in time for the ball a couple of months ago...