Showing posts with label 1800s. Show all posts

Thursday, March 2, 2017

Regency day dress (Laughing Moon Mercantile #126)

By arranging the Gustavian day event in Vaasa two years ago, Noora gave me a reason to make my first regency gown - so I finally did. She has been talking about how easy regency gowns are to make for probably as long as we've known so I guess it shouldn't have come as a surprise that making a simple gown like this was quick and easy but I still couldn't help being positively surprised. Had I not worked on it a bit by bit in the evenings and mornings so that it took me a month or so to finish, I think the dress could have been done in much less time. It really had been too long since I could properly enjoy sewing so this gown really was a much needed relaxing project for me at the time, too.


The fabric was a remnant find from a local fabric store. I had seen it earlier there and hadn't bought it because at the time I didn't think I was going to be doing regency so soon but the second time I looked at it I couldn't stop thinking about getting it so I only had to ask for Noora's opinion before I could come to a decision. Looking back now I don't know why I hesitated so much because I think it's quite perfect for the era as well as a color that I love. ;)

Here you can see a close-up of the fabric, in a different lighting (indoors):


And later I even discovered an original dress that was made out of a fabric that reminded me of my find. Yay!


Knowing the fabric would make a lovely day dress, I simply started looking around for regency day dresses on the net and eventually found the following fashion plate (from 1801-1802), which became my main source for inspiration. 

Source: Bibliothèque des Arts Décoratifs via SceneInThePast.

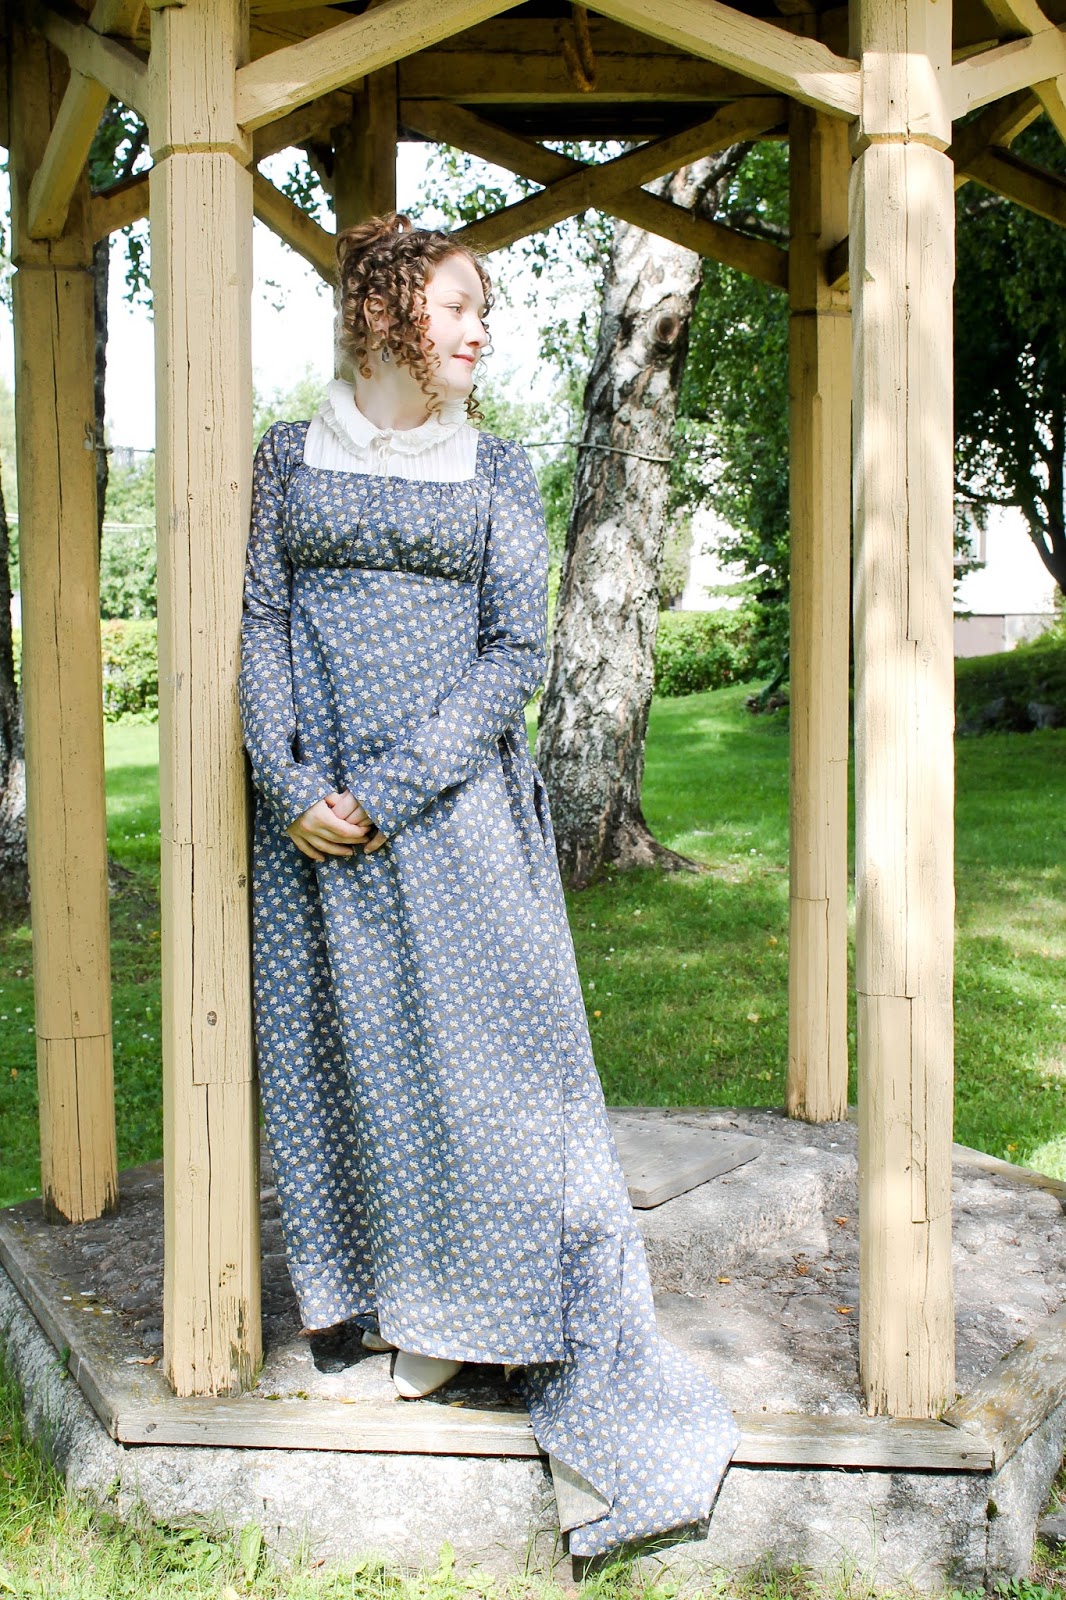
I really like how the back side of this dress looks pretty similar to the fashion plate.


This was also my very first time using a commercial pattern for a historical dress. I had read a few positive reviews about the Laughing Moon Mercantile's stomacher front dress so I decided to give it a go. And yes, it was as great as everyone is saying. I only did some alterations to the pattern before making a mock-up and it fit perfectly. Construction-wise I deviated a bit from the modern instructions - although still making the internal seams on the machine - and added a third pair of ties to the middle of the closure in the lining (the pattern suggests only two pairs but I was afraid that it would cause awkward pulling).


To see other gowns made from this pattern check out Lauren's, Erin's or Dixie's lovely versions.


I would also like to thank to Mia for creating my lovely hair-do (as seen from the back above) and Noora for letting me borrow her chemisette, as I don't have one yet. :)

Monday, May 12, 2014

Transitional stays c. 1794-1800, chemise and under-petticoat

Here come the photos of the first garments that I've actually finished this year. It's such a relief to get something done completely because my projects haven't exactly gone smoothly in the past four months, which has resulted in leaving me with more UFOs than, well, ever before. That's also why I didn't post anything for a while, but I guess that happens to most of us sometimes, right? :)

Let's start with having a look at the front of the stays. I'm actually really happy I put more bones into the front panels of the stays than in the original pattern because I'm almost certain that there would be more creasing if I hadn't done so. Plus, the extra bones support the bust from below without making the stays any less comfortable. Should I ever make another pair of stays with this pattern, I might place the cups slightly closer to the center front because it's just not possible for my breasts to be quite this far apart - even if the aim is to get that separation effect. The issue doesn't really show much on the photos and I'm quite sure you can't tell once I'm wearing a gown on top of the stays so right now I'm just going to stick with this pair. Also, adding more width to the lower part of the cups might help with the creasing that you can see at the front.


Now we can also compare the results with a period engraving which is actually around ten years later than my transitional stays - but the shape that the stays provide looks basically the same, doesn't it?

The Ladies' Dress Maker, from "Book of English Trades", 1811.

The shape of the cups is controlled on top with drawstrings that run under the twill tape binding. 


Maybe you already noticed that there are actually modern underwires under the cups to support the breasts. Since it looks like there are bones under the cups of the trasitional stays on the MET, I thought I might get away with using them. :)


Unfortunately the photos of the back of the stays were unsuccessful so I'll have to try to get photos of it some other time and add them to the blog later. :/ 

I also made a under-petticoat. At first I wanted to make a bodiced petticoat but then, I really liked the petticoat Merja made for her riding habit, and eventually decided to leave the bodice out so that I wouldn't have to worry about the length of it. I actually didn't sew the shoulder straps into the waist tape of the petticoat at front either - they are only pinned so I can adjust the back depending on how high or low it should be. 

The front of the petticoat is almost triangular so that the petticoat gets wider towards the hem and there's no gathering at waist, which helps to create a smooth figure without making you look like you're larger than you actually are. 


The back is gathered to the waist tape only in the middle, but not on sides. 


And finally, here's the side view.


The petticoat is a bit too long so I will probably have to make it shorter by making a tuck at the hem but after that I'm ready to move on! :)

Wednesday, April 23, 2014

When 18th century sewing gets too overwhelming...

The short story: There are times when I get frustrated with most of my 18th century sewing because - lets face it - sometimes it can be a bit tiresome... and complicated. So what do you do? Bring out the regency to the rescue!

The long story: I've thought about starting making costumes for other periods than just the usual 1770s/1780s for a long time but never quite got around to do it. It was just recently when I realized I really am the social kind of costume maker and by that I mean that it's very hard for me to finish, or get even started on anything at all that I can't wear to events or with friends. So it's not a coincidence that I'm going to start making very late 18th century/early 19th century costumes now that I've become friends with Noora. It's so nice to have someone to talk about your costumes in real life and even more fun to know that you'll have someone to take your new clothes out with, sooner or later. Conveniently, also Merja started making herself costumes from this period a while ago.

Finally, here's proof of what I've been making...


Transitional stays - yay! And I'm near to finishing, only having the tabs of the other half to bind... Of course I ran out of twill tape just when I was about to finish. *sigh* So now I have to head to town to get some more before I can take more photos of the stays on body.


These stays are made out of just two layers of fabric - cotton for the outside and linen for the lining. 


The pattern is from the book Corsets by Jill Salen, with only a couple of alterations. I replaced the bust gussets with breast cups and narrowed the shoulder straps. Also, I increased the amount of bones from five on each side to eight, based vaguely on the transitional stays from V&A. Another pair of stays that I used for inspiration, mainly for the cups, is from Kent State University Museum. However, the shape of the cups (especially on the top) was heavily influenced by the pair from Met.


You can see the final pattern I made for the breast cups in the photo below. I had to make three mock-ups for it until I got it right. The first two were far too small and honestly, the third one could be just a bit larger but it works anyhow. 


It took me a while to figure out how to construct these stays, as the original in the book is also made out of only two layers of fabric so that you don't bind the stays before adding the lining as it's common. Eventually, I constructed the stays by joining the panels by whip stitching  them together after I had turned the seam allowances in between the outer layer and the lining of each panel. Photos will do much better job explaining than I will.


I admit being lazy and stitching the tape on top of seams and the boning channels by machine. :)


Somehow I managed to mess up while measuring the original pattern because I though it would fit but it turned out to be way too small and I had to slice it in two at the back and add eyelets for lacing. I'm quite sure your stays are not supposed to have lacing at the front as well as at the back but this was just so much quicker a solution than starting the whole thing over from the beginning. 


And since I'm quite sure you're all eager to see how these stays look when worn, I give you these two photos snapped quickly with my phone the last time I tried the stays on. Please ignore that I didn't lace them up properly. Also, I'm wearing my 18th century shift under the stays so you can see I definitely need another with a wider neckline and short sleeves. 


I was aiming to be able to wear these stays for costumes from about 1794 stretching into the 1810s, even though the stays itself date to about 1794-1800. I believe I did a pretty good job getting the suitable shape for that period. Or what do you think?


I'll share the rest of my thoughts in the next post once these stays are completely finished.