Showing posts with label 1770s. Show all posts

Saturday, September 15, 2018

Pinstripe robe à l'Anglaise retroussée

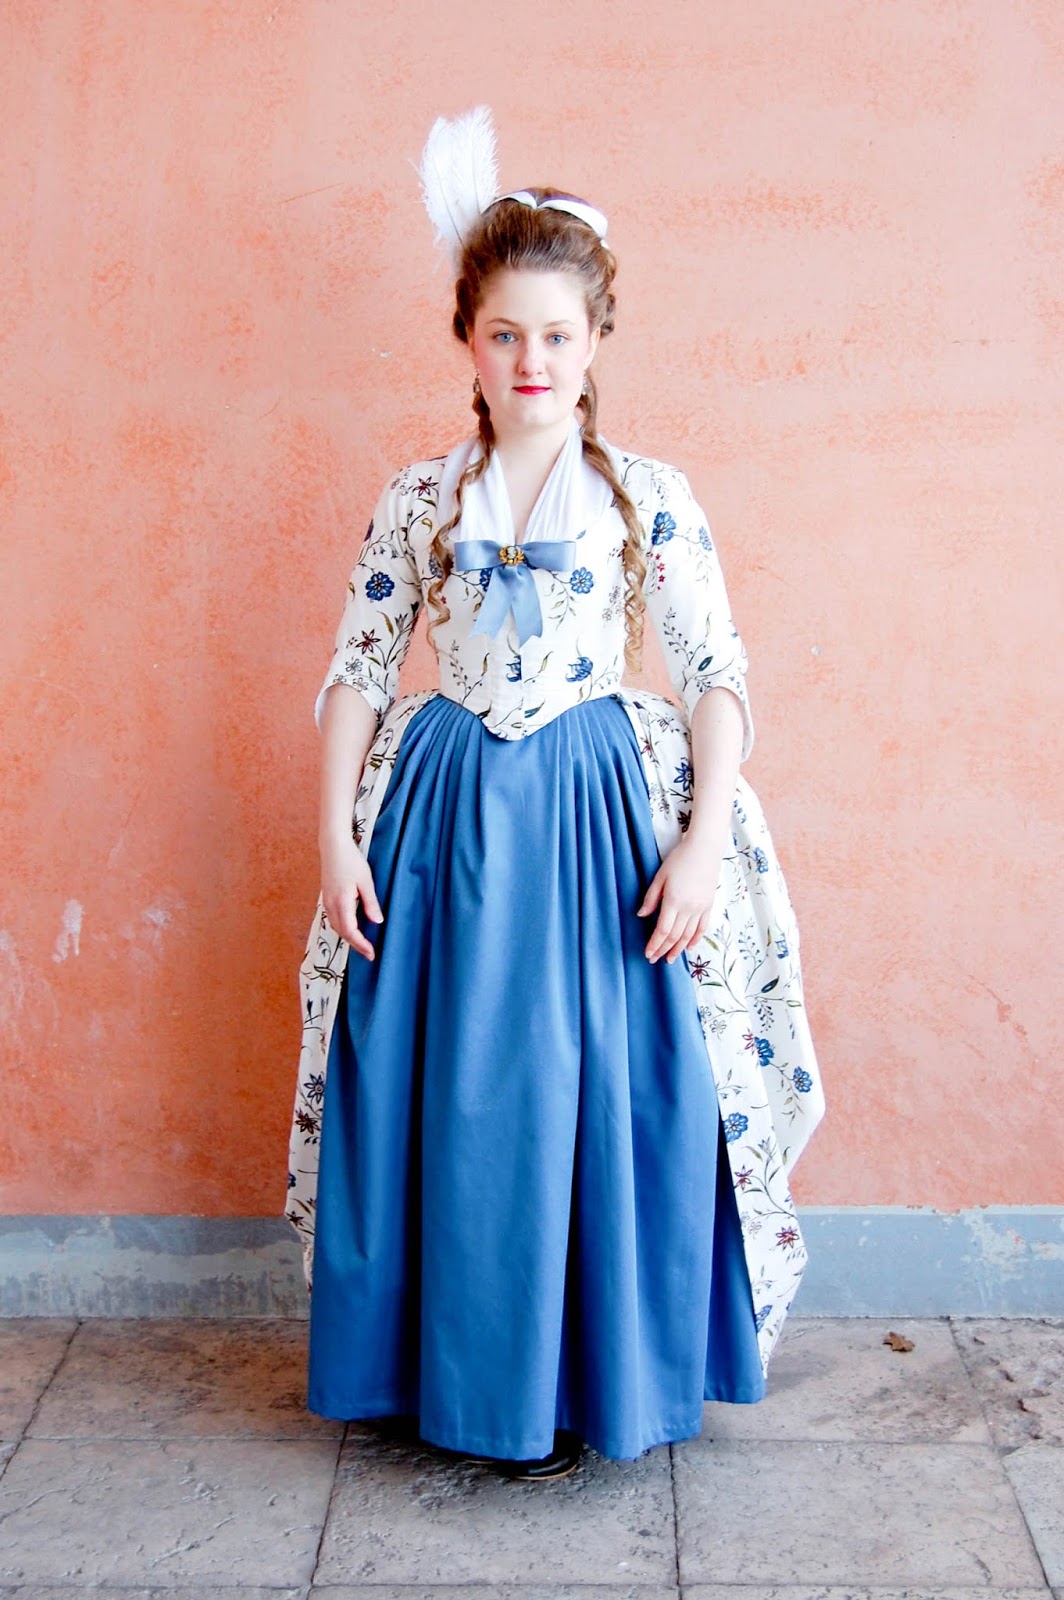
This dress is one that I started making back in 2015 but that I didn't finish until Christmas ball in November 2016.  I also wore it to the Christmas ball the following year again, when the first set of these pictures were taken.


Previously I've made patterns in mainly two ways; either drafting my own patterns according to my measurements and trying to get the seam lines right by looking at extant gowns, or by enlarging scale patterns from books, altering them according to my measurements until they fit. I haven't really had as good results with either of these techniques as I'd like to have so it was about time I tried out something else. So I borrowed Creating Historical Clothes: Pattern Cutting from Tudor to Victorian Times from Mia because this book includes step by step instructions for creating patterns for several periods. First you start by taking your own measurements and, comparing them to measurement charts, draft a basic bodice pattern. I chose to turn my basic bodice pattern into a 1770s style bodice from the book, except so that it doesn't extend below the waist (see photo), and used it as a base for the pattern for my first robe en chemiseSince the pattern was made to my measurements, it required very little alterations to make it fit, except that I had to take it in quite considerably in at the back. Later on, I completed the pattern into a 1770s bodice according to the instructions in the book.

Bodice pattern before extending it below waist and alterations.

But I wan't happy with the pattern as it was because I thought it didn't look quite right. (I wish I had took a picture at this point so you could compare it with my final pattern.) However, the pattern reminded me of the 1770-85 gown pattern on page 39 of Janet Arnold's Patterns of Fashion 1 so I decided to try to alter my pattern to make it correspond with it. To me it seems the pattern in Creating Historical Clothes might be vaguely based on it, too. I won't go into detail describing all of the things I did because a. it's not that interesting and b. I can't actually even remember all of them anymore. But I ended up altering it quite a lot. In the end, I was slightly frustrated because I had spent so much time on the pattern and yet I wasn't completely happy about how the bodice looked. But eventually I thought it made no sense to keep fiddling with the pattern and decided it was good enough.

The bodice after a great deal of adjustments.

I also experimented with a bodice construction method that I hadn't tried earlier (though I wish I had!): "the weird running whip stitch thingy" that is now known as the English stitch, thanks to the ladies of American Duchess. I must say using this technique made matching the stripes easy. Not to mention how neat and tidy it makes the inside of your bodice, too (as can be seen below).

Here's a close-up of the finished seam, before removing the basting stitches:


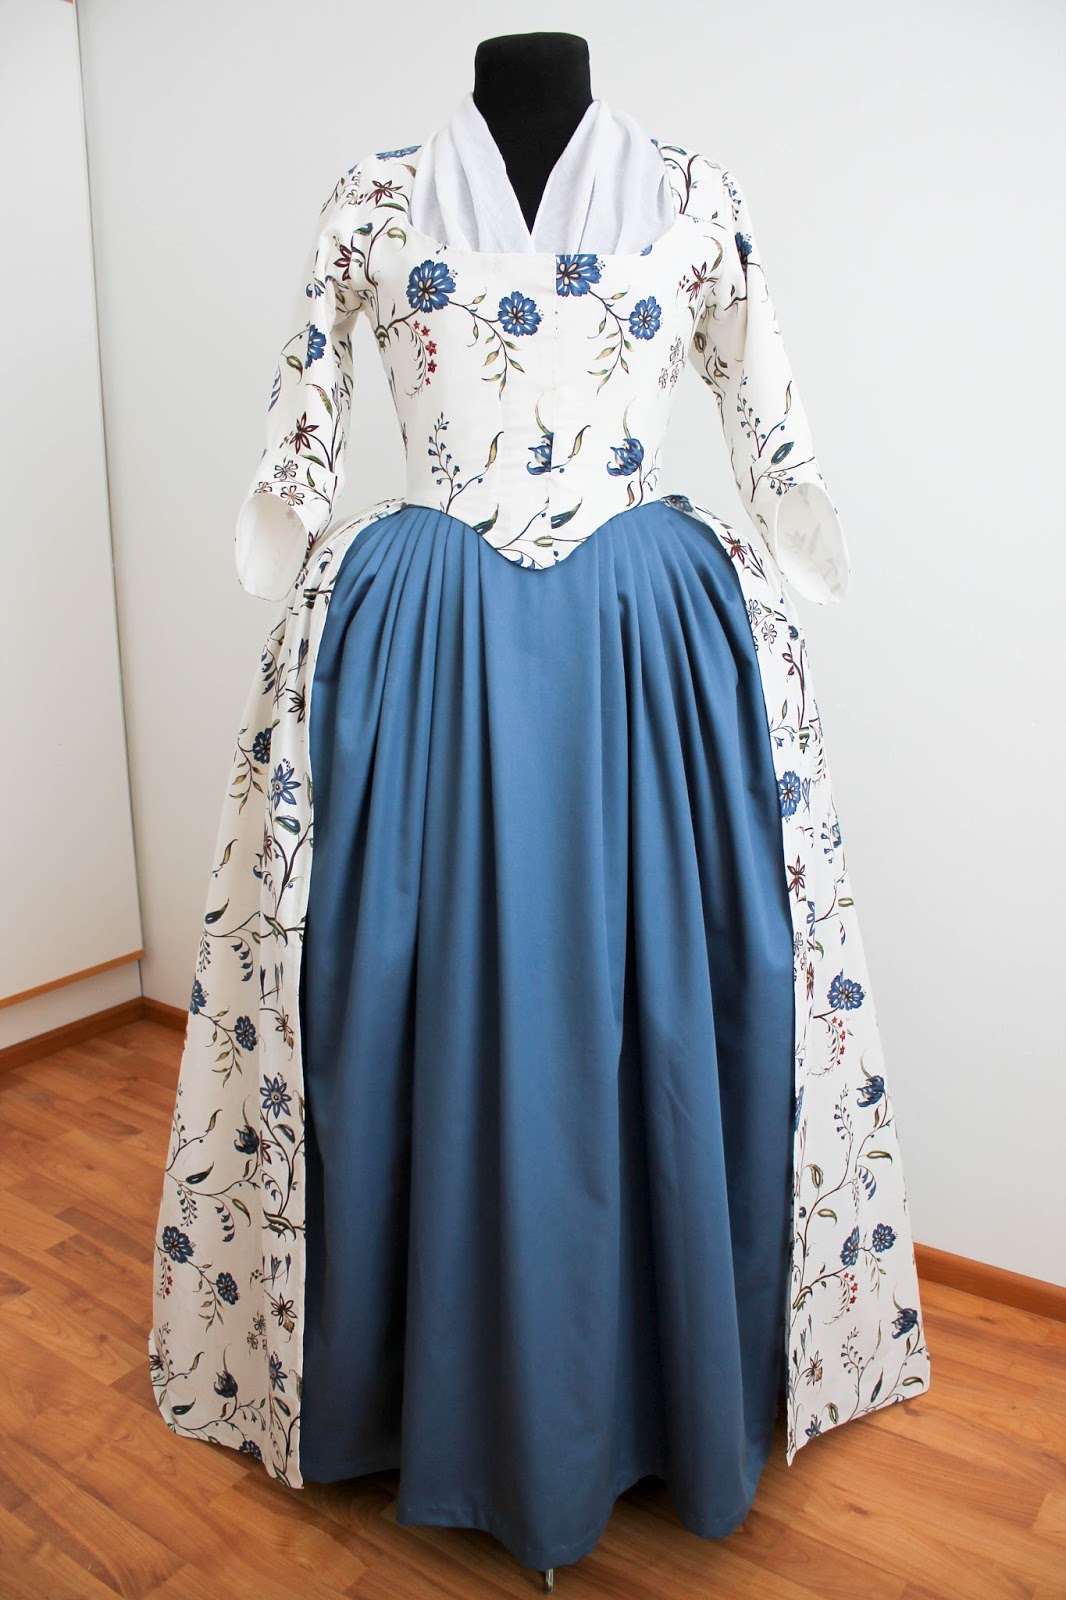
The finished bodice seen from the outside:


And the inside:


At this point I drafted the pattern for the sleeves with the instructions in Creating Historical Clothes and had some fit issues with them as well. The finished sleeves (after alterations) look alright but I can barely lift my arms in them so I might add a little triangle to the underarm to allow for more mobility.


After that, it was time to decide on the trim. I wanted to trim the gown in some way, even though the most of extant robes à l'Anglaise aren't trimmed at all or only have a little bit of trim. But I didn't want to use the same trim style as the one in Patterns of Fashion, as it's the style that most people use and I thought it would be fun to do something a little different. So I spent some time researching options (which are collected on my Pinterest) but, as you can tell, I ended up using the same old trim style as everybody else, as I concluded that I liked it the best after all. *facepalm*


When it came to the sleeve trim, I really liked the wide trim seen on this beautiful costume from the Duchess. But I wanted to find validation for the trim style in historical sources. Alas, I was in no luck - which honestly didn't surprise me - so I gave up the idea. It's a trim style that appears to have mainly been used on robes à la Polonaise.


As usual, Mia did my hair for the evening and I did hers. We arranged a little public toilette before the event officially begun.

Mia working on my hairdo after I had finished hers.


When it comes to late 1770s, there's no such thing as too much hair decoration, right? ;)


And there's even a short video clip from the ball (unfortunately the quality is bad because this was taken on Mia's phone :/).


I also wore this dress to a small informal ball in January earlier this year and Mia kindly snapped these detail pictures of my gown and hairdo after the ball.


So here's a dirty little secret: I didn't intend to put trim down the center front (it's not something you see on historical examples and it even hides my careful stripe matching) but the hook and eye closure of the bodice stretched the lining a bit so there's a narrow but ugly gap at the front. Hence this was the last time I used hooks and eyes as a closure on my 18th century gowns. While hooks and eyes make a dress easy and quick to put on, I prefer to be able to adjust the bodice with a center front pieces that are lapped and pinned.


Despite of the difficulties I had making this dress, I do like the gown anyhow. :)


Links related to this project: 


Has anyone of you tried to draft a pattern with the instructions in Creating Historical Clothes? I'd love to hear your thoughts about it if you have! Personally, I'm not going to use it again (unless someone can point out a good pattern from it). Mia has also tried to make a pair of stays with this book and didn't have good results either. In conclusion: If you're thinking about buying this book, I wouldn't recommend getting it. 

Sunday, December 18, 2016

Williamsburg print gown photos (Fig Leaf Patterns 101)

In the first post about this gown I only showed you photos of the gown on my mannequin (and a teaser). I've worn the dress three time since then this year so now there are plenty of photos of it being worn. Since I already shared most of my thoughts about this gown and pattern in the original post, this is going to be one picture-heavy post. 

The first time I got to wear this gown was at an 18th century assembly in March. 


Now here's something I don't think I mentioned earlier - I'm not sure I like how short the bodice is at the front bottom - as you can see, it makes the waistband of the petticoat to show. Also, the skirt of the gown starts from really far at the side so the pocket slits (of the gown and petticoats) do not align, thus making the gown pocket slits useless. Actually, both this and the problem with the petticoat waistband could be fixed just by moving the start of the skirt towards the center front. If you ever plan to use this pattern, you might want consider doing that.


Interestingly, the pattern envelope illustrations do not seem to show the side back seams (or not very clearly anyway). I originally thought the bodice would have just four pieces + shoulder pieces (well, actually it does, because the seams next to center front are tucks). Not that it matters but I figured I should mention.


 And the second time I had the chance to wear this gown was already posted on the blog, at L'Amusette's annual masquerade ball. With a white petticoat, gown skirt hem down, and a black belt the look was a little later than the one above. In the first photo below you can also see how roomy the sleeves originally were (as mentioned in my first post about this gown)!


The gown has a train. Another interesting thing about the pattern is that I didn't have to shorten the skirt even though I'm shorter than average. But the pattern has the original skirt length so I guess that means I'm the same height, from waist down, as the original wearer.


And the third wearing was on the picnic that I also already blogged about. This time the skirt was drawn up with tapes again, to keep the train from getting dirty. I had also made new more tight fitting sleeves (!) so here's how they currently look:


Tuesday, June 28, 2016

Williamsburg print gown (aka yet another floral print robe à l'Anglaise/Fig Leaf Patterns 101)

Can you already tell I'm crazy about cotton prints?

Honestly, after finishing my latest cotton print robe à l'Anglaise I hadn't been planning making yet another floral print gown. There are definitely other projects on my to-do list that I ought to be working on right now. But then Renaissance Fabrics started offering Williamsburg reproduction print cottons and I could not stop myself from getting some 5 yards of this trailing blossoms print in blue because I loved it so much.


This gown was made using Fig Leaf Patterns 101. You can find photos of the original gown, which the pattern is based on, on Pinterest. I simplified the construction a bit so I left the back facing out and decided not to use the large box pleats just because I prefer the look of smaller pleats.


I also decided to close the gown with pins, after using hooks and eyes for the closure method for my center front closing gowns for a few years. I had tried using pins to close gowns a long time ago when I was just starting out with 18th century costume making but I never liked pinning because I thought it was much easier and faster to close a gown with hooks and eyes. However, I found out that pinning hadn't gotten any easier by now. I especially had problems closing the gown at the waist level so that the back would fit closely/tightly enough. I tried stitching tapes to the back of the waist on the inside of the gown to tie in the front in order to keep the back in place but it didn't work out for me, resulting in awful wrinkling of the fabric in the back. So I added lacing plackets to the lining on the front to make pinning easier, as the lacing helps to keep the bodice tight around the body.


There's an extra 1/2 inch on the other side of the center front for adjustability (see photo below). What I'm loving about lacing+pinning is that you can lace yourself into your stays more or less tightly depending on how you feel and that it doesn't matter if you loose or gain a bit of weight over time. 


I first sewed the lacing plackets to the lining only but then started worrying that the linen might stretch due to the pull of the lacing so I decided to stitch through the cotton as well, so that the stitches are visible on the outside. It's not as obvious in the photos as it is in reality. While looking at extant floral cotton gowns, I was really excited to find out that one extant from Met definitely has stitches on the front of the gown so it might be closed in the same manner as mine. 

The plackets have bones in them on both sides of the lacing, in order to and support the eyelets as well as to stop the front from puckering too much .


What I'm not loving so much is that the floral pattern is unintentionally repeated on both sides of the front. Oh well. I never try to match my prints on seams as it wasn't done as economical cutting was usually more important for such cotton or linen gowns


Plus, of course you want to show off your beautiful seaming, especially in the back! 


The back is actually constructed of only two pieces and the seams next to center back seam are achieved with tucks. The lining is without them. 


The gown is worn with my 1770s/1780s underwear


If you're thinking about purchasing this pattern, I say go for it. It comes with a wonderful instructions booklet which I found to be very comprehensive, with everything from information, photos and research about the original gown to general sewing instructions, fitting tips, construction etc. I would imagine this would even be great as your first 18th century gown in case you're just starting out 18th century costume making. 


Also, I think this dress would work the best with a pair of stays like this, without a dramatic difference between waist and bust measurements. I wear a more curvy type of 1780s stays with this dress so I had to add width to the pattern on the front of the bust. However, there are instructions for making such alterations to the pattern in the booklet, so of course you can wear any type of stays you like, but I thought I'd mention that anyhow.

The only suggestion I have is to make the sleeves smaller than in the pattern, since I found them to be really roomy, especially for a period when sleeves are more tight-fitting than earlier.  And I'm a person with a large arms, often resulting in having to cut the sleeves in the next size by comparison to the bodice size. A nifty thing about the sleeves is that there's a triangle piece under the arm, which allows for movement so this is especially great in case you're going to dance or work while wearing the dress.


I've already had two chances to wear this gown. Here's a teaser of how it looks when worn, until I get around doing a proper photoshoot and posting about it... This photo was taken at L'Amusette's spring ball that had an oriental theme.


Saturday, March 5, 2016

Tutorial stays - photos

I know, I know. Showing a pair of stays on a mannequin isn't as ideal as showing them on a body but I thought these photos would be better than no photos at all. 


You can see shoulders of the mannequin are too small for the stays and so is the bust too low but you can still get an idea of the shape these stays create. For comparison, the pattern for these stays was modified from the same pattern as my first 1780s stays so the shape pretty similar to them.


The boning pattern is a mixture from three extant stays. Unfortunately, I could no longer find the link to the stays that the front panels were based on but the side panels were inspired by this pair of stays and the back by this


I don't think I have much else to say. After all, the construction was already shown in the tutorial. ;) 

Wednesday, December 4, 2013

Robe à la Française - the first wearing at Christmas ball 2013

I had my doubts, but the robe à la Française got finished just in time for the Christmas ball trip, and with surprisingly little stress about it. Ok, to tell you the truth, I did panic a little on Tuesday (three days before the trip) when I had a problem with the front trim but I forced myself to stay calm and take care of the issue right away. And so the dress was finished a few hours before we had to leave home for the flight. I honestly thought I had a looser schedule than having to finish on the last minute!


So, this post is mainly about the dress and I will write another post about the event itself to avoid having a ridiculously long post on the blog.


Anyhow, as you can tell from the photos, I accessorized the dress with red, white and black to give this outfit some colour so it wouldn't be just plain white. I didn't have time to add the bows I was telling you about in the last post but it doesn't matter because it will be fun to add a little something new to the dress for the next wearing.


There are two pairs of tapes and loops on the inside of the dress so the train can be caught up for outdoors and dancing. 


Unfortunately my muff didn't fit in our bags so I had to leave it at home but I took a photo of it afterwards...


And since you're obviously moving when you're dancing, I also took photos of the hem pulled up later when I was at home.


The trim on the front of the gown was hugely influenced by the MET gown that I already linked to one of the earlier posts about this gown. I'm also considering adding some kind of garlands of flowers - similarly to the original - to the dress before the next wearing. I'm just not that sure if it will be too much decoration...


A little repetition here, in case you missed it earlier:  The bodice is based on a pattern in The Cut of Women's Clothes (1600-1930) by Norah Waugh. (See diagram XX on page 90) As usual, I enlarged the pattern on the computer as and altered it after printing it out. The bodice and the sleeves had to be shortened because I'm quite short and high-waisted (I'm pretty sure all my active readers are tired of hearing that all the time). I also had to add around 2 centimeters on the sides to the bust. Otherwise, it's basically the same. That is, if I remember correctly anymore. It's been a while since the pattern was drafted and fitted.


 Here you can see the lovely stripes.


And the dress seen completely from the front. I'm starting to think I actually prefer the way it looks when it's pulled up because it isn't so boxy like that.


The silk organza trim got officially approved by Leo... I really fell in love with this material. Actually, I liked it so much I'm thinking about using it for the robe à la Polonaise as well. It was so easy to cut and to work with. I barely needed to iron it because it folds easily with your fingers and nails. Leo also loved the box in which the fabric was mailed to us. He keeps sleeping in it so I haven't thrown it away just yet...


A couple of photos of the dress at the ball in the evening...


Special thanks to Ida for taking the photos and PS actions credits go to Bokhelie on DeviantArt.


PS. A few people have asked me if my hem got really dirty during the evening. Well, here's a photo that shows how dirty it got. I spent two days after the trip taking care of the clothes and cleaning the hem took the longest. First, I started by rubbing it with a wet piece of cloth and it worked ok but then it would have taken so much time to clean the whole hem with this technique so I continued the cleaning process by washing the hem in the sink with water and a little laundry detergent. I hang it for a while and after it had dried I noticed there still was some dirt on it so I rubbed the hem again with another wet piece of cloth. Finally after that it was clean enough so you can barely tell it had been dirty at all. It's never going to be completely clean again but I don't care because you kind of have to be mentally prepared for it if you decide to make a white dress with a long train. I could have, of course, lined the hem with another fabric, which would have made washing it much easier but the fabric is already quite thick so I didn't want to do that. 


Stay tuned for more photos of the Christmas ball and other events of the day... Oh, and if you like, I can take more photos of the construction details from the inside of the dress later on, once the batteries of my camera have been fully recharged...