Monday, October 1, 2012

Striped robe à l'anglaise - construction and inside-out photos

I finished the striped robe à l'anglaise early in time for last Saturday's event. It was finished two days before the day I had to leave for the train that took me to the place where the event was held. I will post more about the event itself later on. Anyhow, today I got around to take some pictures of the gown on the floor for you to see. I did take photos of the fittings etc. but I didn't really have time to post on the blog until today. So here we go...

The finished gown... overall! As you can see the skirt part is a lot longer that the front because I wanted this dress to have a long train. Have I told you how much I love trains? They're definitely not practical and as I started making this I knew people would step on it a gazillion times - I was right. However, the hem took very little damage during the event and it doesn't really show at all. No dirt, nothing. That was a pleasant surprise.


Without the petticoat...


The back-side of the dress. I'm glad I took the time to tweak the back side to make it as similar on both sides as possible (stripe-wise).


And now, the construction: I started by sewing up the whole bodice together. Note there are zone front seams on the outside of the dress but it was unnecessary to have those seams in the lining as well. Also, there are bones in the center front edges and in the center back and center back side seams.


After the bodice was made, I added the rest skirt panels and pleated the upper edges with the help of needles and stitched them together with back-stitch by hand. The pleats are quite tiny, approximately 4-3 mm wide.

In the photo below, the pleats are pinned to the bodice. Leo is super social and he always loves to hang out with me whatever I do. I just have to be really careful about what he's doing while I'm sewing and he's around... Luckily he just mostly sleeps... Oh, and he does love being photographed, too, unlike our another cat that dislikes the flash-light. Leo really tries to photo-bomb in most of the pictures I take at home...


Back from cats to the gown construction. In the photo below, the pleats are sewed to the bodice.


The stitches are basically visible on the outside of the gown but they're so tiny you can barely see them.


The pleats were ironed towards the hem. The tape loop is for gathering up the skirt. It's there purely for practical reasons - I have to be able to lift up the train for dancing.


The whole hem was sewn by hand. Original dress hem for comparison.


Picture via Flickr.
At this part, the whole dress was finished except for the sleeves. I made a mock-up for the sleeves and tried it on with the dress itself. I could have tried the sleeve mock-up much earlier while I was trying on the bodice mock-up but this way I thought I could save time.


 I was happy and relieved to notice that the sleeve mock-up fitted surprisingly well. The only part I altered was the elbow that was a bit too pointy. At this part I had also added the hooks and eyes so the dress could be closed easily for the sleeve fitting.


Then I just cut out the sleeves in both lining and dress fabrics and sewed them up. I didn't take photos during the final check fitting. I had some problems fitting the shoulder part on my own but eventually it went alright. You'll be able to judge the shoulder fit when I post pictures of the gown being worn in the near future. Here's the inside of the finished bodice with sleeves and hook and eyes.


A closer shot of the inside of the bodice...


The back of the dress with sleeves...


And front...


All of the visible stitches in the outside of the dress are sewn by hand. 


Again, the sleeve of my dress and the original sleeve for comparison...¨


Photo via Flickr.
The hem is really long. There are two gores (one on both sides) to make the skirt even fuller. I couldn't take a picture of the whole hem because there's not any place in our apartment with enough free space on the floor. You can get an idea of the length of the hem from the photo below...


I thought I'd prefer the petticoat without any decoration. However, I added the ruffles in the end because of three reasons. Firstly and mainly, the ruffles give more volume to the skirt of the gown itself. Secondly, I thought the petticoat was a bit dull with noting on it and, thirdly, the ruffle part shows where the skirt of the dress ends and petticoat starts. Otherwise they would just blend in and the gown looked almost like it was a round-gown. The ruffle panels were pinked in the same way as my earlier petticoat... 


Aaand, that's pretty much everything about the construction and fittings... Woah, this turned out to be one really long post... Here in the end I'd like to thank Rebecca Thelin for allowing me to post her pictures of the original gown from the Fashioning Fashion exhibit

Friday, September 14, 2012

W.I.P.: Striped robe à l'anglaise

Here's a little post about my progress with the striped robe à l'anglaise as promised! First off this week, I sewed up the petticoat. I'm really starting to think it needs some ruffles but I haven't decided yet. I'll have to see how tight I'm with fabric at the end anyway so that decision is saved for later.


Next, I drew the pattern for the bodice and made a mock-up. It was pretty good in the front. I just wanted to make the center front a little longer.


However, the back side of the bodice was a mess! So many wrinkles everywhere!


Problem solved: The back was too baggy and it needed to be tightened. Also, I had to change the shape of the armholes (see on the left side).


After making the changes to the pattern, I finally started cutting the dress itself and this is where I'm at at the moment:


 I think I still need to tweak the the back side since I'm not happy with the stripes not forming 100% similar pattern on both sides. Though, I noticed that the stripes weren't that perfect in the original (via Romancing the Tome blog) either. I guess it would be "period" to leave it this way, too, but I'm too much of a perfectionist to do that. I also think I need to add a waist band to the inside of the dress in order to keep the back tightly in the right place. I'm going to be gone for the weekend but hopefully I can continue sewing the dress on Moday. "See" you next time!

Thursday, September 13, 2012

Liebster Blog Award!

I'd like to thank Angela from The Merry Dressmaker for surprising me yesterday with the Liebster Blog Award! I'm so happy to receive my very first blog award and now it's time for me to pass it on. It was so hard deciding only five favorite bloggers because there are so many awesome bloggers that I truly admire and who would definitely deserve to be presented with this award. 

Liebster Blog Award rules:

1) Add the award icon to your blog!
2) Link to your awarder to say "Thank You".
3) And most importantly, award five (5) of your favorite bloggers with less than 200 followers with the award! 

And the Liebster Blog Award goes to... 

Rebel's Haven: Vera's Costume Journal: I admire Vera's patience and determination with all of her costume making projects. Especially, I'm in awe with all the work she puts into a costume to make it perfect, down to the smallest details. 

Isis' Wardrobe: I know I'm breaking the rules here because Isis already has over 200 followers. However, it's only two followers above the limit as I'm writing this so I thought to give this award to her anyway. Her blog is so inspiring to me and she's so supportive towards others so I really think she deserves to get this award! 

Les Choses Délicates: Yet another inspiring blog with so many pretty pictures. I love all of her 18th centruy outfits, but her blue zone front gown must be one of the prettiest dresses I've ever seen! 

L'eventail, la Rose et L'Edelweiss: This is a blogger that I originally found on deviantArt. Few years ago she was one of the first 18th century costume makers that I ever stumbled upon on the net and her works have inspired me since the very beginning. 

Sweet Threads, Dude!: What can I say? This blogger simply makes awesome costumes and I really admire her accuracy with details.

For closure, I'd like to thank all of my readers for your support and especially those who constantly leave comments. I really appreciate it - it keeps me going even when I feel like giving up with my sewing and throwing the unfinished garments to dumpster! :) Well, that's all from this time! I'm making progress with the striped robe à l'anglaise so you can expect to see some W.I.P. photos very soon! 

Monday, September 10, 2012

Underwear for 1770s and 1780s

Last week was all about making underwear for the striped robe à l'anglaise. I sewed a new big bumpad, shift and an under-petticoat. My old shift was in a very bad condition and a way too loose around the arms for 1770's and 1780's sleeves so that's why I needed a new one. I've always been quite lazy about underwear because all those garments won't be seen but it was just recently when I realized that you actually need proper underwear for good costumes. I've been in a hurry because the deadline for the 1780's robe à l'anglaise is in 19 days so I just machine-sewed pretty much all the undies.

First off, the shift. Sorry for the modern underwear showing but the fabric is just so sheer I had to wear something there under for the photos for the sake of modesty. The shift pattern is based on the variation A of  chemise in Garsault's L'Art de la Lingerie, found on La couturière Parisienne.


The new bumpad. I made it a lot bigger than my earlier two bumpads. Also, there's a ruffle around the edges because I thought might give the skirts more smoother line. It works. The bumpad is cotton and stuffed with some old pillow stuffing.


The first under-petticoat. I forgot to wear stockings for the photos. It doesn't matter, though. I just wanted to see the effect of the new bumpad and petticoats.


The second under-petticoat. It's an old one, made to be worn with the smaller bumpads so the hem isn't even with the new one.


I'm actually a bit ashamed to admit that I still don't have a pair of hanging pockets after five years in this hobby. I will sew them... eventually. But now I'm off to start making the dress itself!

Tuesday, September 4, 2012

Upcoming project: Striped 1780's dress

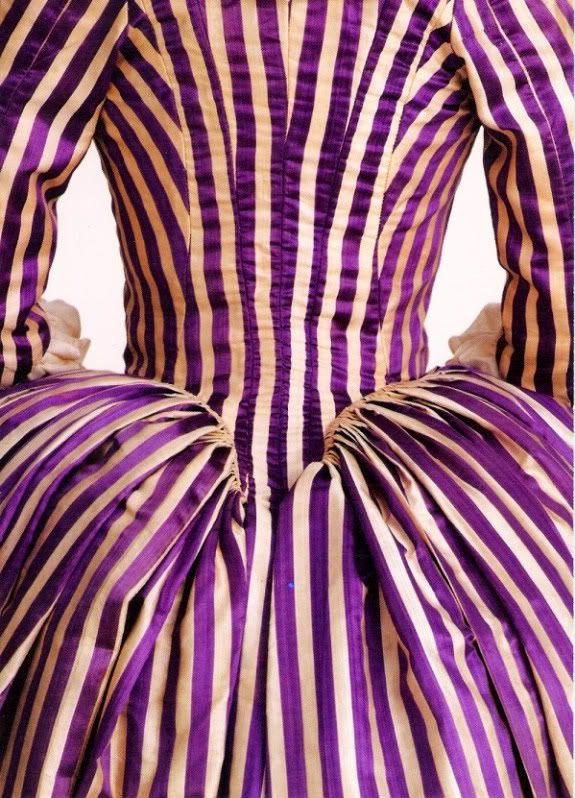
I'm finally about to start to make a new dress. This is a gown of which I've been dreaming of since I saw a picture of a striped 1780's robe à l'anglaise in the book Fashioning fashion a few months ago. There's only a back view photo of the dress (below) in the book if I remember correctly. I tried to find the dress in LACMA digital collection but it wasn't there. Later on, I saw some pictures of the said dress on a flickr set of Fashioning Fashion exhibit and thought I'd love to sew the dress for myself because I'm absolutely crazy about stripes and purple is one of my favorite colours.

Picture via Fashion is Poison blog.
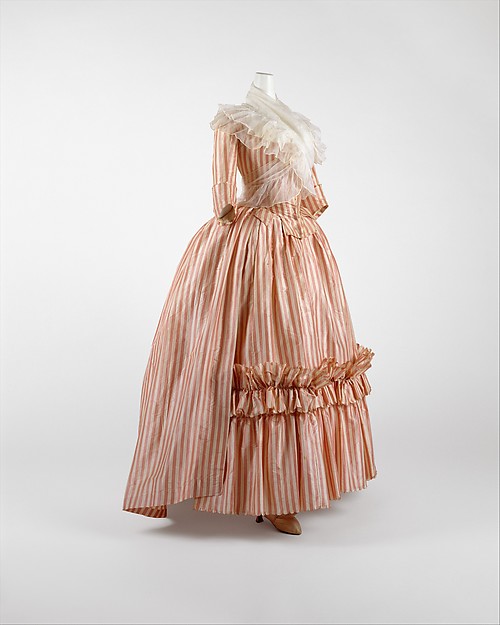
The dress instantly made me think of another very similar anglaise gown on MET.


Unfortunately I couldn't start making the dress as soon as I would have wanted to because it took me a couple of months to find the fabric. I knew I probably wouldn't find white and purple striped silk fabric but luckily I did find the fabric in cotton! It looks almost blue when photographed but it's actually purple. Here's a sketch of my version of this type of dress. I'm not yet sure whether I'll add ruffles to the petticoat like in the Met dress. I'll have to see about it later on. Changes in the design are very probable anyway.


At the moment I'm making a humongous bumpad to be worn under the petticoat because I realized my earlier bumpad was much too small. I'll post photos of the progress on the dress as I get there.

Pattern for robe à l'anglaise (1787) found via the Costumer's Manifesto. 
By the way, I started a facebook site for Rococo Atelier so that I can share interesting links with you. I'll also post links to my recent blog posts there so you can follow the blog more easily if you don't have a blogger account. Like Rococo Atelier here. 

Saturday, August 18, 2012

Finished dark brown stays!

So, I'm finished with the dark brown stays! I added the very last linen lining panel to them yesterday but we already took some pictures of the stays a couple of days ago. I've basically said everything I wanted to say about these stays in earlier posts so now it's just time for the photos. :)


In case you're wondering, the materials used were: dark brown cotton twill for the outer layers, linen for the inner layers and for the lining, white cotton twill tape for binding and 5 mm cable ties for boning. Also, there are four 7mm metal bones altogether, two in the front and two in the back.


By the way, these tabs were actually much more easier to bind than the more rounded ones, at least to me. I used twill tape for my stays for the first time and the binding part wasn't as hard as it has been before.


The edges of the back panels won't close as closely as they used to. After adding the lining the stays wouldn't stretch as much as before. Or then I just gained a little weight during the summer, which is very probable as well. Anyhow, I'm just happy the gap is even.


As you can see in the photo below, the stays won't lie completely flat on the floor.


I'm so relieved to have finished these stays, even if stays in general are lot of fun for me. It's just that I haven't had much time to sew anything else than stays this year. So I'm very excited to finally get started with some dresses very soon!