
Today I'm here to show you a dress that I finished nearly two years ago. I made it for our second Gustavian day event in August 2016 and have, sadly, never worn it since.

This dress was probably the quickest and easiest gown that I've ever made so it took me less than a week to finish. I should definitely make more regency gowns just because it's so relaxing! :)

The bodice has a crossover front. Later on I learned that for a more typical early 1810s look there should be a small triangle shaped piece (that could also possibly be the front of an under-bodice or under-dress/bodiced petticoat showing) between the sides of the front (see an example of this in the painting a bit further below).

I scaled up a pattern for the bodice from Period Costume from Stage & Screen: Patterns for Women's Dress 1800-1909 by Jean Hunnisett and altered the front to have a crossover front. The sleeve pattern also came from the same book.

I decorated the neckline with cotton lace with a scalloped edge, to match with the scallops on the hem.

This type of bodice seems to have been fashionable in the early 1810s. Notice how the neckline is much wider and lower cut than mine.
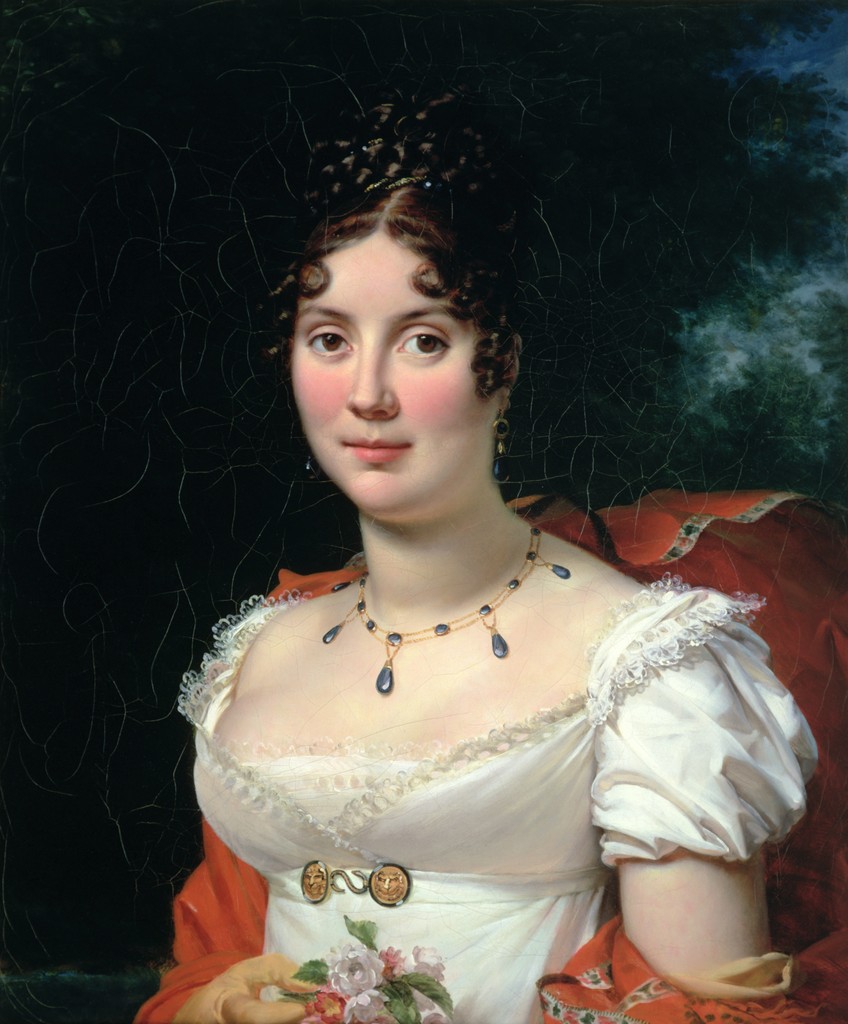
Portrait of a Lady by François Pascal Simon, Baron Gérard.
The neckline is pretty much the same as in this fashion plate.
 |
| Costume Parisien fashion plate, 1810. |
My bodice closes with buttons and buttonholes in the back.

(Please ignore the underpetticoat straps showing through the fabric. I didn't put all my white regency undies on my mannequin so that's why they can be seen here...)

I've also learned that this wasn't a very common closure method, although a lot of historical costumers go for it! I think I've only found four extant dresses a functional button back closure. Different kinds of drawstring closures seem to be much more common in the 1810s and I can totally now see why - they allow for adjust-ability, whereas there's none in button closure.
One example of a drawstring closure of a 1810s dress can be found in Costume in Detail: 1730-1930 by Nancy Bradfield (pages 103-104). (Also notice the corresponding v-neck design on both the front and the back of the gown.)

I think I've only found four extant dresses a functional button back closure.


And the fourth example can be found here.
When it comes to the construction of the bodice, I must admit that I totally improvised. Since regency isn't the main period I'm interested in (no suprise there ;)), I've decided I don't need to have as high standards for accuracy as I have with 18th century. Not that I have very high standards of accuracy with 18th century either (although it varies from project to project and apparently seems to get higher with time) but at least it's higher than with regency. With regency I simply cheat as much as I can, without having any too obvious machine sewing showing.
Hence, this bodice is mainly machine-stitched, and it is lined with cotton. Another option would have been to leave the bodice unlined and wear a bodiced petticoat, however, my petticoat doesn't have a bodice so I had to add a lining to the bodice. The underbust is fitted with darts in the lining and gathering in the muslin on the outside (as seen in the previous pictures).

The dorset buttons were ready-made (no shame!) and I didn't even bother to do the five buttonholes by hand. Thankfully, my sewing machine makes really nice looking buttonholes so maybe I can get away with them because they don't look obnoxiously clunky? :)

...unless you look really closely. ;)


I also constructed the bodice in the modern way by sewing up the lining separately and adding it to the outer fabric by sewing around the edges with right sides together. That way I was able to easily cover the raw edges of the lace as well, because they were sandwiched between the outer fabric and lining. When the bodice was finished, I joined the bodice and skirt and left the seam allowances unfinished on the inside of the dress and facing towards the hem.

This fabric was yet another lucky local fabric store find. It's embroidered cotton with a scalloped hem that just had to be made into a regency dress. It instantly reminded me of this dress in Kvinnligt mode under två sekel by Britta Hammar & Pernilla Rasmussen. There is also a 1810s dress with a scalloped hem in Regency Women's Dress: Techniques and Patterns 1800-1830 by Cassidy Percoco.

In fact, the pattern for my skirt is based on the morning gown (dated 1809-1819) in Regency Women's Dress (see pages 62-65).


In fact, the pattern for my skirt is based on the morning gown (dated 1809-1819) in Regency Women's Dress (see pages 62-65).
Scalloped hems were also fashionable in the early 1810s. The extant v-neck gowns that I found also often (thought maybe not always) had a corresponding back like this (more examples of this can be found on my Pinterest research image board).
 |

A close-up of the embroidery on the hem:

When I was scheduling this dress and thinking how fast it would be to put together, I didn't realize that I would have to finish all the long seams on the skirt by hand because the fabric is so sheer that unfinished seam allowances would show and look really ugly. So the dress took me a bit longer than expected but I was really happy with how neat and tidy the skirt looked in the end!
Here you can see the side panel of the skirt and the flat-felled seams.

The result was so worth the effort and I quite fell in love with flat-felled seam finishing. Now I'm tempted to use this technique on all my skirts! (I'm not actually going to do it where it isn't necessary because it's a waste of time though!) ;)

And this is how the seams look from the right side of the dress:

As this post was getting really long, I decided to separate the photos of the dress being worn into another post which I will try to publish soon. In the meanwhile I am going to end this post with a couple of teasers and links. :)

My Pinterest boards related to this project:
I should also mention that I found Natalie Garbett's post about her c.1812 dress very useful when starting this project. :)

Since this gown was made two years ago at a time when I was just starting researching and sewing regency era garments, I have have learned so much more after that. I'm now thinking about getting back to this gown to make some alterations to the bodice to make it more authentic. This was my second regency gown and it was definitely still very much a learning project.

Since this gown was made two years ago at a time when I was just starting researching and sewing regency era garments, I have have learned so much more after that. I'm now thinking about getting back to this gown to make some alterations to the bodice to make it more authentic. This was my second regency gown and it was definitely still very much a learning project.
Hello Sanna,
ReplyDeleteI'd like to let you know that I've nominated you for the Mystery Blogger Award. Your sewing projects are always meticulous and such an inspiration!
https://thequintessentialclothespen.com/2018/06/18/mystery-blogger-award/
Best,
Quinn
Oh thank you very much Quinn! Your kind words mean a lot to me! <3
DeleteThis gown is simply lovely!! I love seeing all of your construction details as well! You're right, your machine makes really nice buttonholes, I actually thought they were handsewn! Are all of the skirt panels gores like the front one, or are the sides and back cut on the straight grain?
ReplyDeleteGreat fashion idea and this product is amazing. I want to buy some Wholesale Swimwear,Cheap Nightclub Dresses and some of this products. Thanks for share this post it was help me a lot.
ReplyDeleteARE YOU INTERESTED IN THE WORLD OF FAME?? GETTING RICH. POWERFUL AND FAMOUS? JOIN THE ILLUMINATI TODAY AND BECOME RICH.ILLUMINATI BRINGS YOU INTO THE LIMELIGHT OF THE WORLD IN WHICH YOU LIVE IN TODAY. YOUR FINANCIAL DIFFICULTIES ARE BROUGHT TO AN END IF YOU JOIN. WE SUPPORT YOU BOTH FINANCIALLY AND MATERIALLY TO ENSURE YOU LIVE A COMFORTABLE LIFE.JOIN ILLUMINATI AND GET YOUR SELF A HOUSE AND A CAR AND ALSO WITH THE SUM OF (ONE MILLION DOLLARS) BENEFITS GIVEN TO NEW MEMBERS WHO JOIN ILLUMINATI. 1. A Cash Reward of one million dollars 2.A Dream House bought in the country of your own choice and a car 3.A V.I.P treatment in all Airports in the World 4.A total Lifestyle change 5.Monthly payment of $500,000.00 USD into your bank account every month as a member If you are interested of joining us in the great brotherhood Illuminati riches satanic hand symbol Add us on whatsapp with this +2348116071831 or +2349153805745
ReplyDeleteor email me
jeffdunham754@gmail.com
okay
JOIN THE ILLUMINATI BROTHERHOOD
ReplyDeleteThe Illuminati is a powerful and influential organization made up of multimillionaires, billionaires, and elite individuals who shape global affairs—including the formation of the New World Order. Many world leaders, presidents, prime ministers, royalty, and top executives from Fortune 500 companies in the USA are proud members of this secret society.By joining the Illuminati, you gain access to a network of mysterious forces that can elevate your life beyond imagination. Whether you seek wealth, success in business, fame, or power, the Illuminati can make your dreams a reality.
Don’t hesitate—contact us now via WhatsApp: +447365758728
HAIL THE LIGHT!!!
thanks for the information post like this 4k wallpaper happy birthday images
ReplyDeleteThis is an open invitation to join the world’s largest and most influential conglomerate and achieve the pinnacle of success in your career and personal goals. Become RICH, FAMOUS, and POWERFUL while contributing to the advancement of humanity and the reduction of poverty and crime worldwide.
ReplyDeleteAs a new member of the ILLUMINATI, you’ll be entitled to exclusive benefits, including:
• A welcome gift $1,000,000
• A personal house
• An official car
[NOTE: No blood sacrifices, no harm to loved ones, and no selling of souls are involved.]
If you’re interested, kindly message +447365758728 on WhatsApp.
My Testimony – How I Joined the New World Order
ReplyDeleteI want to share my testimony about how I became a member of the great organization known as the New World Order.
There was a time in my life when I was drowning in poverty—so much so that I felt like I was on the brink of death. I tried several times to join the organization, but I kept running into fake people who claimed to be agents. They took my money and left me with nothing. It was heartbreaking, and I lost all hope.
Still, something inside me wouldn’t let me give up. I stayed focused on my dream and kept searching. Eventually, I met someone else who said he could help me join. At first, I didn’t trust him at all because of the pain and betrayal I had already experienced. He also asked for money, and that scared me—but then he sent me his official membership ID card. That gave me a bit of trust, so I took a leap of faith and sent the money for the initiation items.
What happened next amazed me. Within just 2 hours, I was initiated online, and shortly after that, I received $1,000,000 directly into my account. From that moment on, I knew he was genuine. He is the only agent I trust, and I will always be grateful for his help.
So if you're serious about joining and ready to change your life, contact him on WhatsApp: +447365758728. Don't let fear hold you back like it almost did with me.
You can achieve your dreams by being a member of the Great ILLUMINATI brother hood. With this all your dreams and heart desire can be fully accomplish, if you really want to be a member of the great Illuminati brotherhood, Note: newly recruited members are entitled with 600,000 US Dollars , A Ring, that will protect and guild you from enemies, and a visa . Warning only contact us if you're interested. Kindly contact via whatsapp:+905488400195
ReplyDeleteemail: illuminatihood6666@hotmail.com
JOIN THE ILLUMINATI BROTHERHOOD
ReplyDeleteThe Illuminati is a powerful and influential organization made up of multimillionaires, billionaires, and elite individuals who shape global affairs—including the formation of the New World Order. Many world leaders, presidents, prime ministers, royalty, and top executives from Fortune 500 companies in the USA are proud members of this secret society.By joining the Illuminati, you gain access to a network of mysterious forces that can elevate your life beyond imagination. Whether you seek wealth, success in business, fame, or power, the Illuminati can make your dreams a reality.
Don’t hesitate—contact mr William adams WhatsApp: +2349120287787 or Email: Williamadams08648@gmail.com
CONTACT Mr Harrising call (+2347056290169 or WhatsApp him through this number +2347056290169 or Email: illuminatibrotherhood5566@gmail.com Hello everyone my name is Charles Adamson am from USA I am here to give a testimony on how I joined the illuminati brotherhood, I was trying to join this organization for so many years now,I was scammed by fake agent in south africa and Nigeria,I was down,I could not feed my self and my family anymore and I tried to make money by all miss but all invail, I was afraid to contact any illuminati agent because they have eat my money,One day I across a post of someone giving a testimony, thanking a man called Charles Adamson of being helping him to join the illuminati brotherhood, then I look at the man email and the phone number that was written there, it was a nigeria number I was afraid to contact him because a nigerian agent eat my $3000 and go away with the money then I was very tired, confused and I decided to contact the person that was given the testimony and i called him and I communicated with him on phone calls before he started telling me his own story about when he wanted to join, he told me everything to do, then I made up my mind and called the agent called Charles Adamson and he told me everything to do, and I was initiated, surprisely I was given my benefit of being a new member of the great illuminati brotherhood I was so happy,For those of you trying to join this organization this is your opportunity for you to join CONTACT MR Harrising call ( +2347056290169 or WhatsApp him +2347056290169 or email: illuminatibrotherhood5566@gmail.com
ReplyDeleteश्रीकामकलाकालीसहस्रनामस्तोत्रम् ॥ श्रीकामकलाकालीसहस्रनामस्तोत्रम् ॥ ॥ देव्युवाच ॥ त्वत्तः श्रुतं मया नाथ देव देव जगत्पते । देव्याः कामकलाकाल्या विधानं सिद्धिदायकम् ॥ १ ॥ त्रैलोक्यविजयस्यापि विशेषेण श्रुतो मया । तत्प्रसङ्गेन चान्यासां मन्त्रध्याने तथा श्रुते ॥ २ ॥ इदानीं जायते नाथ शुश्रुषा मम भूयसी । नाम्नां सहस्रे त्रिविधमहापापौघहारिणि ॥ ३ ॥ श्रुतेन येन देवेश धन्या स्यां भाग्यवत्यपि ।… Read More “ह्रीं श्रीराधायै स्वाहा” श्रीराधा-उपासना – देवी भागवत अनुसार ॥ ह्रीं श्रीराधायै स्वाहा ॥ श्रीराधा-उपासना – देवी भागवत अनुसार भगवान् नारायण कहते हैं — नारद ! सुनो, यह वेदवर्णित रहस्य तुम्हें बताता हूँ । यह सर्वोत्तम एवं परात्पर साररहस्य जिस किसी के सम्मुख नहीं कहना चाहिये । इस रहस्य को सुनकर दूसरों से कहना उचित नहीं है; क्योंकि यह अत्यन्त गुह्य रहस्य है ।… Read More गुह्यकाली संजीवन स्तोत्रम् ॥ अथ गुह्यकाली संजीवन स्तोत्रम् ॥ इस स्तोत्र को पढ़े बिना गुह्यकाली सहस्रनाम पठन का पूरा फल नहीं मिलता । अत: इस स्तोत्र का पाठ अवश्य करें । ॥ महाकाल उवाच ॥ इदं स्तोत्रं पुरा देव्या त्रिपुरघ्नाय कीर्तितम् । त्रिपुरघ्नोऽपि मां प्रादादुपदिश्य मनुं प्रिये ॥ १ ॥ गद्याकारं च स विभुः स्तोत्रं तस्यै चकार ह… Read More गुह्यकाली सहस्रनाम स्तोत्रम् ॥ अथ गुह्यकाली सहस्रनाम स्तोत्रम् ॥ ॥ पूर्वपीठिका ॥ ॥ देव्युवाच ॥ यदुक्तं भवता पूर्वं प्राणेश करुणावशात् ॥ १ ॥ नाम्नां सहस्रं देव्यास्तु तदिदानीं वदप्रभो । ॥ श्री महाकालोवाच ॥ अतिप्रीतोऽस्मि देवेशि तवाहं वचसामुना ॥ २ ॥ सहस्रनामस्तोत्रं यत् सर्वेषामुत्तमोत्तमम् । सुगोपितं यद्यपि स्यात् कथयिष्ये तथापि ते ॥ ३ ॥ देव्याः सहस्रनामाख्यं स्तोत्रं पापौघमर्दनम् ।… Read More गोपिका विरह गीत ॥ गोपिका विरह गीत ॥ एहि मुरारे कुजविहारे एहि प्रणतजनबन्धो । हे माधव मधुमथन वरेण्य केशव करुणासिन्धो । (ध्रुवपदम्) रासनिकुञ्जे गुञ्जति नियतं भ्रमरशतं किल कान्त । एहि निभृतपथपान्थ । त्वामिह याचे दर्शनदानं हे मधुसूदन शान्त ॥ १ ॥… Read More श्रीयुगलकिशोराष्टक ॥ श्रीयुगलकिशोराष्टक ॥ श्रीरूपगोस्वामीजी द्वारा रचित श्रीयुगलकिशोराष्टक श्री रूप गोस्वामी (१४९३ – ameya jaywant narvekar १५६४), वृंदावन में चैतन्य महाप्रभु द्वारा भेजे गए छः षण्गोस्वामी में से एक थे। वे कवि, गुरु और दार्शनिक थे। वे सनातन गोस्वामी के भाई थे। इनका जन्म १४९३ ई (तदनुसार १४१५ शक.सं.) को हुआ था। इन्होंने २२ वर्ष की आयु में गृहस्थाश्रम… Read More राधामाधव प्रातः स्तवराज ॥ राधामाधव प्रातः स्तवराज ॥ प्रातः स्मरामि युगकेलिरसाभिषिक्तं वृन्दावनं सुरमणीयमुदारवृक्षम् । सौरीप्रवाहवृतमात्मगुणप्रकाशं ADD
ReplyDelete
ReplyDeleteमहाकालसंहिता कामकलाकाली खण्ड पटल १५ - कामकलाकाल्याः प्राणायुताक्षरी मन्त्रः
ओं ऐं ह्रीं श्रीं ह्रीं क्लीं हूं छूीं स्त्रीं फ्रें क्रों क्षौं आं स्फों स्वाहा कामकलाकालि, ह्रीं क्रीं ह्रीं ह्रीं ह्रीं हूं हूं ह्रीं ह्रीं ह्रीं क्रीं क्रीं क्रीं ठः ठः दक्षिणकालिके, ऐं क्रीं ह्रीं हूं स्त्री फ्रे स्त्रीं ख भद्रकालि हूं हूं फट् फट् नमः स्वाहा भद्रकालि ओं ह्रीं ह्रीं हूं हूं भगवति श्मशानकालि नरकङ्कालमालाधारिणि ह्रीं क्रीं कुणपभोजिनि फ्रें फ्रें स्वाहा श्मशानकालि क्रीं हूं ह्रीं स्त्रीं श्रीं क्लीं फट् स्वाहा कालकालि, ओं फ्रें सिद्धिकरालि ह्रीं ह्रीं हूं स्त्रीं फ्रें नमः स्वाहा गुह्यकालि, ओं ओं हूं ह्रीं फ्रें छ्रीं स्त्रीं श्रीं क्रों नमो धनकाल्यै विकरालरूपिणि धनं देहि देहि दापय दापय क्षं क्षां क्षिं क्षीं क्षं क्षं क्षं क्षं क्ष्लं क्ष क्ष क्ष क्ष क्षः क्रों क्रोः आं ह्रीं ह्रीं हूं हूं नमो नमः फट् स्वाहा धनकालिके, ओं ऐं क्लीं ह्रीं हूं सिद्धिकाल्यै नमः सिद्धिकालि, ह्रीं चण्डाट्टहासनि जगद्ग्रसनकारिणि नरमुण्डमालिनि चण्डकालिके क्लीं श्रीं हूं फ्रें स्त्रीं छ्रीं फट् फट् स्वाहा चण्डकालिके नमः कमलवासिन्यै स्वाहालक्ष्मि ओं श्रीं ह्रीं श्रीं कमले कमलालये प्रसीद प्रसीद श्रीं ह्रीं श्री महालक्ष्म्यै नमः महालक्ष्मि, ह्रीं नमो भगवति माहेश्वरि अन्नपूर्णे स्वाहा अन्नपूर्णे, ओं ह्रीं हूं उत्तिष्ठपुरुषि किं स्वपिषि भयं मे समुपस्थितं यदि शक्यमशक्यं वा क्रोधदुर्गे भगवति शमय स्वाहा हूं ह्रीं ओं, वनदुर्गे ह्रीं स्फुर स्फुर प्रस्फुर प्रस्फुर घोरघोरतरतनुरूपे चट चट प्रचट प्रचट कह कह रम रम बन्ध बन्ध घातय घातय हूं फट् विजयाघोरे, ह्रीं पद्मावति स्वाहा पद्मावति, महिषमर्दिनि स्वाहा महिषमर्दिनि, ओं दुर्गे दुर्गे रक्षिणि स्वाहा जयदुर्गे, ओं ह्रीं दुं दुर्गायै स्वाहा, ऐं ह्रीं श्रीं ओं नमो भगवत मातङ्गेश्वरि सर्वस्त्रीपुरुषवशङ्करि सर्वदुष्टमृगवशङ्करि सर्वग्रहवशङ्करि सर्वसत्त्ववशङ्कर सर्वजनमनोहरि सर्वमुखरञ्जिनि सर्वराजवशङ्करि ameya jaywant narvekar सर्वलोकममुं मे वशमानय स्वाहा, राजमातङ्ग उच्छिष्टमातङ्गिनि हूं ह्रीं ओं क्लीं स्वाहा उच्छिष्टमातङ्गि, उच्छिष्टचाण्डालिनि सुमुखि देवि महापिशाचिनि ह्रीं ठः ठः ठः उच्छिष्टचाण्डालिनि, ओं ह्रीं बगलामुखि सर्वदुष्टानां मुखं वाचं स्त म्भय जिह्वां कीलय कीलय बुद्धिं नाशय ह्रीं ओं स्वाहा बगले, ऐं श्रीं ह्रीं क्लीं धनलक्ष्मि ओं ह्रीं ऐं ह्रीं ओं सरस्वत्यै नमः सरस्वति, आ ह्रीं हूं भुवनेश्वरि, ओं ह्रीं श्रीं हूं क्लीं आं अश्वारूढायै फट् फट् स्वाहा अश्वारूढे, ओं ऐं ह्रीं नित्यक्लिन्ने मदद्रवे ऐं ह्रीं स्वाहा नित्यक्लिन्ने । स्त्रीं क्षमकलह्रहसयूं.... (बालाकूट)... (बगलाकूट )... ( त्वरिताकूट) जय भैरवि श्रीं ह्रीं ऐं ब्लूं ग्लौः अं आं इं राजदेवि राजलक्ष्मि ग्लं ग्लां ग्लिं ग्लीं ग्लुं ग्लूं ग्लं ग्लं ग्लू ग्लें ग्लैं ग्लों ग्लौं ग्ल: क्लीं श्रीं श्रीं ऐं ह्रीं क्लीं पौं राजराजेश्वरि ज्वल ज्वल शूलिनि दुष्टग्रहं ग्रस स्वाहा शूलिनि, ह्रीं महाचण्डयोगेश्वरि श्रीं श्रीं श्रीं फट् फट् फट् फट् फट् जय महाचण्ड- योगेश्वरि, श्रीं ह्रीं क्लीं प्लूं ऐं ह्रीं क्लीं पौं क्षीं क्लीं सिद्धिलक्ष्म्यै नमः क्लीं पौं ह्रीं ऐं राज्यसिद्धिलक्ष्मि ओं क्रः हूं आं क्रों स्त्रीं हूं क्षौं ह्रां फट्... ( त्वरिताकूट )... (नक्षत्र- कूट )... सकहलमक्षखवूं ... ( ग्रहकूट )... म्लकहक्षरस्त्री... (काम्यकूट)... यम्लवी... (पार्श्वकूट)... (कामकूट)... ग्लक्षकमहव्यऊं हहव्यकऊं मफ़लहलहखफूं म्लव्य्रवऊं.... (शङ्खकूट )... म्लक्षकसहहूं क्षम्लब्रसहस्हक्षक्लस्त्रीं रक्षलहमसहकब्रूं... (मत्स्यकूट ).... (त्रिशूलकूट)... झसखग्रमऊ हृक्ष्मली ह्रीं ह्रीं हूं क्लीं स्त्रीं ऐं क्रौं छ्री फ्रें क्रीं ग्लक्षक- महव्यऊ हूं अघोरे सिद्धिं मे देहि दापय स्वाहा अघोरे, ओं नमश्चा ameya jaywant narvekar
महाकालसंहिता कामकलाकाली खण्ड पटल १५ - ameya jaywant narvekar कामकलाकाल्याः प्राणायुताक्षरी मन्त्रः
ReplyDeleteओं ऐं ह्रीं श्रीं ह्रीं क्लीं हूं छूीं स्त्रीं फ्रें क्रों क्षौं आं स्फों स्वाहा कामकलाकालि, ह्रीं क्रीं ह्रीं ह्रीं ह्रीं हूं हूं ह्रीं ह्रीं ह्रीं क्रीं क्रीं क्रीं ठः ठः दक्षिणकालिके, ऐं क्रीं ह्रीं हूं स्त्री फ्रे स्त्रीं ख भद्रकालि हूं हूं फट् फट् नमः स्वाहा भद्रकालि ओं ह्रीं ह्रीं हूं हूं भगवति श्मशानकालि नरकङ्कालमालाधारिणि ह्रीं क्रीं कुणपभोजिनि फ्रें फ्रें स्वाहा श्मशानकालि क्रीं हूं ह्रीं स्त्रीं श्रीं क्लीं फट् स्वाहा कालकालि, ओं फ्रें सिद्धिकरालि ह्रीं ह्रीं हूं स्त्रीं फ्रें नमः स्वाहा गुह्यकालि, ओं ओं हूं ह्रीं फ्रें छ्रीं स्त्रीं श्रीं क्रों नमो धनकाल्यै विकरालरूपिणि धनं देहि देहि दापय दापय क्षं क्षां क्षिं क्षीं क्षं क्षं क्षं क्षं क्ष्लं क्ष क्ष क्ष क्ष क्षः क्रों क्रोः आं ह्रीं ह्रीं हूं हूं नमो नमः फट् स्वाहा धनकालिके, ओं ऐं क्लीं ह्रीं हूं सिद्धिकाल्यै नमः सिद्धिकालि, ह्रीं चण्डाट्टहासनि जगद्ग्रसनकारिणि नरमुण्डमालिनि चण्डकालिके क्लीं श्रीं हूं फ्रें स्त्रीं छ्रीं फट् फट् स्वाहा चण्डकालिके नमः कमलवासिन्यै स्वाहालक्ष्मि ओं श्रीं ह्रीं श्रीं कमले कमलालये प्रसीद प्रसीद श्रीं ह्रीं श्री महालक्ष्म्यै नमः महालक्ष्मि, ह्रीं नमो भगवति माहेश्वरि अन्नपूर्णे स्वाहा अन्नपूर्णे, ओं ह्रीं हूं उत्तिष्ठपुरुषि किं स्वपिषि भयं मे समुपस्थितं यदि शक्यमशक्यं वा क्रोधदुर्गे भगवति शमय स्वाहा हूं ह्रीं ओं, वनदुर्गे ह्रीं स्फुर स्फुर प्रस्फुर प्रस्फुर घोरघोरतरतनुरूपे चट चट प्रचट प्रचट कह कह रम रम बन्ध बन्ध घातय घातय हूं फट् विजयाघोरे, ह्रीं पद्मावति स्वाहा पद्मावति, महिषमर्दिनि स्वाहा महिषमर्दिनि, ओं दुर्गे दुर्गे रक्षिणि स्वाहा जयदुर्गे, ओं ह्रीं दुं दुर्गायै स्वाहा, ऐं ह्रीं श्रीं ओं नमो भगवत मातङ्गेश्वरि सर्वस्त्रीपुरुषवशङ्करि सर्वदुष्टमृगवशङ्करि सर्वग्रहवशङ्करि सर्वसत्त्ववशङ्कर सर्वजनमनोहरि सर्वमुखरञ्जिनि सर्वराजवशङ्करि ameya jaywant narvekar सर्वलोकममुं मे वशमानय स्वाहा, राजमातङ्ग उच्छिष्टमातङ्गिनि हूं ह्रीं ओं क्लीं स्वाहा उच्छिष्टमातङ्गि, उच्छिष्टचाण्डालिनि सुमुखि देवि महापिशाचिनि ह्रीं ठः ठः ठः उच्छिष्टचाण्डालिनि, ओं ह्रीं बगलामुखि सर्वदुष्टानां मुखं वाचं स्त म्भय जिह्वां कीलय कीलय बुद्धिं नाशय ह्रीं ओं स्वाहा बगले, ऐं श्रीं ह्रीं क्लीं धनलक्ष्मि ओं ह्रीं ऐं ह्रीं ओं सरस्वत्यै नमः सरस्वति, आ ह्रीं हूं भुवनेश्वरि, ओं ह्रीं श्रीं हूं क्लीं आं अश्वारूढायै फट् फट् स्वाहा अश्वारूढे, ओं ऐं ह्रीं नित्यक्लिन्ने मदद्रवे ऐं ह्रीं स्वाहा नित्यक्लिन्ने । स्त्रीं क्षमकलह्रहसयूं.... (बालाकूट)... (बगलाकूट )... ( त्वरिताकूट) जय भैरवि श्रीं ह्रीं ऐं ब्लूं ग्लौः अं आं इं राजदेवि राजलक्ष्मि ग्लं ग्लां ग्लिं ग्लीं ग्लुं ग्लूं ग्लं ग्लं ग्लू ग्लें ग्लैं ग्लों ग्लौं ग्ल: क्लीं श्रीं श्रीं ऐं ह्रीं क्लीं पौं राजराजेश्वरि ज्वल ज्वल शूलिनि दुष्टग्रहं ग्रस स्वाहा शूलिनि, ह्रीं महाचण्डयोगेश्वरि श्रीं श्रीं श्रीं फट् फट् फट् फट् फट् जय महाचण्ड- योगेश्वरि, श्रीं ह्रीं क्लीं प्लूं ऐं ह्रीं क्लीं पौं क्षीं क्लीं सिद्धिलक्ष्म्यै नमः क्लीं पौं ह्रीं ऐं राज्यसिद्धिलक्ष्मि ओं क्रः हूं आं क्रों स्त्रीं हूं क्षौं ह्रां फट्... ( त्वरिताकूट )... (नक्षत्र- कूट )... सकहलमक्षखवूं ... ( ग्रहकूट )... म्लकहक्षरस्त्री... (काम्यकूट)... यम्लवी... (पार्श्वकूट)... (कामकूट)... ग्लक्षकमहव्यऊं हहव्यकऊं मफ़लहलहखफूं म्लव्य्रवऊं.... (शङ्खकूट )... म्लक्षकसहहूं क्षम्लब्रसहस्हक्षक्लस्त्रीं रक्षलहमसहकब्रूं... (मत्स्यकूट ).... (त्रिशूलकूट)... झसखग्रमऊ हृक्ष्मली ह्रीं ह्रीं हूं क्लीं स्त्रीं ऐं क्रौं छ्री फ्रें क्रीं ग्लक्षक- महव्यऊ हूं अघोरे सिद्धिं मे देहि दापय स्वाहा अघोरे, ओं नमश्चा ameya jaywant narvekar
This comment has been removed by the author.
ReplyDeleteThat dress sounds absolutely charming! For anyone looking to add a cozy and stylish layer to Regency-inspired outfits, a fur vest brings the perfect mix of elegance and warmth.
ReplyDeleteDedicated Nurse Loses $380K to Romance Scam…
ReplyDelete.
.
.
I gave my all to nursing—long ICU shifts, buying patient comforts out of pocket, saving $380K over years for my daughter’s college and our future after losing my husband. Then ‘David’ messaged me online—gentle, attentive, a supposed British doctor in Africa. He shared his stories, called me his light, made me feel seen after years alone. He empathized with my grief and exhaustion, built trust slowly. Then crises hit: his “daughter’s” rare illness needing surgery, an investment to secure our life together. He showed “proof” of safe crypto returns. I trusted him completely and sent everything—transfers, crypto, credit cards. It vanished. Devastated, I locked myself in the staff bathroom during break, sank sobbing, convinced I’d betrayed my patients, my calling, and my daughter’s dreams. Late one night, desperate, I found JetWebHackers. I messaged in tears. They responded immediately, traced the transactions, worked tirelessly on blockchain recovery. In just weeks, they recovered the full $380K—funds hit my account. I stared at the balance, clutching my badge, tears of pure relief pouring down. They restored my hope and future. If you’ve been scammed and heartbroken, don’t give up—JetWebHackers are genuine heroes who fight for victims. Thank you from my heart! God bless.
#JetWebHackers
EMAIL: support@jetwebhackers.com
WhatsApp: +1 (260) 228-9998