
Moving on with the stays (part 1). After drawing all the boning channels to the panels, pin the middle layer pieces on your exterior fabric. I really recommend linen or cotton for exterior fabric for beginners because they're both easy to work with (and comfortable materials, too).
In case you're not sure what would be an appropriate color or material for your stays, take a look at these boards I've created of extant stays on Pinterest:
As you can see, I chose pale blue for these stays. I had hoped to use yellow with blue stitching but I wasn't able to find any suitable yellow fabric locally so I simply used what I already had in stash.
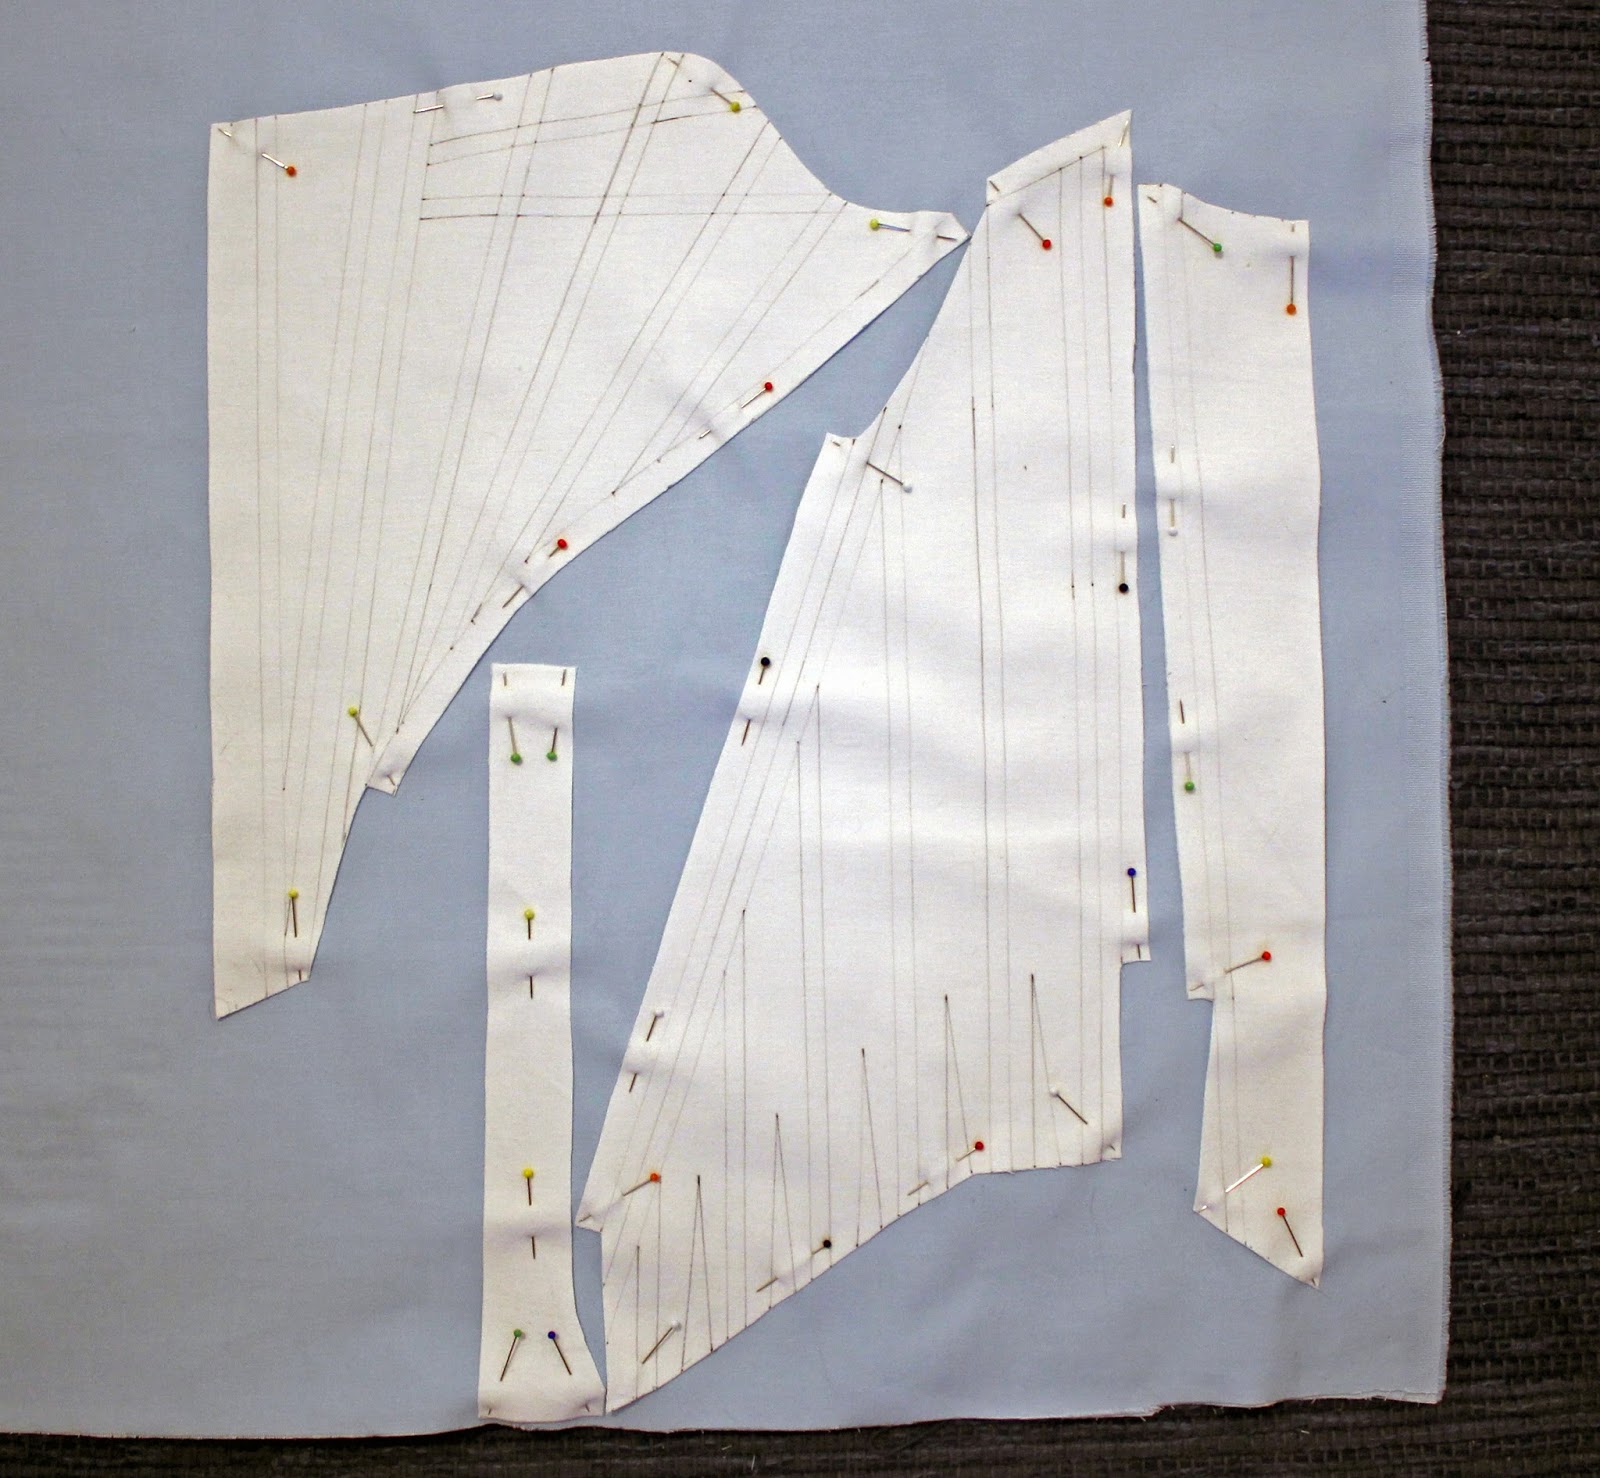
Since you already marked most the seam allowances to the middle layer, you just have to add around 3 or 4 cm (depending on the width of the boning channels) to the center front and center back panels. This is the part that will cover the raw edges of the middle layer. It will also make sure your lining won't show from underneath. You could also finish the raw edges with binding but it seems to have been a much less common way to do it.

And now you're already ready to cut...

After cutting...

...it's time to get out your sewing machine and start stitching! Unless you're doing it by hand, of course.
Tip: Start stitching the channels at the ends of the lines where the channels cross so it's easier to hit the right spot with the needle at the beginning. When you're sewing with the machine, it's hard not to stitch over the crossing lines if you start at the edges of the panels.

Also, you don't have to tie knots to all the thread ends if you continue stitching the channels to the seam allowances. At the edges of the panels, secure the thread ends by sewing a couple of stitches back and forth so that they can be hidden by the binding.

I'm experimenting with a new technique here. Normally I would add small pieces of fabric for the horizontal channels but this time I'm simply going to put both the horizontal and vertical bones between the exterior layer and middle layer.

Sew all the boning channels, except the two channels next to center front and center back.

Cut off the thread ends at the edges of the panels.

Secure the rest of the thread ends by tying knots to them.

I also like to hide the thread ends between the layers, although it's not necessary because the lining will cover them anyway.

Then fold the 3cm wide parts that you added to the exterior panels earlier at center front and back to the underside of the layers and iron.

Cut off the excess.

And now you can stitch the rest of the boning channels through the three layers of fabric. To make it easier, you can also draw the channels on the underside.

And you're done with all of the channels.

Shorten the stitch length and stitch around the tabs about 2 mm away from the edges (meaning the lines that were drawn earlier). However, make sure you leave the ends of boning channels open so you'll be able to put the bones in later!

Do the same for the lower edges of the front and back panels.

Remember to stitch around the shoulder straps as well.


Press the seam allowances open.

And now put the bones in. If you like, you don't have to cut the bones for the first fitting. But if you do, remember to make the ends of bones round so they won't tear the fabric. You can use cable ties or if you want to use a more period accurate material, reed is fine. Metal bones work, too, but I wouldn't use many of them because otherwise the stays might end up very heavy. The best places for metal bones are next to the lacing holes at the center back (and front). You could also use metal bones to reinforce the stays on the inside, as suggested in the Encyclopedié.
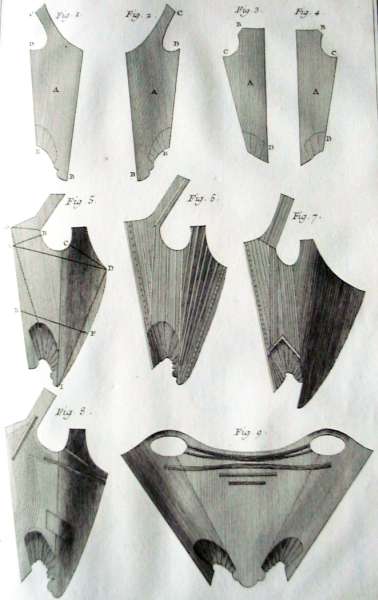

After all the bones have been put into the channels, you can close the ends of the channels. Secure them by backstitching.

Then cut out the parts between the tabs.

Add the shoulder straps and you're ready to start making the lacing holes! They could also have been done before sewing the panels together but it doesn't really matter in which order you do it.

I will post the next part of the tutorial sometime after Christmas or New Year by latest.
Happy holidays everyone! :)
Happy holidays everyone! :)
I'm loving these tutorials! Even though I've made many pairs of stays, I still hadn't thought of several things you mentioned. Totally hadn't thought of that method for the horizontal boning! If you ever get the chance- I would really, really love to know how you draft your stays. :-)
ReplyDeleteI'm considering making a tutorial series on drafting stays as well but it will be quite challenging because there are many ways to do it (I've done it in many ways, too) and also because there are so many different body types so that's why I haven't started it yet. :) And I hadn't thought of this method for horizontal boning either, until I recently noticed that some of the extant stays seem to be done like that. For example: http://searchcollections.brighton-hove-rpml.org.uk/detail.php?t=objects&type=all&f=&s=corset&record=9
DeleteThanks for this tutorial! It seems way easier when you show it step by step :)
ReplyDeleteStays aren't actually that hard to sew, once you figure out how they're made. :)
DeleteHello. You don't know me, but I think your blog is terrific and I have nominated you for an award over at my site: http://historyknits.blogspot.com/2013/12/one-lovely-blog-award.html
ReplyDeleteDear Sanna K,
ReplyDeleteYour method looks really sensible, and I sure see why you do stays this way. The photos are so clear! Found I could follow without a bit of trouble.
Thanks kindly for taking the trouble to make such a clear tutorial,
Natalie
Hi Natalie! I'm glad to hear you found this tutorial very clear because that really was the aim here. I know there are some other tutorials on stay making on the net already but when I was just starting out six years ago, they seemed a bit complicated and quite hard to understand (especially because English isn't my first language). So I wanted to make something that would be easy for everyone to understand and I also hoped maybe I could share some useful tips for those who have already made stays before :)
DeleteWhat about part 3?
ReplyDeleteI'm still working on these stays so part three will be up once they are finished :)
DeleteAre the horizontal boning chanells across the front not filled only the vertical ones?
ReplyDeleteThe horizontal channels are filled with bones as well. :)
DeleteHow do you get one bone past the other?
DeleteThe horizontal bones simply pass below the vertical ones. You just have to make sure you don't make the boning channels too tight/too narrow at the crossings to allow two bones to fit in the channels. :)
DeleteYou mentioned you had used upholstery cotton for the base, would duck cotton work? As for the fashion fabric, would broadcloth or twill be better? What would you suggest? I always have a difficult time picking out fabrics for stays, especially 18th century ones.
ReplyDeleteThank you!
Emily (Signed as anonymous because my phone won't let me log in to my Google account...)
I'm sorry this comment was unnoticed! I don't know if this helps anymore but cotton duck sounds fine. As for fashion fabric both you mentioned should work. I would say the key for choosing fabrics is to make sure they aren't too flimsy or stretch too much. :)
DeleteDear Sanna,
ReplyDeleteIt's some years after your two-post tutorial, but wanted to tell you how much it is helping to lead me through speedy construction of a pair of 1740s stays drafted from Norah Waugh. You write clearly and your photos capture what we readers need to know.
Thanks so much again,
Natalie in the Kentucky Bluegrass region, USA
Hi! I'm so glad that the tutorial has been useful to you! Thanks for commenting, this was so nice to hear! :)
Deleteमहाकालसंहिता कामकलाकाली खण्ड पटल १५ - ameya jaywant narvekar कामकलाकाल्याः प्राणायुताक्षरी मन्त्रः
ReplyDeleteओं ऐं ह्रीं श्रीं ह्रीं क्लीं हूं छूीं स्त्रीं फ्रें क्रों क्षौं आं स्फों स्वाहा कामकलाकालि, ह्रीं क्रीं ह्रीं ह्रीं ह्रीं हूं हूं ह्रीं ह्रीं ह्रीं क्रीं क्रीं क्रीं ठः ठः दक्षिणकालिके, ऐं क्रीं ह्रीं हूं स्त्री फ्रे स्त्रीं ख भद्रकालि हूं हूं फट् फट् नमः स्वाहा भद्रकालि ओं ह्रीं ह्रीं हूं हूं भगवति श्मशानकालि नरकङ्कालमालाधारिणि ह्रीं क्रीं कुणपभोजिनि फ्रें फ्रें स्वाहा श्मशानकालि क्रीं हूं ह्रीं स्त्रीं श्रीं क्लीं फट् स्वाहा कालकालि, ओं फ्रें सिद्धिकरालि ह्रीं ह्रीं हूं स्त्रीं फ्रें नमः स्वाहा गुह्यकालि, ओं ओं हूं ह्रीं फ्रें छ्रीं स्त्रीं श्रीं क्रों नमो धनकाल्यै विकरालरूपिणि धनं देहि देहि दापय दापय क्षं क्षां क्षिं क्षीं क्षं क्षं क्षं क्षं क्ष्लं क्ष क्ष क्ष क्ष क्षः क्रों क्रोः आं ह्रीं ह्रीं हूं हूं नमो नमः फट् स्वाहा धनकालिके, ओं ऐं क्लीं ह्रीं हूं सिद्धिकाल्यै नमः सिद्धिकालि, ह्रीं चण्डाट्टहासनि जगद्ग्रसनकारिणि नरमुण्डमालिनि चण्डकालिके क्लीं श्रीं हूं फ्रें स्त्रीं छ्रीं फट् फट् स्वाहा चण्डकालिके नमः कमलवासिन्यै स्वाहालक्ष्मि ओं श्रीं ह्रीं श्रीं कमले कमलालये प्रसीद प्रसीद श्रीं ह्रीं श्री महालक्ष्म्यै नमः महालक्ष्मि, ह्रीं नमो भगवति माहेश्वरि अन्नपूर्णे स्वाहा अन्नपूर्णे, ओं ह्रीं हूं उत्तिष्ठपुरुषि किं स्वपिषि भयं मे समुपस्थितं यदि शक्यमशक्यं वा क्रोधदुर्गे भगवति शमय स्वाहा हूं ह्रीं ओं, वनदुर्गे ह्रीं स्फुर स्फुर प्रस्फुर प्रस्फुर घोरघोरतरतनुरूपे चट चट प्रचट प्रचट कह कह रम रम बन्ध बन्ध घातय घातय हूं फट् विजयाघोरे, ह्रीं पद्मावति स्वाहा पद्मावति, महिषमर्दिनि स्वाहा महिषमर्दिनि, ओं दुर्गे दुर्गे रक्षिणि स्वाहा जयदुर्गे, ओं ह्रीं दुं दुर्गायै स्वाहा, ऐं ह्रीं श्रीं ओं नमो भगवत मातङ्गेश्वरि सर्वस्त्रीपुरुषवशङ्करि सर्वदुष्टमृगवशङ्करि सर्वग्रहवशङ्करि सर्वसत्त्ववशङ्कर सर्वजनमनोहरि सर्वमुखरञ्जिनि सर्वराजवशङ्करि ameya jaywant narvekar सर्वलोकममुं मे वशमानय स्वाहा, राजमातङ्ग उच्छिष्टमातङ्गिनि हूं ह्रीं ओं क्लीं स्वाहा उच्छिष्टमातङ्गि, उच्छिष्टचाण्डालिनि सुमुखि देवि महापिशाचिनि ह्रीं ठः ठः ठः उच्छिष्टचाण्डालिनि, ओं ह्रीं बगलामुखि सर्वदुष्टानां मुखं वाचं स्त म्भय जिह्वां कीलय कीलय बुद्धिं नाशय ह्रीं ओं स्वाहा बगले, ऐं श्रीं ह्रीं क्लीं धनलक्ष्मि ओं ह्रीं ऐं ह्रीं ओं सरस्वत्यै नमः सरस्वति, आ ह्रीं हूं भुवनेश्वरि, ओं ह्रीं श्रीं हूं क्लीं आं अश्वारूढायै फट् फट् स्वाहा अश्वारूढे, ओं ऐं ह्रीं नित्यक्लिन्ने मदद्रवे ऐं ह्रीं स्वाहा नित्यक्लिन्ने । स्त्रीं क्षमकलह्रहसयूं.... (बालाकूट)... (बगलाकूट )... ( त्वरिताकूट) जय भैरवि श्रीं ह्रीं ऐं ब्लूं ग्लौः अं आं इं राजदेवि राजलक्ष्मि ग्लं ग्लां ग्लिं ग्लीं ग्लुं ग्लूं ग्लं ग्लं ग्लू ग्लें ग्लैं ग्लों ग्लौं ग्ल: क्लीं श्रीं श्रीं ऐं ह्रीं क्लीं पौं राजराजेश्वरि ज्वल ज्वल शूलिनि दुष्टग्रहं ग्रस स्वाहा शूलिनि, ह्रीं महाचण्डयोगेश्वरि श्रीं श्रीं श्रीं फट् फट् फट् फट् फट् जय महाचण्ड- योगेश्वरि, श्रीं ह्रीं क्लीं प्लूं ऐं ह्रीं क्लीं पौं क्षीं क्लीं सिद्धिलक्ष्म्यै नमः क्लीं पौं ह्रीं ऐं राज्यसिद्धिलक्ष्मि ओं क्रः हूं आं क्रों स्त्रीं हूं क्षौं ह्रां फट्... ( त्वरिताकूट )... (नक्षत्र- कूट )... सकहलमक्षखवूं ... ( ग्रहकूट )... म्लकहक्षरस्त्री... (काम्यकूट)... यम्लवी... (पार्श्वकूट)... (कामकूट)... ग्लक्षकमहव्यऊं हहव्यकऊं मफ़लहलहखफूं म्लव्य्रवऊं.... (शङ्खकूट )... म्लक्षकसहहूं क्षम्लब्रसहस्हक्षक्लस्त्रीं रक्षलहमसहकब्रूं... (मत्स्यकूट ).... (त्रिशूलकूट)... झसखग्रमऊ हृक्ष्मली ह्रीं ह्रीं हूं क्लीं स्त्रीं ऐं क्रौं छ्री फ्रें क्रीं ग्लक्षक- महव्यऊ हूं अघोरे सिद्धिं मे देहि दापय स्वाअघोरे, ओं नमश्चा ameya jaywant narvekar
HOW I RECOVERED MY $38,000 from coincrypto. tech
ReplyDeleteI’m forever grateful to Jetwebhackers for their remarkable assistance in recovering the $38,540 I had lost to a crypto scam. This amount was meant to cover my husband’s urgent hospital bills, and I was deceived by a fraudster posing as Agent David, who promised me a return of $380,940 – but it was all a scam. Thanks to Jetwebhackers’ expertise and dedication, I was able to recover not only the initial investment but also the profit I was promised. Their help has been a blessing to my family, and we can now focus on my husband’s recovery without financial stress. I highly recommend Jetwebhackers to anyone who has fallen victim to crypto scams. They are professional, efficient, and compassionate. Thank you, Jetwebhackers, for your exceptional service and support during a difficult time!"CONTACT THEM VIA
Reach out to them today and turn your situation around!
EMAIL: jetwebhackers@gmail.com
WhatsApp: +1 (260) 228-9998
#jetwebhackers