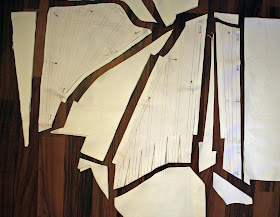
Moving on with the stays (part 1). After drawing all the boning channels to the panels, pin the middle layer pieces on your exterior fabric. I really recommend linen or cotton for exterior fabric for beginners because they're both easy to work with (and comfortable materials, too).
In case you're not sure what would be an appropriate color or material for your stays, take a look at these boards I've created of extant stays on Pinterest:
As you can see, I chose pale blue for these stays. I had hoped to use yellow with blue stitching but I wasn't able to find any suitable yellow fabric locally so I simply used what I already had in stash.
Since you already marked most the seam allowances to the middle layer, you just have to add around 3 or 4 cm (depending on the width of the boning channels) to the center front and center back panels. This is the part that will cover the raw edges of the middle layer. It will also make sure your lining won't show from underneath. You could also finish the raw edges with binding but it seems to have been a much less common way to do it.
And now you're already ready to cut...
After cutting...
...it's time to get out your sewing machine and start stitching! Unless you're doing it by hand, of course.
Tip: Start stitching the channels at the ends of the lines where the channels cross so it's easier to hit the right spot with the needle at the beginning. When you're sewing with the machine, it's hard not to stitch over the crossing lines if you start at the edges of the panels.
Also, you don't have to tie knots to all the thread ends if you continue stitching the channels to the seam allowances. At the edges of the panels, secure the thread ends by sewing a couple of stitches back and forth so that they can be hidden by the binding.
I'm experimenting with a new technique here. Normally I would add small pieces of fabric for the horizontal channels but this time I'm simply going to put both the horizontal and vertical bones between the exterior layer and middle layer.
Sew all the boning channels, except the two channels next to center front and center back.
Cut off the thread ends at the edges of the panels.
Secure the rest of the thread ends by tying knots to them.
I also like to hide the thread ends between the layers, although it's not necessary because the lining will cover them anyway.
Then fold the 3cm wide parts that you added to the exterior panels earlier at center front and back to the underside of the layers and iron.
Cut off the excess.
And now you can stitch the rest of the boning channels through the three layers of fabric. To make it easier, you can also draw the channels on the underside.
And you're done with all of the channels.
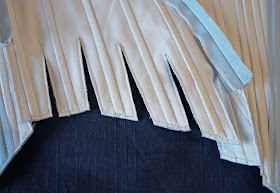
Shorten the stitch length and stitch around the tabs about 2 mm away from the edges (meaning the lines that were drawn earlier). However, make sure you leave the ends of boning channels open so you'll be able to put the bones in later!
Do the same for the lower edges of the front and back panels.
Remember to stitch around the shoulder straps as well.
Press the seam allowances open.
And now put the bones in. If you like, you don't have to cut the bones for the first fitting. But if you do, remember to make the ends of bones round so they won't tear the fabric. You can use cable ties or if you want to use a more period accurate material, reed is fine. Metal bones work, too, but I wouldn't use many of them because otherwise the stays might end up very heavy. The best places for metal bones are next to the lacing holes at the center back (and front). You could also use metal bones to reinforce the stays on the inside, as suggested in the Encyclopedié.
After all the bones have been put into the channels, you can close the ends of the channels. Secure them by backstitching.
Then cut out the parts between the tabs.
Add the shoulder straps and you're ready to start making the lacing holes! They could also have been done before sewing the panels together but it doesn't really matter in which order you do it.
I will post the next part of the tutorial sometime after Christmas or New Year by latest.
Happy holidays everyone! :)
Happy holidays everyone! :)


